Performing Initial Configuration (BUI)
Use this procedure, which is a step-by-step utility, to complete initial configuration of network interfaces, the Domain Name Service (DNS), time settings, name services, directory services, storage, and remote support on the appliance. This procedure is for standalone and clustered appliance configuration.
Note - If you are installing clustered controllers, it is strongly recommended that you use the BUI for initial configuration.
For clustered controllers, configure only the primary controller. Do not attempt initial configuration on both controllers independently. For more information about clustering, see Appliance Cluster Configuration in Oracle ZFS Storage Appliance Administration Guide, Release OS8.7.x.
Before You Begin
-
Gather the following information for the interfaces and services you will set up, and network configuration details.
Note - LDAP and NIS are optional for setup, but recommended. LDAP is preferred to NIS; do not run NIS and LDAP at the same time.-
Default router IP address
-
IP address and netmask for the management interface (two if clustered controllers)
-
IP address and netmask for the data interface (two if clustered controllers)
-
DNS/NIS/LDAP domain name
-
DNS IP address(es)
-
NIS server IP address(es)
-
NTP server IP address
-
For LDAP:
-
LDAP server IP addresses
-
Base search domain name
-
Recursive or non-recursive search
-
Authentication method: anonymous, self, or proxy (specific user)
-
SSL/TLS usage
-
-
-
You can skip any or all configuration screens by clicking COMMIT without making any changes. For the final and registration step, click LATER if you want to complete the screen later. To return to the beginning of the configuration utility, go to Maintenance > System and click INITIAL SETUP.
- Ensure you have configured the system as described in Configuring the System.
-
Direct your browser to the appliance using either the IP address or host name
you assigned during system configuration as follows:
https://ipaddress:215 or https://hostname:215
The login screen appears.
Note - If the login screen does not appear and an error message is displayed instead, add an exception and download the certificate. -
Log in to the appliance:
- Username - Enter root.
- Password - Password you assigned during system configuration.
- Click LOGIN or press Enter.
-
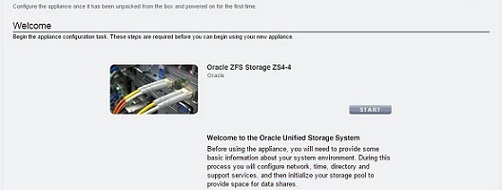
To begin initial configuration, click START.
-
If configuring clustered controllers, go to step 5.
-
If configuring a standalone controller, go to step 6.
-
-
To configure clustered controllers, click CLUSTER.
Note - Optionally, click SKIP to configure this device as a standalone controller, and go to step 6. To configure clustered controllers later, see Upgrading a Standalone Appliance to a Clustered Configuration (BUI) in Oracle ZFS Storage Appliance Administration Guide, Release OS8.7.x.-
Ensure that there are three solid lines in the diagram of active
cluster links and click COMMIT.
If you do not see three solid lines, ensure that the three cluster cables connecting the two controllers together are properly connected and secure in their connectors. The system automatically senses these cables in real-time.
-
Set the appliance name and password for the peer controller:
-
Appliance Name - Enter the peer controller name (must be different from primary controller name).
-
Root Password - Enter the same password that you set for the appliance during system configuration.
-
Confirm Password - Re-enter the password.
-
-
Click COMMIT.
A status bar in the masthead displays the progress.
-
Ensure that there are three solid lines in the diagram of active
cluster links and click COMMIT.
-
Configure the appliance networking interfaces.
Note - You can create a management interface now, or at another time using a task in Configuring Management Interfaces in Oracle ZFS Storage Appliance Administration Guide, Release OS8.7.x.
For detailed information, see the following topics:
To create a management interface now, use the following steps as an example:
-
Click the add icon
 next to Datalinks.
-
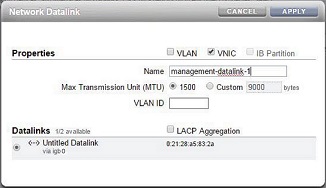
In the Network Datalink dialog box, set the following minimum datalink
properties.
-
VNIC - Select this check box.
-
Name - Enter a name for the datalink.
For detailed information, see the following tasks:
-
- Click APPLY.
- Drag the resulting datalink to the Interfaces column.
-
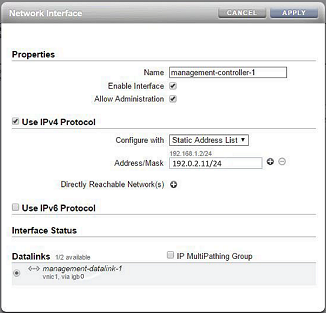
In the Network Interface dialog box, set the following minimum
interface properties:
-
Name - Type a name for the interface.
-
Enable Interface - Select this check box to enable the interface.
-
Allow Administration - Select this check box to make this a management interface, which enables BUI connections on port 215 and CLI connections on ssh port 22.
-
Use IPv4 Protocol or Use IPv6 Protocol - Select a protocol, its type of address, and enter one or more IP addresses in CIDR notation.
-
- Click APPLY.
-
For clustered controllers, repeat steps a-f for the second controller,
and choose a unique controller name.

-
Click the trash icon
 next to the default interface, named Untitled
Interface, to destroy it and click APPLY.
-
In the Update Default Route dialog box, type the Default Gateway and
select an Interface from the drop-down menu. Click COMMIT WITH
ROUTE.
The default gateway is the default router IP address. For the interface, select the datalink that you assigned to the first management interface.
Note - It is strongly recommended to set a route because it enables communication with the appliance via the BUI and CLI. Without a route, the only means of communication with the appliance is through an Oracle ILOM connection to the SP.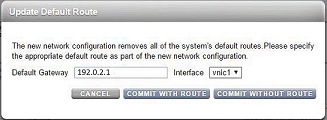
- To configure additional routing, go to step 7. Otherwise, click COMMIT and skip to step 8.
-
Click the add icon
-
(Optional) To configure additional routing, use the following steps.
For clustered controllers and if not using a VNIC, create a route on each interface that is assigned to a controller. For detailed routing information, see Configuring Network Routing in Oracle ZFS Storage Appliance Administration Guide, Release OS8.7.x.
-
Click the add icon
 next to Routing Table Entries.
-
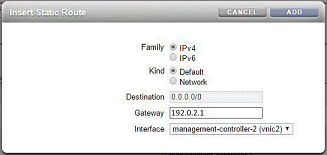
In the Insert Static Route dialog box, set the following
properties:
-
Family - Select IPv4
-
Kind - Select Default
-
Gateway - Type the same default gateway from step 6i.
-
Interface - Select the interface for which you want to configure routing.
-
-
Click ADD.
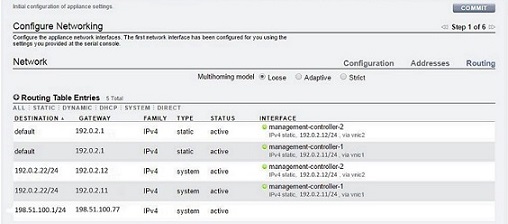
The new route appears in the routing table.
- Click COMMIT.
-
Click the add icon
-
Configure the Domain Name Service (DNS) and click COMMIT.
For detailed information, see DNS Configuration in Oracle ZFS Storage Appliance Administration Guide, Release OS8.7.x.

-
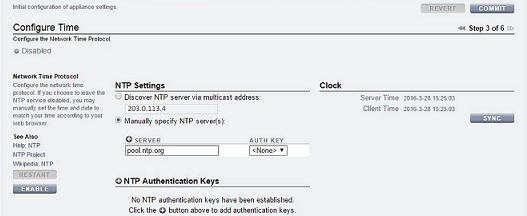
Configure the Network Time Protocol (NTP) to synchronize the appliance clock
by performing one of the following options and then click COMMIT:
-
To automatically discover the NTP server and set the appliance time to match your network time, enter the multicast address.
-
To manually set the appliance time to match your network time, enter the NTP server name(s) and select an authentication key.
-
To set the appliance (server) time to match your client browser time, click SYNC.
Note - If you share filesystems using SMB and Active Directory, the client clocks must be synchronized to within five minutes of the appliance clock to avoid user authentication errors. One way to ensure clock synchronization is to configure the appliance and the SMB clients to use the same NTP server.For detailed information, see NTP Configuration in Oracle ZFS Storage Appliance Administration Guide, Release OS8.7.x.
-
-
Configure name services.
For detailed information, see Configuring Services in Oracle ZFS Storage Appliance Administration Guide, Release OS8.7.x.
Note - Active Directory has two modes: domain and workgroup mode, which dictate how SMB users are authenticated. In domain mode, SMB clients are authenticated through the Active Directory domain controller, and you must ensure that the times on the appliance and the domain controller match within five minutes.-
Click CONFIGURE for the appropriate service, set its parameters, and
click APPLY.
- When the summary of Name Services settings is displayed, click COMMIT if all settings are complete and correct. Otherwise, click CONFIGURE to adjust the settings for a service.
-
Click CONFIGURE for the appropriate service, set its parameters, and
click APPLY.
-
Configure storage pools and click COMMIT.
For detailed information, see Configuring Storage in Oracle ZFS Storage Appliance Administration Guide, Release OS8.7.x.
-
Perform one of the following steps:
-
To register your appliance for remote support, complete the fields and
click REGISTER.
If you do not have an Oracle support account, click LATER and see Phone Home Configuration in Oracle ZFS Storage Appliance Administration Guide, Release OS8.7.x.
-
To skip remote support configuration, click LATER.
-
To register your appliance for remote support, complete the fields and
click REGISTER.
-
Perform one of the following steps:
-
If you clicked REGISTER in the previous step, read the privacy
statement and click OK.
-
If you clicked LATER in the previous step, click OK to confirm that
you want to skip registration.
You can return to the registration and support screen by going to Configuration > Services > Phone Home. For more information, see Phone Home Configuration in Oracle ZFS Storage Appliance Administration Guide, Release OS8.7.x.
-
If you clicked REGISTER in the previous step, read the privacy
statement and click OK.
-
If you configured clustering, use following steps to failback the resources:
- For the second management interface, click the drop-down menu under OWNER and select the peer controller.
- Click FAILBACK to failback the configured resources to the cluster peer.
- Click OK to confirm your action.
- Click COMMIT.
This creates an active-active configuration.

Next Steps
-
If a standalone controller, see Upgrading the Software in Oracle ZFS Storage Appliance Customer Service Manual.
-
If clustered controllers, see Locking Cluster Management Interfaces (BUI) in Oracle ZFS Storage Appliance Administration Guide, Release OS8.7.x.
-
If you did not configure the management interface yet, see the tasks in Configuring Management Interfaces in Oracle ZFS Storage Appliance Administration Guide, Release OS8.7.x.
Related Topics
-
For an overview of network interface configuration, see Working with Network Configuration in Oracle ZFS Storage Appliance Administration Guide, Release OS8.7.x.
-
For further configuration, see Configuring the Appliance in Oracle ZFS Storage Appliance Administration Guide, Release OS8.7.x
-
For more information about cluster configuration, see Appliance Cluster Configuration in Oracle ZFS Storage Appliance Administration Guide, Release OS8.7.x
-
To change the root password, see Changing a User Password (BUI) in Oracle ZFS Storage Appliance Administration Guide, Release OS8.7.x