As described earlier in this guide, actions represent activities performed by the ATG Outreach software, for example sending an e-mail or displaying content in a slot. Events, by contrast, represent activities performed by customers, such as logging into a Web site or clicking a landing page link. When you include an event in a campaign, ATG Outreach waits for any targeted customer to complete the event and then progresses to the next part of the campaign (if there is one).
You can add events to campaign stages in several ways:
Through a Send Email Communication action that includes a landing page, which in turn includes an event.
Through any of the following actions:
Wait for Event
Publish Web Content
Perform Action
Note: If you want to add another stage to a campaign, you must add an event. The child stage follows the event.
The following events are provided by default with ATG Outreach:
A Form Is Submitted
An Email Is Received
Logs In
Logs Out
Profile Property Updated by User
Registers
User Opted Out
Views (an item on a page)
Visits (a page)
If your ATG product suite includes ATG Commerce, the following events are also available:
Abandoned Order Converted
Abandoned Order Lost
Abandoned Order Reanimated
Gift Purchased
Item Added to Order
Item Quantity Changed in Order
Item Removed from Order
Order Abandoned
Order Saved
Order Submitted
Promotion Closeness Disqualification
Promotion Closeness Qualification
Promotion Offered
Promotion Revoked
Uses Promotion
To add an event to an action, perform the following steps:
In the Structure tab for the action you are creating, click Add Event or Choose Event. These options appear only in the following circumstances:
You are adding a landing page to a Send Email Communication action.
You are adding a Wait for Event action.
You are adding a Perform Action element.
The event editor appears.
Enter a name for the event. The name is used only by ATG Outreach and is not visible to customers. After you create this campaign, the event you are adding here will be available to other campaigns, and the name you enter will be used to identify this event in, for example, the Event Picker.
Optionally, enter a description.
Select the event to add.
Fill in the Event fields as needed. Click any element in the expression to see the options for that element. The event editor works the same way as the segment editor, so for detailed information on how to use the UI here, refer to Adding Segments. For information on the values to supply for specific events, see Configuring Events later in this section.
Click OK when you have finished configuring the event.
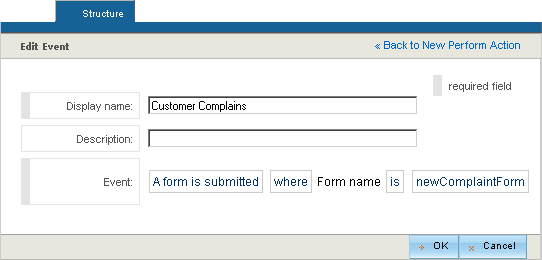
The image below shows the event editor with some sample data: