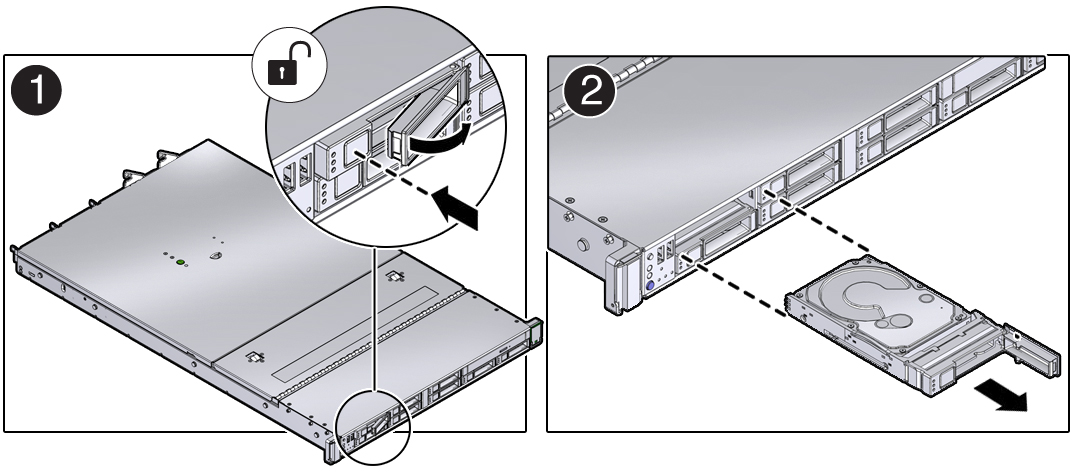
Remove a Drive
This is a hot-service procedure that can be performed by a customer while the server is running.
 | Caution - This procedure requires that you handle components that are sensitive to ESD which can cause server components to fail. Follow safety procedures to Prevent ESD Damage. |
-
Determine which drive is faulty by checking the front of the drives for a lit
amber fault LED.
See Front Panel Components for the locations of the drives in the server.
-
If required, shut down the OS to replace the drive.
Shut down the OS if the drive:
-
Contains the OS, and the OS is not mirrored on another drive.
-
Cannot be logically isolated from the online operations of the server.
To shut down the drive, see Power Off the Server and go to Step 5.
-
-
Take the drive offline.
-
For a standard drive:
-
At the Oracle Solaris prompt, list all drives in the device
tree, including drives that are not configured.
# cfgadm -al
This command lists dynamically reconfigurable hardware resources and shows their operational status. In this case, look for the status of the drive you plan to remove. This information is listed in the Occupant column.
Ap_id                       Type         Receptacle   Occupant       Condition
c0                          scsi-bus     connected    configured     unknown
c0::dsk/c1t0d0              disk         connected    configured     unknown
c0::dsk/c1t0d0              disk         connected    configured     unknown
usb0/1                      unknown      empty        unconfigured   ok
usb0/2                      unknown      empty        unconfigured   ok
...
You must unconfigure any drive you plan to remove.
-
Unconfigure the drive using the cfgadm -c
unconfigure command.
For example, type:
# cfgadm -c unconfigure c0::dsk/c1t1d0
Replace c0:dsk/c1t1d0 with the drive name that applies to your situation.
- Verify that the drive's blue Ready to Remove LED is lit.
-
At the Oracle Solaris prompt, list all drives in the device
tree, including drives that are not configured.
-
For an NVMe Drive:
-
Determine the name of the NVMe drive to be removed.
# hotplug list -lc
Locate the name of the drive, such as /SYS/DBP/NVME0 in this example.
You can use this same command to check the state of the drive at other stages of the removal procedure.
-
Disable the NVMe drive.
# hotplug disable /SYS/DBP/NVME0
Check that the drive's state has changed from enabled to powered.
# hotplug list -lc
-
Power down the NVMe drive.
# hotplug poweroff /SYS/DBP/NVME0
Check that the drive's state has changed from powered to present.
# hotplug list -lc
In this state, the blue OK to Remove LED on the NVMe drive is lit.
Note - Do not remove the drive unless the blue OK to Remove LED is lit.
-
Determine the name of the NVMe drive to be removed.
-
For a standard drive:
- If you are hot-servicing the drive, locate the drive that displays the amber Fault LED and ensure that the blue Ready to Remove LED is lit.
- On the drive you want to remove, complete these tasks.


Caution - The latch is not an ejector. Do not bend it too far to the right. Doing so can damage the latch.
- Push the release button to open the latch and unlock the drive.
- Grasp the latch and pull the drive out of the slot.

Caution - When you remove a drive, replace it with a filler or another drive. Otherwise, the server might overheat due to improper airflow.
-
After you remove an NVMe drive, check that the drive slot's state has changed
to empty.
# hotplug list -lc
- Install a replacement drive or a drive filler.