Remove the Motherboard
 | Caution - Use the Oracle ILOM backup utility prior to removing the motherboard. This utility backs up the Oracle ILOM configuration of the service processor. For more information, see the Oracle ILOM 5.0 Documentation Library at https://www.oracle.com/goto/ilom/docs. |
-
Prepare the server for service.
- Power off the server and disconnect the power cords from the power supplies.
- Extend the server to the maintenance position.
- Attach an antistatic wrist strap to your wrist, and then to a metal area on the chassis.
- Remove the server top cover.
-
Remove the following reusable components:

Caution - During the motherboard removal procedure, it is important to label power supplies with the slot numbers from which they were removed (PS0, PS1). This is required because the power supplies must be reinstalled into the slots from which they were removed; otherwise, the server key identity properties (KIP) data might be lost. When a server requires service, the KIP is used by Oracle to verify that the warranty on the server has not expired. For more information on KIP, see FRU Key Identity Properties (KIP) Automated Update.
-
Air baffles
-
Fan modules
See Remove a Fan Module.
-
Power supplies
-
PCIe risers and attached PCIe cards
See Servicing PCIe Risers (CRU), Servicing PCIe Cards (CRU), and Servicing the Internal HBA Card and HBA Super Capacitor (FRU).
Note - Remove the M.2 SATA cable between the PCIe slot 3 riser and the motherboard SATA connector and set it aside.
-
-
Remove cables from the motherboard.
-
Disconnect the disk backplane power cable from the motherboard by
pressing in on the connector latch and then pulling out the cable
connector [1].
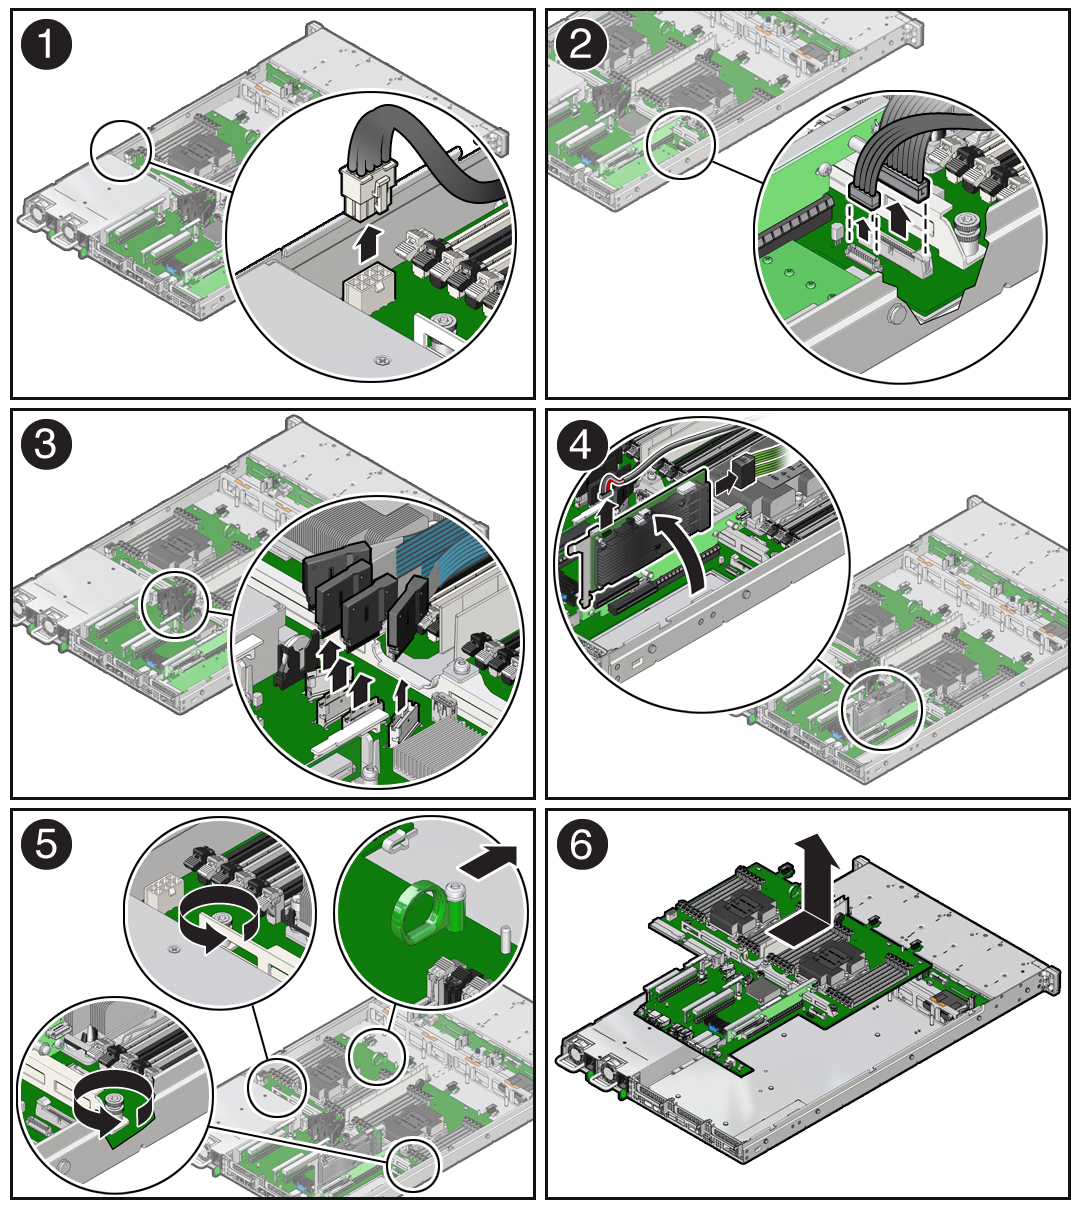
- Disconnect the disk backplane data cable by opening the ejectors and pulling out the cable connector [2].
- Disconnect the front indicator module (FIM) cable connector by opening the ejectors and pulling out the cable connector [2].
-
Disconnect the NVMe cables (if present) and carefully lift them from
the center cable trough and set them aside [3].
Note - You do not need to remove the NVMe cables or the chassis mid-wall when removing the motherboard from the server chassis. - Remove the SAS cables and the super capacitor cable that were connected to the internal HBA card, and then carefully lift them from the left-side cable trough and set them aside [4].
-
Disconnect the disk backplane power cable from the motherboard by
pressing in on the connector latch and then pulling out the cable
connector [1].
-
Remove the motherboard from the server chassis [5, 6].
- Using a Torx T25 screwdriver, loosen the two green captive screws that secure the motherboard bracket/handle to the server chassis.
- Grasp the metal bracket located just to the rear of the DIMM slots and the finger loop, and then slide the motherboard toward the front of the server and lift it slightly to disengage it from the eight mushroom-shaped standoffs located on the server chassis under the motherboard.
- Lift the motherboard out of the server chassis and place it on an antistatic mat and next to the replacement motherboard.
-
Remove the following reusable components from the motherboard and install them
onto the replacement motherboard.
-
USB flash drive
-
DIMMs
See Servicing the DIMMs (CRU).
Note - Install the DIMMs only in the slots (connectors) that correspond to the slots from which they were removed. Performing a one-to-one replacement of the DIMMs significantly reduces the possibility that the DIMMs will be installed in the wrong slots. If you do not reinstall the DIMMs in the same slots, server performance might suffer and some DIMMs might not be used by the server.
-
- Remove the processors from the failed motherboard.
-
Remove the processor socket covers from the replacement motherboard and
install the processors.
-
Grasp the processor socket cover finger grips (labeled REMOVE) and
lift the socket cover up and off the processor socket.
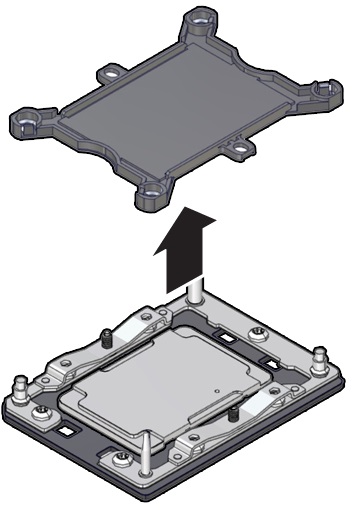
-
Install a processor into the socket from which you removed the
processor socket cover.
See Install a Processor.
- Repeat Step 7.a and Step 7.b to remove the second processor socket cover from the replacement motherboard and install the second processor.
-
Grasp the processor socket cover finger grips (labeled REMOVE) and
lift the socket cover up and off the processor socket.
-
Install the processor socket covers on the faulty motherboard.

Caution - The processor socket covers must be installed on the faulty motherboard; otherwise, damage might result to the processor sockets during handling and shipping.
-
Align the processor socket cover over the processor socket alignment
posts. Install the processor socket cover by firmly pressing down on all
four corners (labeled INSTALL) on the socket cover.
You will hear an audible click when the processor socket cover is securely attached to the processor socket.
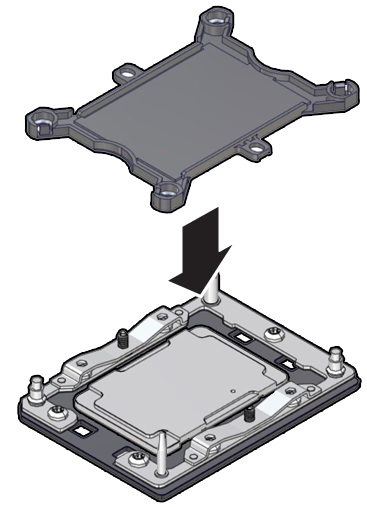
- Repeat Step 8.a to install the second processor socket cover on the faulty motherboard.
-
Align the processor socket cover over the processor socket alignment
posts. Install the processor socket cover by firmly pressing down on all
four corners (labeled INSTALL) on the socket cover.
-
Check to see if the replacement motherboard has a locate light pipe installed.
-
If it does, no action is necessary.
-
If it does not, perform the following steps.
-
Check to see if the replacement motherboard came with a light pipe. It
should be in a separate plastic bag.
-
If you find a replacement light pipe, skip to Step 9.b.
-
If you do not find a replacement light pipe, perform the following steps to remove the light pipe from the faulty motherboard.
-
Insert a flat tool such as a screwdriver or penknife blade
between the light pipe housing and the light pipe.

Caution - Equipment damage. The light pipe is fragile. Handle it carefully.
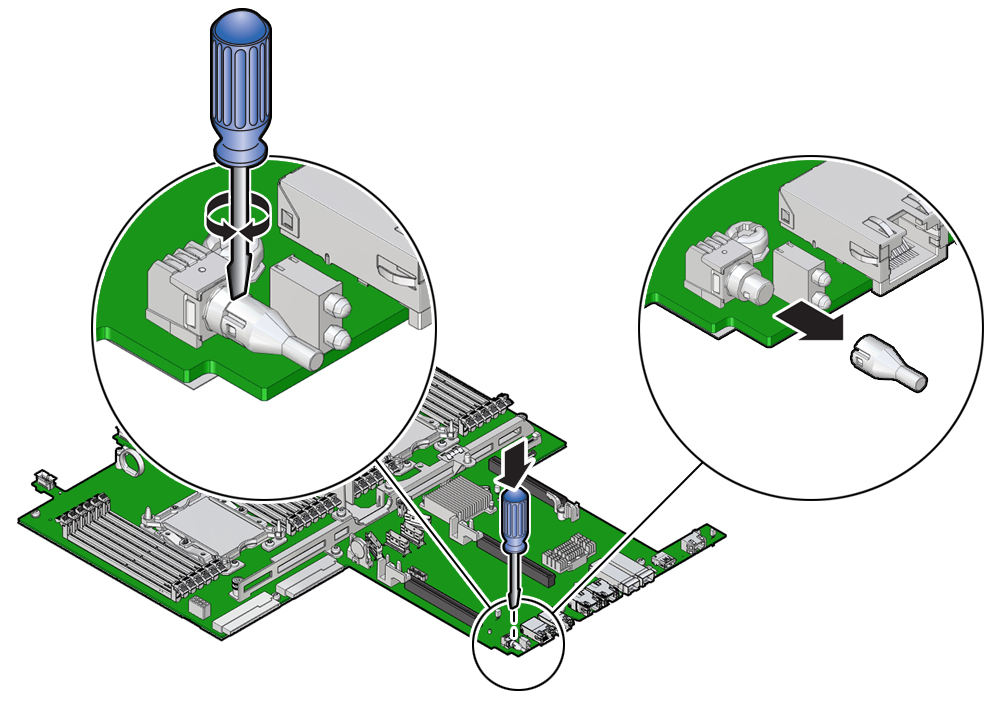
- Twist the tool back and forth to release the light pipe from the housing.
- Pull the light pipe away from the housing.
-
-
Install the light pipe on the replacement motherboard.
-
Match the rectangular holes on the outside of the light pipe
with the retaining clips on the housing.
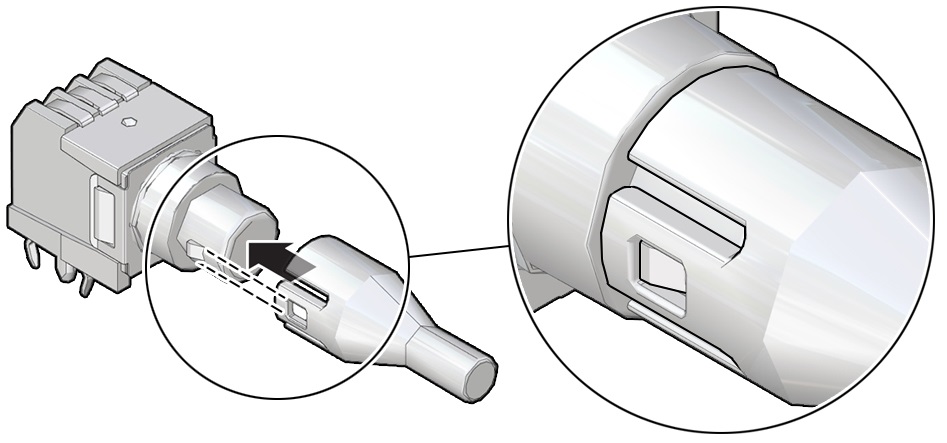
- Push the light pipe onto the housing until the clips latch in the holes.
-
Match the rectangular holes on the outside of the light pipe
with the retaining clips on the housing.
-