Each time you add a new content targeter, you need to set up the business rules for delivering the selected content to its target audience. For example, you could create a rule that shows content from a folder called Weekend Features to all users every Friday.
A word about targeters and site performance: The ATG Personalization module caches (or temporarily stores) the content that it displays after each targeting operation. This behavior allows it to serve the content much faster to the next visitor who matches the targeting criteria. This caching mechanism will not be effective if your targeting rules include profile or request properties (time of day, for example) that have many possible values for each visitor. For example, if you create a targeter that includes a multi-value property called interests, and there are many possible value combinations for each visitor (“skiing, golf, hockey,” “biking, golf,” “soccer, tennis, swimming,”), it is unlikely that the Personalization module would be able to use the page results cached from previous requests, and the targeting operation would take longer.
Note: The configuration for the basic definition of the targeter is the same in an unregistered site or a multisite environment However, in a multisite environment, multisite rule extensions are displayed. For information about how to use the rule extensions in a multisite environment, see Multisite Targeting Rules.
To set up or edit the business rules for a content targeter:
Display the Rules tab for the targeter.
Click Show or Hide at the top of the Rule Set panel.
Show lets you specify the content you want visitors to see.
Hide lets you lets you specify the content you don’t want visitors to see.
Note: Show rules are evaluated before hide rules.
A rule with default values appears in the Rule Set panel. For example, if you click Show, you see the following fields:
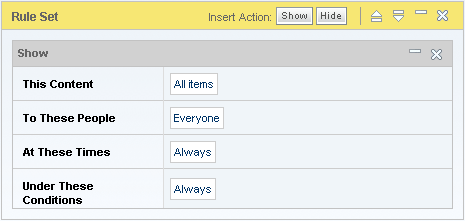
Use these shown to set the rule’s content, people, time, and environment conditions. See the following sections for the procedures:
To add another “Show” section to the same rule, click the Show button and complete the form.
To add another rule set, select Add Rule Set (not shown in the image above), and repeat steps 2-4. For more information on creating multiple rule sets, see the Creating and Prioritizing Multiple Rule Sets section.
When you have finished setting up your targeting rules, click Save (or Create).
Follow the steps outlined in Project Basics to mark the Author task as complete and advance the project to the next task, usually Approval. When all tasks are complete, the project can be deployed, and the new targeter will be available on the live site.
For information on embedding the targeter in the appropriate site pages, see the ATG Page Developer's Guide.
