Content conditions are used to find content items that match some sort of criteria. For example:
Show this content:
   items whose keywords includes Hiking
You can combine multiple content conditions by using AND statements and OR statements. For examples, see the Business Rule Samples section.
If your product suite uses Commerce, the content you can show includes any promotions you have set up. For more information, on promotions, refer to the Commerce documentation.
To set a rule’s content conditions:
Click the Show/Hide This Content button below the Business Rules panel. The content-related option buttons appear as shown below:

Note that you may have to resize the ATG Control Center window to see all the options.
Specify the content you want to show or hide:
Click All Items if you want to show (or hide) all content items stored in the selected repository.
Click Items in Group(s) if you want to show or hide items from content groups created in the Profile and Content Groups window. The Content Groups dialog box appears as shown below.
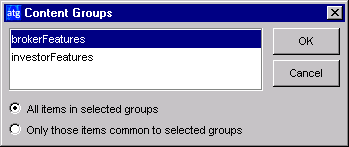
If multiple groups exist and you want to select more than one, hold down the Control key while making your selections. You can choose All Items in Selected Groups or Only Those Items Common to Selected Groups. (A list of the groups you select appears at the bottom of the Business Rules panel along with an Edit Groups button. Click this button if you need to change your group selections.)
If you select the Items in Group(s) option you can define additional criteria by clicking the Whose button (described below).
Click Items in Folder(s) if you want to show or hide all items from specific repository folders. The Select Items in Folders dialog box appears
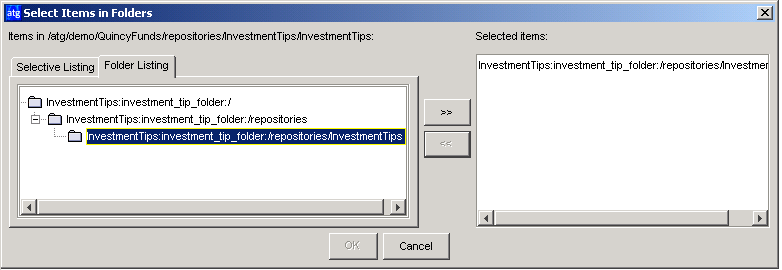
Select the folders containing the content you want to use, and then click the >> button to move them to the Selected Items list on the right. Click OK when you have completed your selections.
You can then define additional criteria by clicking the Whose button (described below).
Click These Particular Items if you want to show or hide specific content items. When the Select Items dialog box opens, select the individual content items you want to include. Use the Selective Listing tab (similar to the dialog box shown above) to search for items of a specific repository type, or use the Folder Listing tab to display items according to the folder that contains them. In either tab, click the >> button to move the items to the Selected Items list on the right. Click OK when you complete your selections.
You can then define additional criteria by clicking the Whose button (described below).
Click Items Whose (or Whose if you clicked the Items in Groups(s), Items in Folder(s), or These Particular Items options) if you want to show or hide items based on specific content properties. When you select this option, several drop-down lists appear as shown below, allowing you to select the property, comparison operator, and value you want to use.
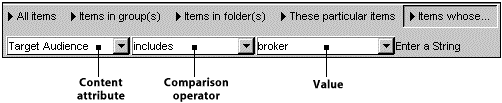
The properties that are available for selection depend on the repository you are working with. The selections in the Comparison Operator and Value drop-down lists change depending on the property you select. If the property has a limited set of values, the Value list will include all of your possible choices. If the property has an unlimited number of values, you can type a unique value directly into the list as shown below. The required value type (“string,” for example) appears next the text field.

In addition to any preset content properties values, or any values you might type yourself, the value list also contains the environment options described in the following table. You can use these options to set the value of your selected content property by testing it against a particular environment condition.
Browser’s
Select Browser’s to add a browser-related property to the definition. For example, …items whose absolutePath is Browser’s request.remoteHost.
Locale’s
Select Locale’s to add a locale-related property. For example, …items whose language is Locale’s acceptLanguage.
Note: Locale properties are relevant if you are working on a localized Web site that displays content in different languages depending on the language setting in a visitor’s browser. For more information about internationalization and localization, see the Platform Programming Guide.
Person’s
Select Person’s to add another person-related property. For example, …items whose keywords includes Person’s Actual Investment Goal.
Request’s
Select Request’s to add a request-related property. For example, …items whose relativePath is Request’s requestURI.
Today’s
Select Today’s to add a time-related property. For example, …items whose lastModified is Today’s date.
The application developers working on your Web site can add other options to this list by setting up a
TargetingSourceMapservice in the Personalization module. For more information, see Setting Up Targeting Services in the Personalization Programming Guide.When you select one of these options, the ATG Control Center displays another drop-down list like the one pictured below, prompting you to select a related property. The properties that are available depend on the option you select from the Value list.

If you want to add other content conditions, click the And Whose and Or Whose buttons at the bottom of the Business Rules panel.
Next, you need to specify your target audience. See the following section, Setting People Conditions, for details.
