While task elements represent the steps that users perform as part of the workflow process, action elements represent the steps that you want the workflow engine to perform, usually in response to the preceding element in the workflow. For example, you could add an action element that sends an e-mail to an employee who submitted an expense report, notifying him or her that the report has been approved.
Action | Purpose |
|---|---|
Change | Change a specified property in the workflow. Example: Also use this element to change any variables that you set earlier in the workflow by means of the Set Variable action. |
Record Audit Trail | Track data that monitors scenario or workflow activities. See Recording Scenario Activity for more information. |
Record Event | Track data for inclusion in reports, to track the result of the preceding workflow element and store information about it in a specified dataset. |
Send Notification | Send a specified e-mail message to a given recipient or group of recipients. You can define the recipients as users (people with user profiles in the Profile repository) or e-mail addresses. This action is the same as the Send Notification scenario action; for more information, see Send Notification in the scenarios chapter of this guide. |
Send Task Notification | Send an e-mail to the owner of a specific task in the workflow. For example, you can set the action to inform the owner of the next task in the workflow that the task is ready to be performed. Example: Send Task Notification: /notifyaccepted.jsp to owner of task Submit. |
Fork elements let you split a workflow into two or more branches, each branch representing a possible path that the workflow can follow. There are two types of fork element you can add to workflows: workflow fork elements and regular fork elements.
Using Workflow Fork Elements
All the branches in a workflow fork element must be completed before the workflow can proceed to the next element after the fork. For that reason, a workflow fork is appropriate for situations where two or more tasks can be active at the same time and can be completed independently; as long as all tasks are completed, the order in which they occur is not important.
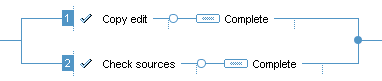
A solid circle at the end of the workflow fork differentiates it from a regular fork. (Regular forks have no circle at the end.)
Note: You can change a regular fork into a workflow fork by right-clicking it and selecting Require All Branches to Succeed from the drop-down menu. You can also use this technique to add the functionality of a workflow fork to the fork elements that you include in scenarios.
Using (Regular) Fork Elements in a Workflow
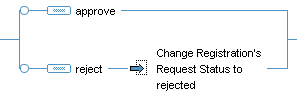
Regular fork elements (in other words, non-workflow fork elements) are the same as the fork elements you use in scenarios. They allow you to divide a workflow into separate branches that represent parallel “if” conditions. For example, you could create a fork with two branches, each containing different condition elements. The workflow could proceed along both branches, either branch, or neither branch, depending on the success or failure of the condition element. Unlike workflow forks, regular forks allow the workflow to proceed if only one branch is completed.
Note: You can change a regular fork into a workflow fork by right-clicking on it and selecting Require All Branches to Succeed from the drop-down menu.
For more information on using regular fork elements, see Using Fork Elements in Scenarios.
Add Branch
By default, forks and workflow forks have two branches. If you want to insert additional branches into either type of element, select the Add Branch menu option. For more information, see Using Fork Elements in Scenarios.
Using Otherwise Elements in Workflows
An Otherwise element is a special type of condition element that can appear at the beginning of one branch of a fork. It allows you to define how the workflow should proceed if none of the other branches is completed. For examples and more detail, refer to Using Otherwise Elements in Scenarios.
