Install a Host Channel Adapter
- Power down the server, and un-cable as necessary to gain access to the server's PCI slots.
- Refer to the server's documentation to select the correct slot in which to install the HCA card.
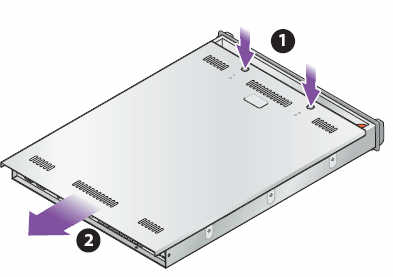
- Remove the server's cover. See Removing the Server's Cover. The illustration shows
applying downward pressure on securing tabs (1), before sliding
the cover off of the server (2).
Figure 46 Removing the Server's Cover

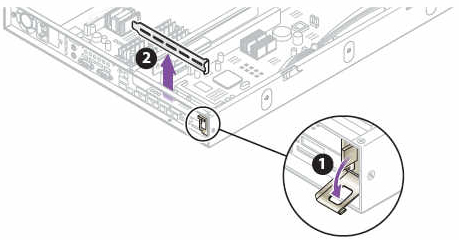
Note - Some servers have a different method of securing the cover to the server. For example, some servers have a securing screw at the rear of the server that holds the cover in place. If your server's cover is held in place by a different method than the illustration shows, consult the manufacturer's documentation for the correct way to remove the cover. - Remove the protective faceplate
(if any) at the rear of the server (2). When the protective faceplate
is removed, the open slot is where the HCA's card will be installed.
See Removing the HCA Slot's Protective Faceplate.
Note - Some servers have a latch that secures the HCA card to the chassis when the card is installed, as shown in the illustration. If your server has a latch, open it before installing the HCA card (1).Figure 47 Removing the HCA Slot's Protective Faceplate

- Align the HCA card so that the
leads are pointing towards the socket, and the HCA's InfiniBand
port is at the rear of the server chassis.
In this position, the components on the HCA card will be facing down, and the HCA's InfiniBand port will be facing out of the rear of the chassis.
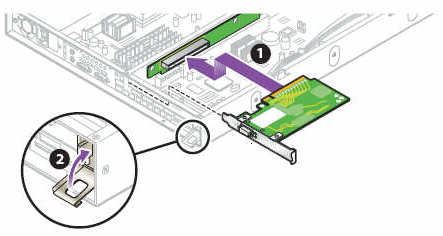
- Slide the HCA card into the socket
making sure to fit the HCA faceplate into place (1), then secure
the HCA faceplate to the rear of the server (2). See Inserting the HCA card and Locking it in Place.
Figure 48 Inserting the HCA card and Locking it in Place

Note - The illustration shows a latching mechanism securing the HCA (2). Some servers have other methods of securing the HCA to the chassis. For example, some servers have a captive screw on the rear of the chassis that holds the HCA in place. If your server does not use a latching mechanism, consult your server's documentation for information about the proper method for securing the HCA card. - When the HCA is installed, replace the cover and reattach cables per the server manufacturer's instructions.