New Policy
When clicking on the 'New policy' link in the Policies menu (this menu is described in Policies Menu), a New Policy page is opened where the user can create a new policy by following a multi-step process guided by a wizard. At the end of the process the wizard is closed and a View and Edit Policy page (described in View and Edit Policy) is opened in the context of the newly created policy. The data model related to this page is described in Data Model. The retrieval and display of data in this page is subject to restrictions described in the implementation guide for user access.
The wizard consists of the following ten steps (in specified order):
-
Enroll
-
Select policyholder
-
Select address
-
Select insurable entities
-
Set policy fields
-
Set enrollment fields
-
Select products
-
Select add-ons
-
Edit selection
-
View and save
Back and forth navigation is possible by using the 'Back' and 'Next' buttons within the steps or by clicking on the step links at the top of the page. The user must complete every step before he or she can continue to the next step. A 'Cancel' button is available in every step, so the entire process can be canceled at any time.
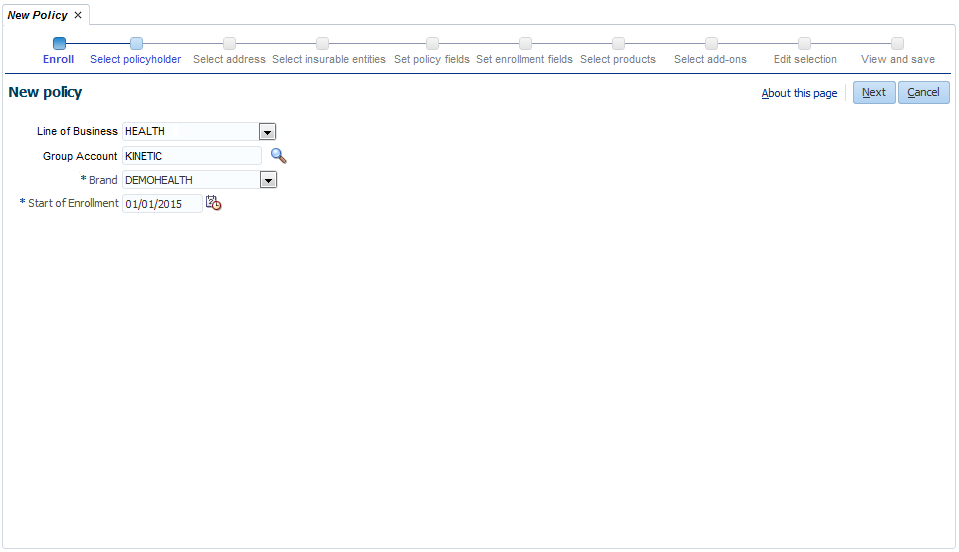
Enroll
In this step the user needs to specify a Line of Business, a Group Account (optional), a Brand and the Start of Enrollment date. The following fields are available:
| Field | Description |
|---|---|
Line of Business |
The line of business that the policy belongs to. Drop-down list with Lines of Business. The drop-down shows only those lines of business that are referenced by at least one insurable entity type. |
Group Account |
The group account that the policy belongs to. LOV on Group Accounts. |
Brand |
The brand that the policy belongs to (mandatory). Drop-down list with all available brands. |
Start of Enrollment |
The date that will be used as the start date for all policy enrollment products and policy add-ons that are selected in the next steps (mandatory). This date is also used as the start date for the policyholder, the addresses of the new persons or objects, the policy collection setting, the policy broker agent and time-valid dynamic fields. |
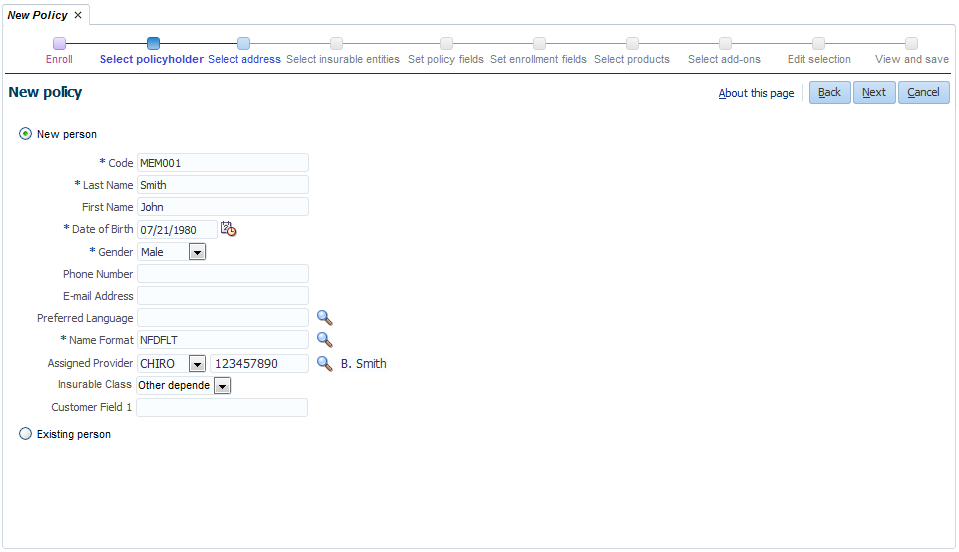
Select policyholder
In this step the user has to select a policyholder for the policy. There are two options available:
-
New person (selected by default)
-
Existing person
New person
When the 'New person' option is chosen the following fields become available:
| Field | Description |
|---|---|
Code |
The code of the person (mandatory). If a dynamic logic function with signature 'Person Code Generation' exists, the code will be generated using this function and it will be pre-filled when the user navigates to this station. |
Last Name |
The last name of the person (mandatory). |
First Name |
The first name of the person. |
Date of Birth |
The date of birth of the person (mandatory). The interpretation of the date of birth will be automatically set to Exact. |
Gender |
The gender of the person: Female, Male or Unknown (mandatory). |
Phone Number |
The private phone number of the person. |
E-mail Address |
The primary e-mail address of the person. |
Preferred Language |
The preferred language for correspondence with this person. The main language for correspondence with this person will be set to the default language. |
Name Format |
The dynamic logic function that is used to format the name of the person (mandatory). If there is only one dynamic logic with signature 'Name Format (Person)', it will be the default value and this field will not be displayed. |
Assigned Provider |
The assigned provider of the person. An assigned provider can be created only if there exists at least one provider assignment type. |
Insurable Class |
If insurable classes are defined in the system, an insurable class can be
selected here. |
Dynamic Fields |
Dynamic fields configured for relations. Only single-value (non-time-valid and time-valid) dynamic fields are displayed. Note that time-valid dynamic fields are displayed as non-time-valid dynamic fields; the start date will be set to the Start of Enrollment date that is selected in the Enroll step. |
The user needs to select both assignment type and provider for creation of an assigned provider. If the user does not specify value for either one of them, the following fatal message is displayed when navigating to a next station: Assigned provider type and assigned provider should both be filled or both be left empty.
A new person will be created with the specified values and that person will be the policyholder on the new policy. The start date of the policyholder and the assigned provider (if specified) will be the Start of Enrollment date that is selected in the Enroll step.
Existing person
When the 'Existing person' option is chosen, a mandatory field with a list of values becomes available, so the user can select an existing person in the application to be the policyholder on the new policy.
If insurable classes are defined in the system, an insurable class can be selected for the existing person. In case of a group account policy: if insurable classes are defined for the group account, one of these insurable classes can be selected here.
image::new-policy-select-policyholder-existing-person.png[ New policy - Select policyholder - Existing person]
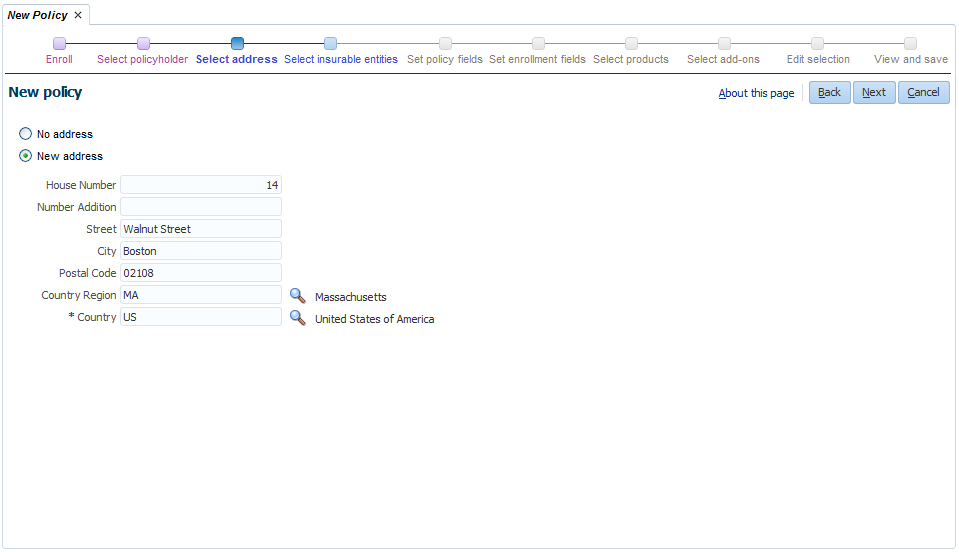
Select address
This step is only available if the 'New person' option was chosen in the previous step. In this step the user can select an address for the new person (policyholder on the policy). There are two options available:
-
No address
-
New address (selected by default)
New address
When the 'New address' option is chosen, the following fields become available:
| Field | Description |
|---|---|
House Number |
The house number of the address. |
Number Addition |
The house number addition, such as a floor or apartment number. |
Street |
The street of the address. |
City |
The city where the address is situated. |
Postal Code |
The postal code of the address. |
Country Region |
The region of the country in which the address is situated. LOV on Country Regions. Only the regions that are part of the selected country are available. |
Country |
The country in which the address is situated (mandatory). LOV on Countries. The default country is selected by default. |
A new address will be created with the specified values for the new person. The start date of the address will be the Start of Enrollment date that is selected in the Enroll step.
Select insurable entities
In this step the user needs to select one or more insurable entities that will be enrolled on the policy.
If the line of business selected in the first step allows persons to be enrolled on the policy a checkbox is provided so the user can choose if the policyholder is an insured on the policy (checked by default). If the line of business does not allow persons to be enrolled, the check-box is not provided.
The available options depend on the line of business of the policy and the insurable entity types referencing that line of business. In the case that the policy’s line of business is referenced by an insurable person type and more than one insurable object type the following options are available:
-
Create new persons (selected by default)
-
Select existing persons
-
Create new objects of type [drop-down list of insurable object types]
-
Select existing objects of type [drop-down list of insurable object types]
-
No extra insurable entities
The phrases 'Create new persons' and 'Select existing persons' depend on the plural display name of the insurable person type. Based on the configuration it could also display as, for example, 'Create new members' and 'Select existing members'
If the policy’s line of business is referenced by only one insurable object type, the 'create' / 'select' options display that object type, e.g. 'Create new cars' and 'Select existing cars'.
The following mock-ups are based on a policy’s line of business that is referenced by an insurable person type with the plural display name persons and one insurable object type with the plural display name cars.
Create new persons
If the 'Create new persons' option is selected the following field becomes available:
| Field | Description |
|---|---|
Code |
The code of the person (mandatory). If a dynamic logic function with signature 'Person Code Generation' exists, the code will be generated using this function and it will be pre-filled when the user navigates to this station. |
Last Name |
The last name of the person (mandatory). |
First Name |
The first name of the person. |
Date of Birth |
The date of birth of the person (mandatory). The interpretation of the date of birth will be automatically set to Exact. |
Gender |
The gender of the person: Female, Male or Unknown (mandatory). |
Assigned Provider |
The assigned provider of the person. An assigned provider can be created only if there exists at least one provider assignment type. Same as policyholder if an assigned provider is specified for the policyholder. |
Insurable Class |
If insurable classes are defined in the system an insurable class can be selected here. In case of a group account policy and insurable classes are defined for the group account, one of the group account insurable classes can be selected here. |
Same address as policyholder? |
If this checkbox is checked, the new person will have the same address as the policyholder, with as start date the Start of Enrollment date that is selected in the Enroll step. Else the new person will have no specified address. |
There is an 'Add person' icon next to the 'Create new persons' radio button (only displayed if this option is selected). When clicking on this icon a new set of fields (as described above) becomes available so the user can create multiple new persons. A 'Delete' icon is available above every set of fields if there is more than one set. Clicking on this icon will clear all values of the fields of that set and remove the specific set of fields.
The user needs to select both assignment type and provider for creation of an assigned provider. If the user does not specify value for either one of them, the following fatal message is displayed when navigating to a next station: Assigned provider type and assigned provider should both be filled or both be left empty.
New persons (and related addresses if that option is chosen) will be created with the specified values and those persons will be enrolled on the new policy. The start date of the assigned provider (applicable only for persons where it is specified) will be the Start of Enrollment date that is selected in the Enroll step.

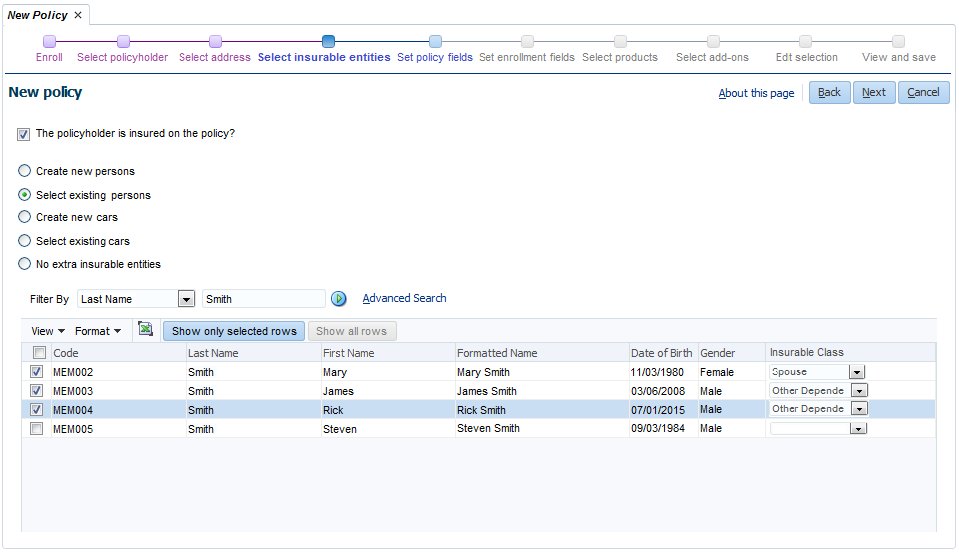
Select existing persons
If the 'Select existing persons' option is selected, a selection table becomes available that consists of the following columns:
| Column | Description |
|---|---|
Code |
The code of the person. |
Last Name |
The last name of the person. |
First Name |
The first name of the person. |
Formatted Name |
The formatted name of the person (not searchable). |
Date of Birth |
The date of birth of the person. |
Gender |
The gender of the person. |
Insurable Class |
The insurable class of the enrollment |
The user can search (both quick search and advanced search functionality is available) for existing persons and select persons using a selection checkbox. Every returned row has a selection checkbox. The header row also has a selection checkbox: selecting or deselecting this checkbox will select or deselect all returned rows. The user needs to select at least one person to be enrolled on the policy. If the user does not select at least one person, the following fatal message is displayed when navigating to a next step: At least one person needs to be selected. Clicking on the 'Show only selected rows' button above the table will filter the search results so only selected rows are returned. Clicking on the 'Show all rows' button will remove this filter. The selected persons will be persons on the new policy.
If insurable classes are defined in the system, every returned row has an insurable class drop-down. In case of a group account policy and insurable classes are defined for the group account, one of the group account insurable classes can be selected here.
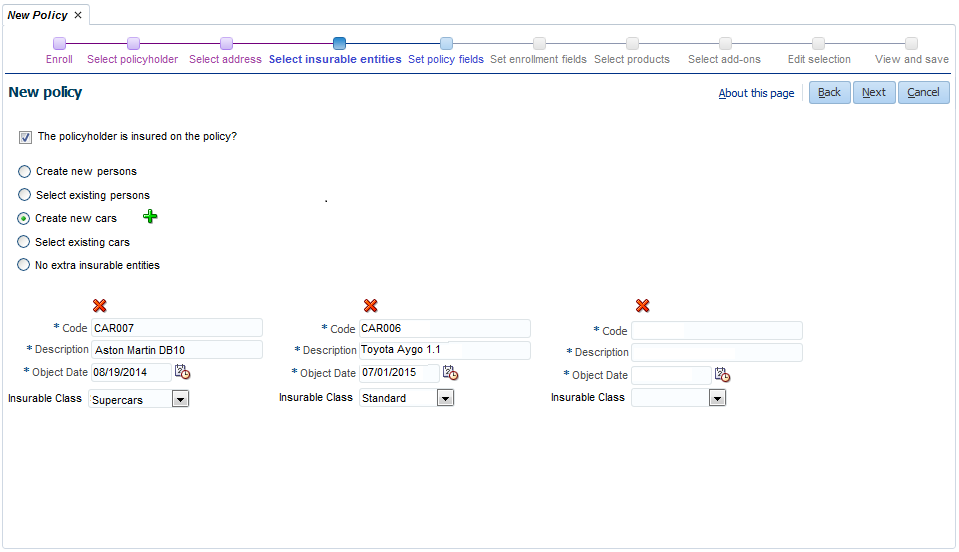
Create new objects
If the 'Create new objects' option is selected the following field becomes available:
| Field | Description |
|---|---|
Code |
The code of the object |
Description |
The description of the object |
Object Date |
The date of the object |
Insurable Class |
The insurable class of the object |
There is an 'Add object' icon next to the 'Create new objects' radio button (only displayed if this option is selected). When clicking on this icon a new set of fields (as described above) becomes available so the user can create multiple new objects. If the policy’s line of business is referenced by only one insurable object type, this type is automatically selected. If the policy’s line of business is referenced by more than one insurable object type, the insurable object type has to be selected from the drop-down list. If insurable classes are defined in the system, an insurable class can be selected here. In case of a group account policy: if insurable classes are defined for the group account, one of these insurable classes can be selected here. A 'Delete' icon is available above every set of fields if there is more than one set. Clicking on this icon will clear all values of the fields of that set and remove the specific set of fields. New objects will be created with the specified values and those objects will be enrolled on the new policy.
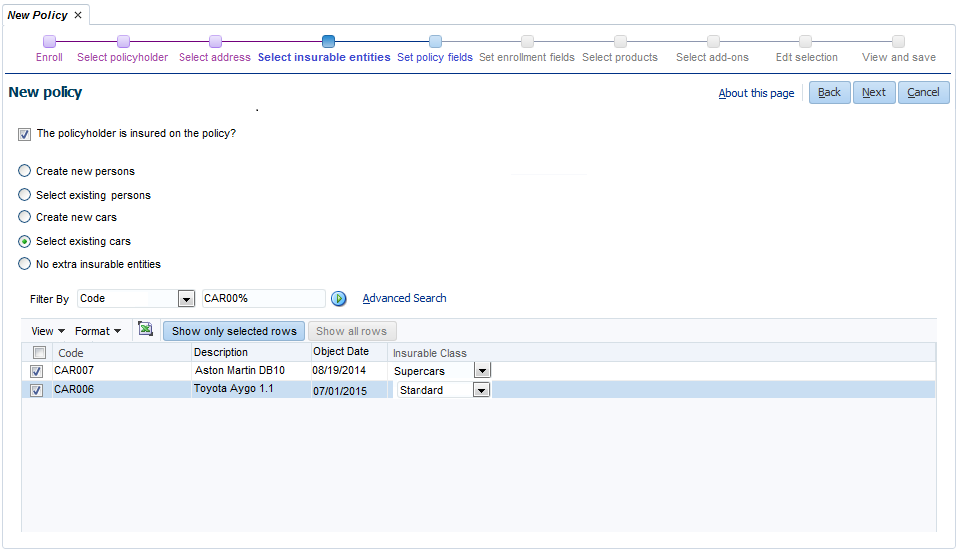
Select existing objects
If the 'Select existing objects' option is selected, a selection table becomes available that consists of the following columns:
| Field | Description |
|---|---|
Code |
The code of the object |
Description |
The description of the object |
Object Date |
The date of the object |
Insurable Class |
The insurable class of the objects |
The user can search (both quick search and advanced search functionality is available) for existing objects and select objects using a selection checkbox. Every returned row has a selection checkbox. The header row also has a selection checkbox: selecting or deselecting this checkbox will select or deselect all returned rows. The user needs to select at least one object to be enrolled on the policy. If the user does not select at least one object, the following fatal message is displayed when navigating to a next step: At least one object needs to be selected.
If the policy’s line of business is referenced by only one insurable object type, this type is automatically used in the selection table. If the policy’s line of business is referenced by more than one insurable object type, the insurable object type has to be selected from the drop-down list at the right side of the 'Select existing objects' option. The selection table only shows objects of the selected object type. Clicking on the 'Show only selected rows' button above the table will filter the search results so only selected rows are returned. Clicking on the 'Show all rows' button will remove this filter. The selected objects will be enrolled on the new policy.
If insurable classes are defined in the system, every returned row has an insurable class drop-down. In case of a group account policy and insurable classes are defined for the group account, one of the group account insurable classes can be selected here.
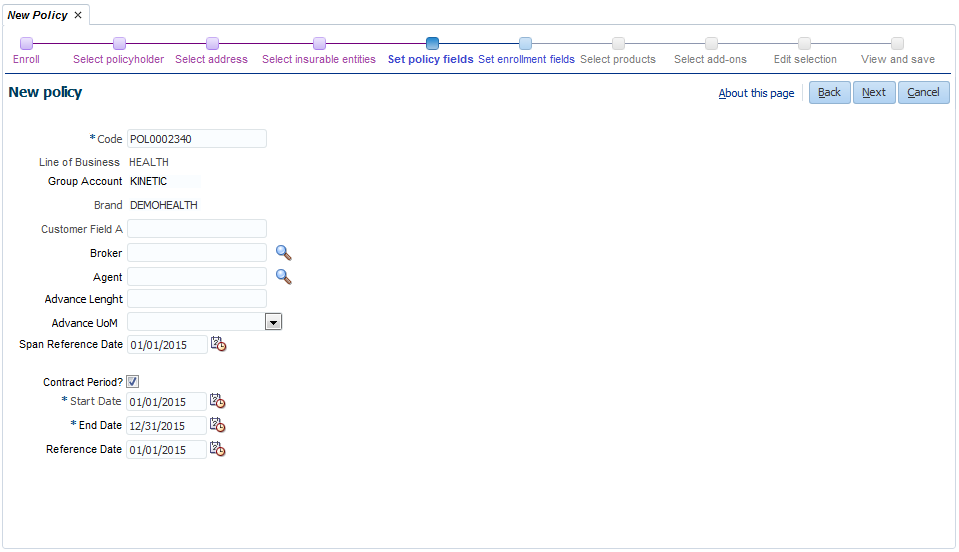
Set policy fields
In this step the fields of the policy (such as Code and configured dynamic fields) including the policy collection setting, policy contract period, broker and agent need to be specified. The following fields are available:
| Field | Description |
|---|---|
Code |
The code of the policy (mandatory). If a dynamic logic function with signature 'Policy Code Generation' exists, the code will be generated using this function and it will be pre-filled when the user navigates to this station. |
Line of Business |
The line of business that the policy belongs to (read-only) |
Group Account |
The group account that the policy belongs to as specified in the Enroll step (read-only). |
Brand |
The brand that the policy belongs to as specified in the Enroll step (read-only). |
Dynamic Fields |
Dynamic fields configured for policies. Only single-value (non-time-valid and time-valid) dynamic fields are displayed. Note that time-valid dynamic fields are displayed as non-time-valid dynamic fields; the start date will be set to the Start of Enrollment date that is selected in the Enroll step. |
Broker |
The broker that serves as intermediary. LOV on Brokers. This is an attribute of the Policy Broker Agent. |
Agent |
The agent that serves as intermediary. LOV on Agents. This is an attribute of the Policy Broker Agent. |
Advance Length |
The number of days or months the premium is calculated up front. This is an attribute of the Policy Collection Setting. |
Advance UoM |
The time unit of measure for which the advance premium calculation is defined, e.g. days or months. This is an attribute of the Policy Collection Setting. |
Span Reference Date |
The date to determine the start of a span of calculation periods. By default the date specified in the Start of Enrollment field in the 'Enroll' step is selected. This is an attribute of the Policy Collection Setting. |
Contract Period? |
If this checkbox is checked, the new policy will have a contract period with as start date, end date and reference date the values as filled in the fields below. This checkbox is checked by default. |
Start Date |
The start date of the contract period (mandatory). By default the date specified in the Start of Enrollment field in the 'Enroll' step is selected. This is an attribute of the Policy Contract Period, so this field is not displayed if the 'Contract Period?' checkbox is unchecked. |
End Date |
The end date of the contract period (mandatory). By default the following date is selected: the date specified in Start of Enrollment field in the 'Enroll' step plus one year minus one day. This is an attribute of the Policy Contract Period, so this field is not displayed if the 'Contract Period?' checkbox is unchecked. |
Reference Date |
The date that is used as a look-up date in premium calculation. By default the date specified in the Start of Enrollment field in the 'Enroll' step is selected. This is an attribute of the Policy Contract Period, so this field is not displayed if the 'Contract Period?' checkbox is unchecked. |
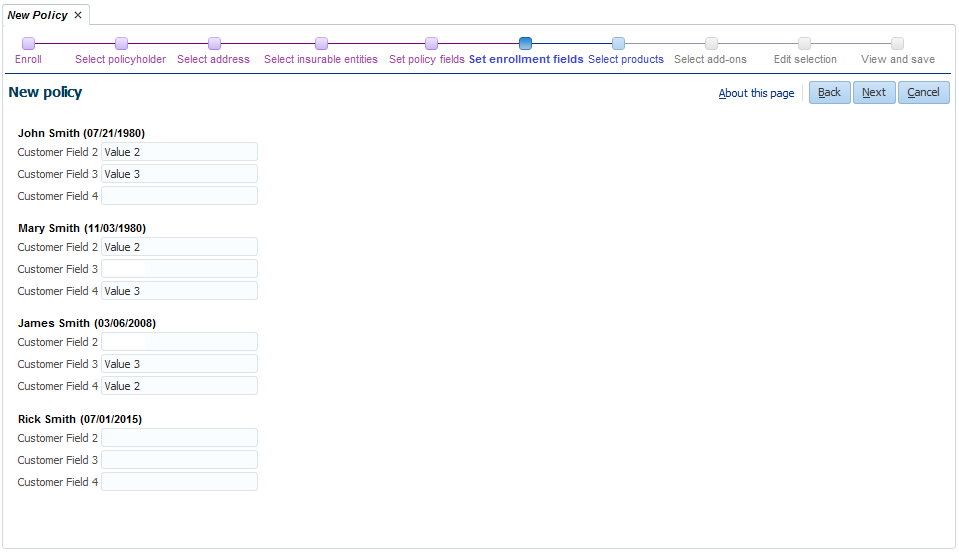
Set enrollment fields
In this step the single-value dynamic fields (non-time-valid and time-valid) for policy enrollments are displayed per insurable entity (for all insurable entities that are selected in the 'Select insurable entities' station). Note that time-valid dynamic fields are displayed as non-time-valid dynamic fields; the start date will be set to the Start of Enrollment date that is selected in the Enroll step.
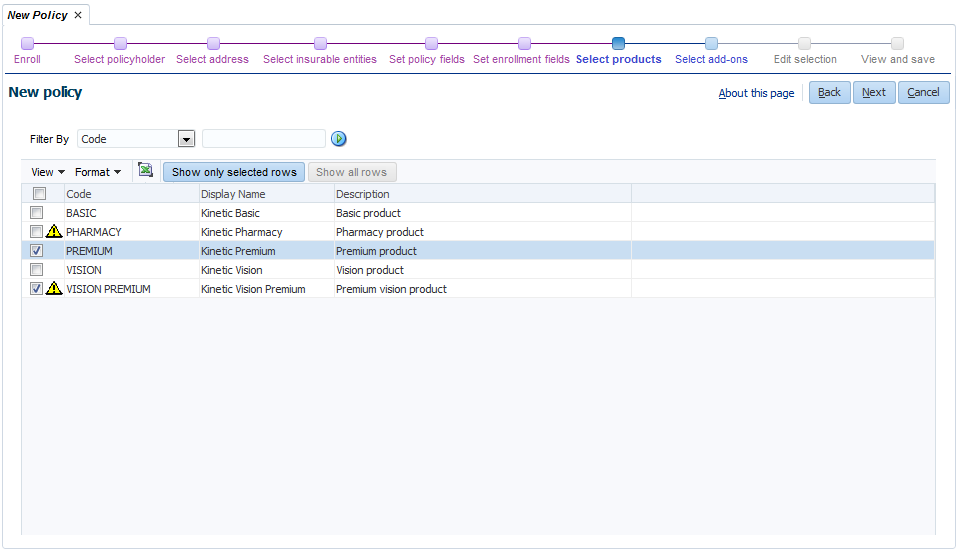
Select products
In this step the user needs to select at least one product for the persons and/or objects on the policy. A selection table is available that consist of the following columns:
| Column | Description |
|---|---|
Code |
The code of the enrollment product. |
Display Name |
The display name of the enrollment product or the display name of the group account product in case a group account is specified on the policy. |
Description |
The description of the enrollment product. |
The user can search (only quick search functionality is available) for products and select products using a selection checkbox. Only products that are for the same line of business as the policy’s line of business can be selected. If a group account is specified on the policy, only the products that belong to that group account can be selected. Every returned row has a selection checkbox. The header row also has a selection checkbox: selecting or deselecting this checkbox will select or deselect all returned rows. The selected products will be initially added to all insurable entities on the new policy; in the 'Edit selection' step the user can choose to deselect specific products for specific insurable entities. The user needs to select at least one product. If the user does not select at least one product, the following fatal message is displayed when navigating to a next step: At least one product needs to be selected.
If a group account is specified on the policy and a listed product is not available for all enrolled entities (based on the insurable classes of products and enrolled entities) an attention icon is displayed next to the check box. The product can still be selected in the UI but the product will only be added to those policy enrollments where the insurable classes of the product and the policy enrollment match.
Clicking on the 'Show only selected rows' button above the table will filter the search results so only selected rows are returned. Clicking on the 'Show all rows' button will remove this filter.
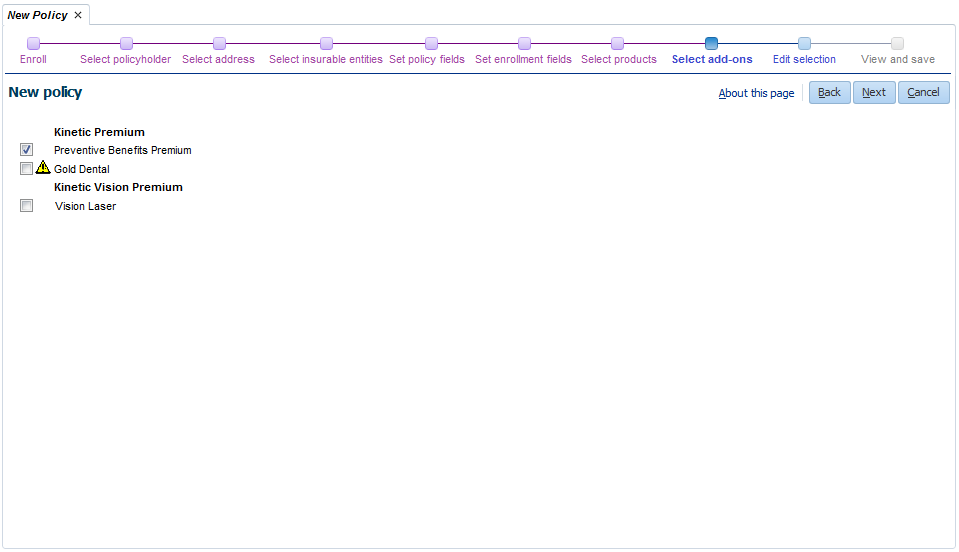
Select add-ons
The products that are chosen in the previous step and their available add-ons are displayed under each other. The user can select add-ons using a selection checkbox that is displayed for every add-on.The checkboxes are unchecked by default.The selected add-ons will be initially added to all insurable entities on the new policy; in the 'Edit selection' step the user can choose to select or deselect specific add-ons for specific insurable entities.
If a group account is specified on the policy, only the add-ons that belong to that group account can be selected. If a group account is specified on the policy and a listed add-on is not available for all enrolled entities (based on the insurable classes of products and enrolled entities) an attention icon is displayed next to the check box. The add-on can still be selected in the UI but it will only be added to those policy enrollment products where the insurable classes of the add-on and the policy enrollment match.
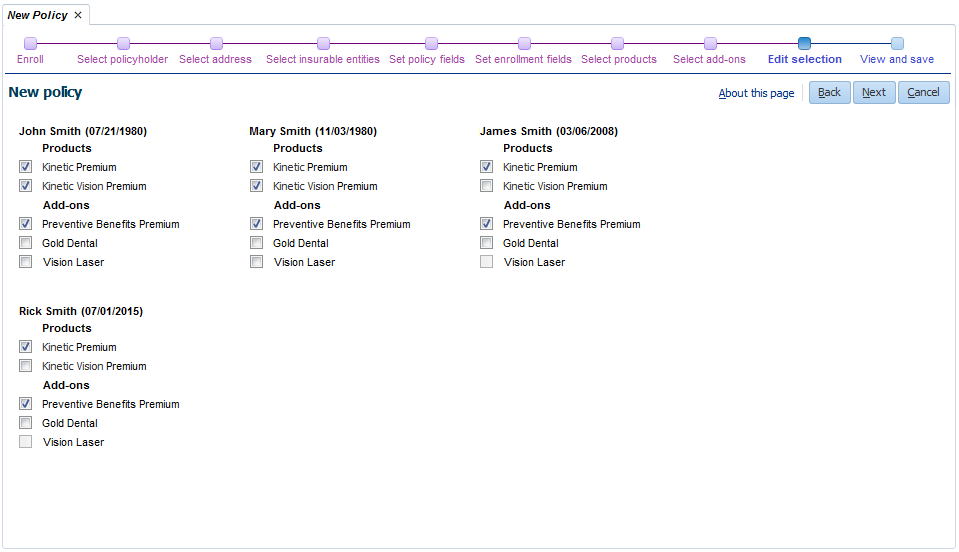
Edit selection
In this step the products that are chosen in the 'Select products' step and all their available add-ons are displayed per person or object (for all insurable entities that are selected in the 'Select insurable entities' step). A selection checkbox is displayed for every product and add-on where the insurable class matches the insurable class of the policy enrollment.The products are checked by default for all persons and/or objects. The add-ons that have been selected in the 'Select add-ons' step are checked by default for all persons and/or objects; the other add-ons are unchecked by default. If the user unchecks a product checkbox, then the related add-on checkboxes (add-ons that belong to the product) are automatically unchecked and disabled. If the user checks a product checkbox, then the related add-on checkboxes are enabled. At least one product needs to be selected for every person or object. If the user does not select at least one product for every person or object, the following fatal message is displayed when navigating to a next step: At least one product needs to be selected for every insurable entity.
A new policy enrollment product will be created for every selected product and person or object with as start date the value specified in the Start of Enrollment field in the 'Enroll' step. A new policy add-on will be created for every selected add-on and related policy enrollment product with as start date the value specified in the Start of Enrollment field in the 'Enroll' step.
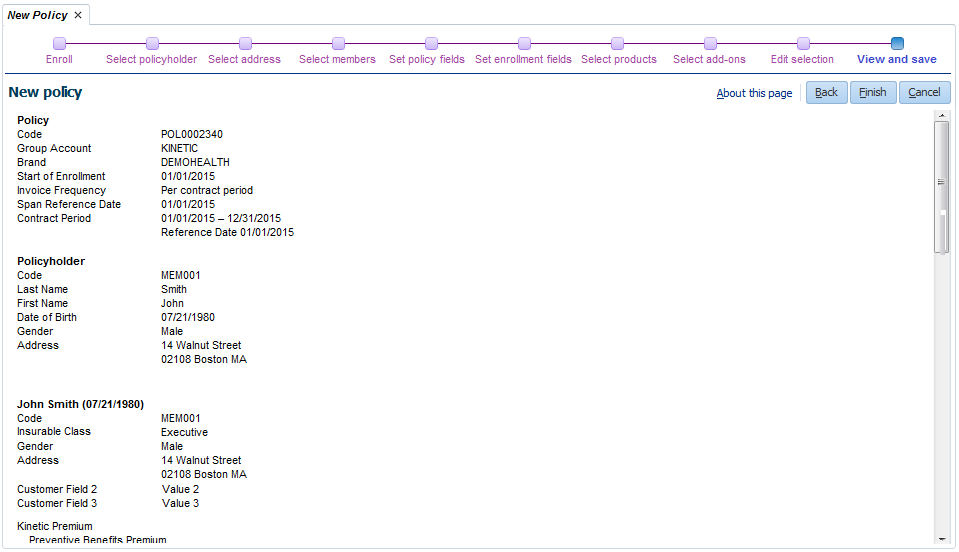
View and save
In this step the user can view all choices that have been made in the previous steps. The following read-only sections are displayed:
| Section | Description |
|---|---|
Policy |
In this section the following Policy related fields are displayed, if they
have a value:
|
Policyholder |
In this section the following Policyholder related fields are displayed, if
they have a value:
|
Insurable entities and Products |
The following fields are displayed per person (the Formatted Name and Date of
Birth are displayed as section headers), if they have a value:
The following fields are displayed per object (the Description and Object
Date are displayed as section headers), if they have a value:
Per insurable entity, the chosen policy enrollment products, the related policy add-ons and parameters are displayed under the above specified fields. Parameter values can not be specified within this wizard; the parameter values that are displayed here are the values that are specified at the product level. |
If changes are required, the user can choose to navigate back to any step in the process by using the 'Back' button or the links at the top of the page. If no changes are required, the user needs to click on the 'Finish' button to end the wizard and save the new policy. The new policy will be saved with status Edit and the View and Edit Policy page will be opened in the context of the new policy.