Depending on what you want to test, you can create a search test in several ways. You can test the outcome of applying new or updated search configurations and facets from inside a project, or troubleshoot a deployed site that is not working as expected. You can also create a search test while editing a facet or search configuration.
To create a search test:
In a Merchandising project, navigate to Search Merchandising and show Search Testing.
To create a search test while editing a facet or search configuration, click the Test Search button in the Details pane.
To troubleshoot searches for deployed assets without creating a project, navigate to Search Merchandising using the Browse link on the BCC home page. For more information, see [add cross reference].
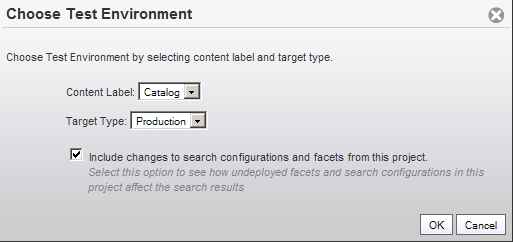
To specify the test environment that contains the products and SKUs you want to test, click Select and pick a content label and target type:
The target type identifies the general purpose of the Search project, for example, Production or Staging.
The content label identifies the purpose of a content set, such as a catalog or a collection of articles.
To include undeployed search configurations and facets from the current project in the test, select the checkbox. This option appears only if you are working in a project.
Click the OK button.
The available Content Label and Target Type options depend on ATG Search settings configured by your administrator.
If your test environment contains one or more registered sites, select a site from the Search From list. This is the site from which the test query will originate.
This list includes all registered sites associated with the content label you selected for your test environment.
Note: if there is only one site registered, no dropdown menu is shown in the Search From control. The site is shown as a label.
If you selected a site in the previous step, select Cross Site Search to search all sites in the Search From list.
Choose the search inputs you want to test. See Specifying the Search Criteria to Test.
Choose the output types you want to include in the test results. See Test Output Types.
Click the Search button to run the test.
