Configuring the Neutron L3 Agent
This section shows how to create a virtual network that represents an external network. On this virtual network, DHCP is not used. Instead, floating IP addresses are created. These floating IP addresses are assigned to a particular tenant and can be assigned to Nova VM instances for their use by users under that tenant. The Neutron L3 agent automatically creates one-to-one NAT mappings between addresses assigned to Nova instances and the floating IP addresses.
The Oracle Solaris 11.2 implementation of OpenStack Neutron supports a provider router with private networks deployment model. For more information about this model, see the OpenStack Neutron use cases in Chapter 7 of the Operator Training Guide. In this deployment model, each tenant can have one or more private networks and all the tenant networks share the same router. The data administrator creates, owns, and manages the router. The router is not visible in the network topology view of the tenant. Because there is only a single router, tenant networks cannot use overlapping IP addresses. The administrator creates the private networks on behalf of tenants.
By default, the router in this model prevents routing between private networks that are part of the same tenant: VM instances within one private network cannot communicate with VM instances in another private network, even though they are all part of the same tenant. To change this behavior, set allow_forwarding_between_networks to True in the /etc/neutron/l3_agent.ini configuration file and restart the neutron-l3-agent SMF service.
The router in this model provides connectivity to the outside world for the tenant VM instances. The router performs bidirectional NAT on the interface that connects the router to the external network. Tenants create as many floating IPs (public IPs) as they need or as are allowed by the floating IP quota and then associate these floating IPs with the VM instances that require outside connectivity.
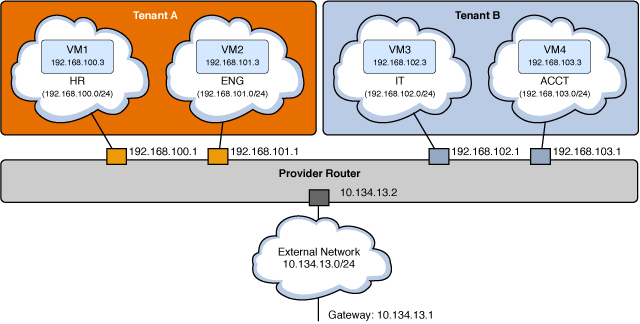
The following figure depicts the Oracle Solaris 11.2 Neutron deployment model. A description of the figure follows the figure.
Figure 3-3 Provider Router with Private Networks Model

In the model shown in the preceding figure, each tenant has two internal networks and two VM instances.
- Tenant A
-
-
HR network with subnet 192.168.100.0/24 and gateway 192.168.100.1
-
ENG network with subnet 192.168.101.0/24 and gateway 192.168.101.1
-
VM1 connected to HR with a fixed IP address of 192.168.100.3
-
VM2 connected to ENG with a fixed IP address of 192.168.101.3
-
- Tenant B
-
-
IT network with subnet 192.168.102.0/24 and gateway 192.168.102.1
-
ACCT network with subnet 192.168.103.0/24 and gateway 192.168.103.1
-
VM3 connected to IT with a fixed IP address of 192.168.102.3
-
VM4 connected to ACCT with a fixed IP address of 192.168.103.3
-
The bidirectional NAT table is configured as shown in the following table.
|
All the gateway interfaces are instantiated on the node that is running the neutron-l3-agent SMF service. Though a cloud can have many Neutron instances, you need only one neutron-l3-agent per cloud.
The external network is a provider network that is associated with the subnet 10.134.13.0/24, which is reachable from outside. Tenants will create floating IP addresses from this network and associate them to their VM instances. VM1 and VM2 have floating IPs 10.134.13.40 and 10.134.13.9 associated with them respectively. VM1 and VM2 are reachable from the outside world through these IP addresses.
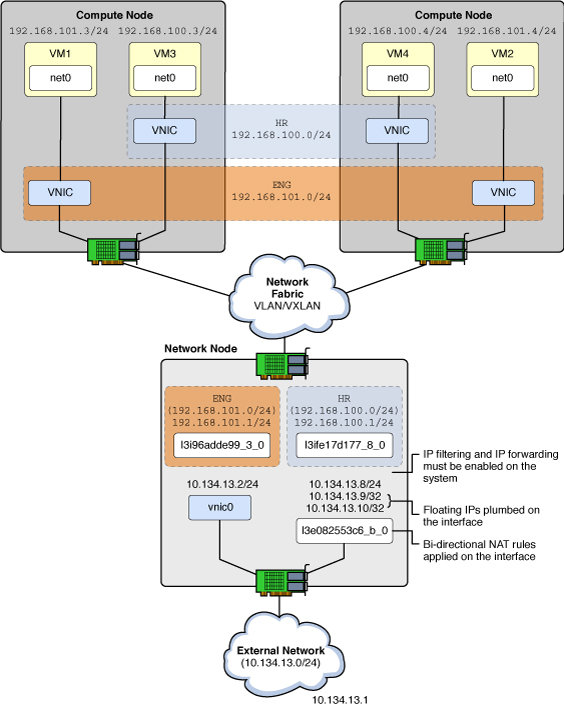
The following diagram shows how these tenant resources are configured in a Network node and two Compute nodes. Descriptions of some of the features shown on the figure follow the figure.
Figure 3-4 Neutron L3 Agent Configuration

- VNIC
-
Virtual network interface.
- l3e...
-
The L3 agent created a VNIC on the external (“e”) network where bidirectional NAT occurs.
- l3i...
-
The L3 agent created a VNIC on the internal (“i”) network that has the default gateway IP address.
The following list shows how IP addresses will be used in this example configuration.
- 10.134.13.1
-
Default gateway
- 10.134.13.2 - 10.134.13.7
-
IP addresses set aside for exposing OpenStack APIs (such as Nova, Cinder, Glance) to tenants
- 10.134.13.9 - 10.134.13.254
-
Floating IP addresses for the tenant VM instances
How to Configure the Neutron L3 Agent
This procedure shows how to use the service tenant to create a router, an external network, and an external subnet that will be used by all of the tenants in the data center.
This procedure is performed by the data center administrator. You must use the command line to configure the shared single router and associate networks and subnets from different tenants because the OpenStack dashboard enables you to manage the resources of only one tenant at a time.
Refer to Figure 3–4 as you perform the following steps.
Before You Begin
You must complete the configuration of internal networks before you perform this procedure.
-
Enable Solaris IP filter functionality.
network# svcadm enable ipfilter
-
Enable IP forwarding on the entire host.
network# ipadm set-prop -p forwarding=on ipv4
network# ipadm set-prop -p forwarding=on ipv6
-
Ensure that EVS is configured correctly and has the VLAN ID required for the external network.
In the following example, the VLAN ID and range values are based on the EVS configuration completed in Step 9.
network# evsadm show-controlprop -p vlan-range,l2-type
PROPERTY     PERM    VALUE         DEFAULT    HOST
l2-type      rw      vlan          vlan       --
vlan-range   rw      13,1000-2000  --         --
-
Ensure that the service tenant exists.
network# keystone tenant-list
-
Create the provider router.
The provider router is created as the OpenStack neutron user under the service tenant.
Note the UUID (id) of the new router. You will use this in the next step.
network# export OS_USERNAME=neutron
network# export OS_PASSWORD=neutron-password
network# export OS_TENANT_NAME=service
network# export OS_AUTH_URL=http://controller-name:5000/v2.0
network# neutron router-create provider_router
Created a new router:
+-----------------------+--------------------------------------+
| Field                 | Value                                |
+-----------------------+--------------------------------------+
| admin_state_up        | True                                 |
| external_gateway_info |                                      |
| id                    | 181543df-40d1-4514-ea77-fddd78c389ff |
| name                  | provider_router                      |
| status                | ACTIVE                               |
| tenant_id             | f164220cb02465db929ce520869895fa     |
+-----------------------+--------------------------------------+
-
Update the L3 agent configuration file.
Update the value of router_id in the /etc/neutron/l3_agent.ini file, using the router UUID (id) from the previous step.
router_id = 181543df-40d1-4514-ea77-fddd78c389ff
-
Enable the neutron-l3-agent SMF service.
network# svcadm enable neutron-l3-agent
-
Create an external network.
The virtual network is created as the OpenStack neutron user under the service tenant.
network# neutron net-create --provider:network_type=vlan \
--provider:segmentation_id=13 --router:external=true external_network
Created a new network:
+--------------------------+--------------------------------------+
| Field                    | Value                                |
+--------------------------+--------------------------------------+
| admin_state_up           | True                                 |
| id                       | f67f0d72-0ddf-11e4-9d95-e1f29f417e2f |
| name                     | external_network                     |
| provider:network_type    | vlan                                 |
| provider:segmentation_id | 13                                   |
| router:external          | True                                 |
| shared                   | False                                |
| status                   | ACTIVE                               |
| subnets                  |                                      |
| tenant_id                | f164220cb02465db929ce520869895fa     |
+--------------------------+--------------------------------------+
-
Associate a subnet to the external network.
Create an associated subnet network for the external network, specifying that DHCP is disabled and that the subnet will be used for external routing. Specify a routable IP subnet from where the floating IP addresses will be assigned. In this example, the subnet is associated with VLAN ID 13.
network# neutron subnet-create --enable-dhcp=False \ --allocation-pool start=10.134.13.8,end=10.134.13.254 \ --name external_subnet external_network 10.134.13.0/24 Created a new subnet: +------------------+--------------------------------------------------+ | Field | Value | +------------------+--------------------------------------------------+ | allocation_pools | {"start": "10.134.13.8", "end": "10.134.13.254"} | | cidr | 10.134.13.0/24 | | dns_nameservers | | | enable_dhcp | False | | gateway_ip | 10.134.13.1 | | host_routes | | | id | 5d9c8958-0de0-11e4-9d96-e1f29f417e2f | | ip_version | 4 | | name | external_subnet | | network_id | f67f0d72-0ddf-11e4-9d95-e1f29f417e2f | | tenant_id | f164220cb02465db929ce520869895fa | +------------------+--------------------------------------------------+ -
Add the external network to the router.
In the following command, the first UUID is the provider_router UUID, and the second UUID is the external_network UUID.
network# neutron router-gateway-set \ 181543df-40d1-4514-ea77-fddd78c389ff \ f67f0d72-0ddf-11e4-9d95-e1f29f417e2f Set gateway for router 181543df-40d1-4514-ea77-fddd78c389ff network# neutron router-list -c name -c external_gateway_info +-----------------+--------------------------------------------------------+ | name | external_gateway_info | +-----------------+--------------------------------------------------------+ | provider_router | {"network_id": "f67f0d72-0ddf-11e4-9d95-e1f29f417e2f"} | +-----------------+--------------------------------------------------------+ -
Add the private networks of the tenant to the router.
The networks shown by the neutron net-list command were previously configured.
network# keystone tenant-list
+----------------------------------+---------+---------+
|                id                |   name  | enabled |
+----------------------------------+---------+---------+
| 511d4cb9ef6c40beadc3a664c20dc354 |   demo  |   True  |
| f164220cb02465db929ce520869895fa | service |   True  |
+----------------------------------+---------+---------+
network# neutron net-list --tenant-id=511d4cb9ef6c40beadc3a664c20dc354
+-------------------------------+------+------------------------------+
| id                            | name | subnets                      |
+-------------------------------+------+------------------------------+
| c0c15e0a-0def-11e4-9d9f-      | HR   | c0c53066-0def-11e4-9da0-     |
|  e1f29f417e2f                 |      | e1f29f417e2f 192.168.100.0/24|
| ce64b430-0def-11e4-9da2-      | ENG  | ce693ac8-0def-11e4-9da3-     |
|  e1f29f417e2f                 |      | e1f29f417e2f 192.168.101.0/24|
+-------------------------------+------+------------------------------+
In the following command, the first UUID is the provider_router UUID, and the second UUID is the HR subnet UUID.
network# neutron router-interface-add  \
181543df-40d1-4514-ea77-fddd78c389ff \
c0c53066-0def-11e4-9da0-e1f29f417e2f       (HR subnet UUID)
Added interface 7843841e-0e08-11e4-9da5-e1f29f417e2f to router 181543df-40d1-4514-ea77-fddd78c389ff.
In the following command, the first UUID is the provider_router UUID, and the second UUID is the ENG subnet UUID.
network# neutron router-interface-add \
181543df-40d1-4514-ea77-fddd78c389ff \
ce693ac8-0def-11e4-9da3-e1f29f417e2f
Added interface 89289b8e-0e08-11e4-9da6-e1f29f417e2f to router 181543df-40d1-4514-ea77-fddd78c389ff.
See also
How to Create and Associate Floating IP Addresses as a Tenant User
This procedure is performed by a tenant user using the OpenStack Horizon dashboard.
-
Log into the OpenStack Dashboard.
Log in as described in How to Access the OpenStack Dashboard, using the credentials of the tenant user.
- Select Project → Access & Security → Floating IPs.
- Select external_network.
-
Click the Allocate IP button.
The Floating IPs tab shows that the floating IP address 10.134.13.9 is allocated.
- Click the Associate button.
-
Select the port of the VM instance from the pull-down menu.
The Project → Instances window shows that the floating IP address is associated with the VM instance.
If you had selected a keypair (SSH Public Key) while launching a VM instance, then that SSH key would be added into the authorized_keys file for the root user in the VM instance.
-
Log into the running VM instance.
global# ssh root@10.134.13.9
Last login: Fri Jul 18 00:37:39 2014 from 10.132.146.13
Oracle Corporation      SunOS 5.11      11.2     June 2014
root@host-192-168-101-3:~# uname -a
SunOS host-192-168-101-3 5.11 11.2 i86pc i386 i86pc
root@host-192-168-101-3:~# zoneadm list -cv
ID NAME              STATUS      PATH                 BRAND      IP
 2 instance-00000001 running     /                    solaris    excl
root@host-192-168-101-3:~# ipadm
NAME             CLASS/TYPE STATE     UNDER      ADDR
lo0              loopback   ok        --         --
   lo0/v4        static     ok        --         127.0.0.1/8
   lo0/v6        static     ok        --         ::1/128
net0             ip         ok        --         --
   net0/dhcp     inherited  ok        --         192.168.101.3/24
How to Observe the L3 Agent Configuration
You can use IP filter commands such as ipf, ippool, and ipnat and networking commands such as dladm and ipadm to observe and troubleshoot the configuration done by neturon-l3-agent.
-
Show VNICs created by neutron-l3-agent.
network# dladm show-vnic
LINK                OVER         SPEED  MACADDRESS        MACADDRTYPE VIDS
l3i7843841e_0_0     net1         1000   2:8:20:42:ed:22   fixed       200
l3i89289b8e_0_0     net1         1000   2:8:20:7d:87:12   fixed       201
l3ed527f842_0_0     net0         100    2:8:20:9:98:3e    fixed       0
-
Show IP addresses created by neutron-l3-agent.
network# ipadm
NAME                  CLASS/TYPE STATE   UNDER      ADDR
l3ed527f842_0_0       ip         ok      --         --
  l3ed527f842_0_0/v4  static     ok      --         10.134.13.8/24
  l3ed527f842_0_0/v4a static     ok      --         10.134.13.9/32
l3i7843841e_0_0       ip         ok      --         --
  l3i7843841e_0_0/v4  static     ok      --         192.168.100.1/24
l3i89289b8e_0_0       ip         ok      --         --
  l3i89289b8e_0_0/v4  static     ok      --         192.168.101.1/24
-
Show IP filter rules.
network# ipfstat -io empty list for ipfilter(out) block in quick on l3i7843841e_0_0 from 192.168.100.0/24 to pool/4386082 block in quick on l3i89289b8e_0_0 from 192.168.101.0/24 to pool/8226578 network# ippool -l table role = ipf type = tree number = 8226578 { 192.168.100.0/24; }; table role = ipf type = tree number = 4386082 { 192.168.101.0/24; }; -
Show IP NAT rules.
network# ipnat -l
List of active MAP/Redirect filters:
bimap l3ed527f842_0_0 192.168.101.3/32 -> 10.134.13.9/32
List of active sessions:
BIMAP 192.168.101.3  22  <- -> 10.134.13.9  22 [10.132.146.13 36405]