Configuring the Network Node
Configuring the Network node requires configuring both the Elastic Virtual Switch (EVS) and the Neutron DHCP agent. You can optionally configure the Neutron Layer 3 (L3) agent.
EVS forms the back end for OpenStack networking, and facilitates communication between VM instances, either using VLANs or VXLANs. The VM instances can be on the same Compute node or across multiple Compute nodes. For more information about EVS, refer to Chapter 5, About Elastic Virtual Switches, in Managing Network Virtualization and Network Resources in Oracle Solaris 11.2 .
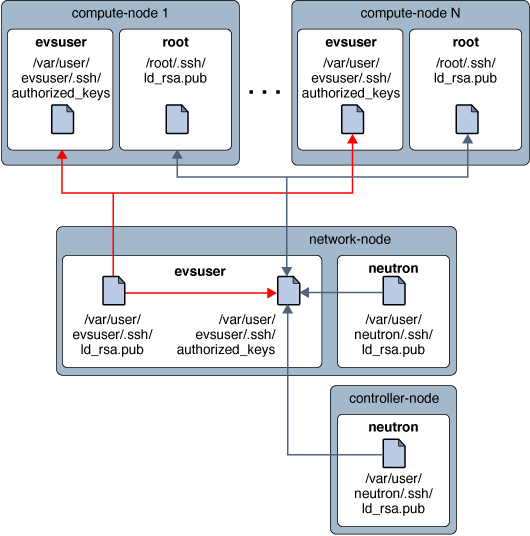
When you configure the Network node, make sure that you copy the evsuser's SSH public keys to each of the evsuser's authorized_keys file in the Compute node and the Network node. Refer to the following image that shows the distribution of the SSH public keys. The image assumes that multiple Compute nodes have been configured.
Figure 3-2 EVS Controller SSH Key Distribution

To better manage memory use between ZFS and applications in Oracle Solaris 11, set the usr_reserve_hint_pct parameter on the node, as shown in the following example:
# echo "set user_reserve_hint_pct=80" >>/etc/system.d/site:kernel-zones-reserve
# reboot
where site can refer to your company.
You should set this parameter on the different OpenStack nodes as well.
For more information about this parameter, log in to your MOS account in https://support.oracle.com and review Document 1663862.1, Memory Management Between ZFS and Applications in Oracle Solaris 11.2.