In order for the Preview plugin to work properly, your environment needs a staging server and a preview server. The staging server serves the application that Experience Manager preview interacts with while the preview server provides the preview functionality that is accessed through Business Control Center. Oftentimes, the preview server is configured to run on the publishing server. Assuming this is the case, a full Preview configuration would use publishing, staging, and production servers.
The following illustration shows how an environment incorporating the Preview plugin should be setup.
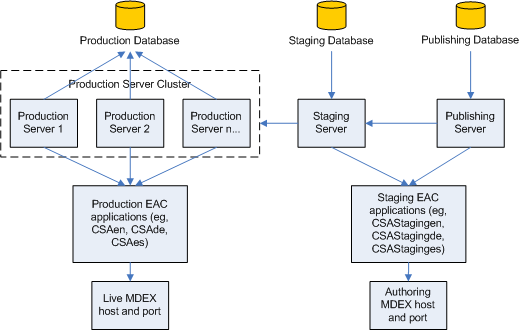
Specifically, this diagram illustrates that:
The production server(s) should use the live Guided Search configuration, including the live EAC applications (for example,
CSAen,CSAde, andCSAes) and the live MDEX that supports those applications.The staging and publishing servers should use the staging Guided Search configuration, including the staging EAC applications (for example,
CSAStagingen,CSAStagingde, andCSAStaginges) and the authoring MDEX that supports those applications.
To create this environment, in CIM you must do the following:
During product selection, in the CHOOSE ADDONS menu, include the Staging Server and Preview Server add ons.
In the EXPERIENCE MANAGER PREVIEW OPTIONS SELECTION FOR STAGING, choose Configure Experience Manager Preview to run on the Staging Server (do not configure Experience Manager Preview to run on the Production Server)
In the PUBLISHING PREVIEW OPTIONS SELECTION Menu, choose Configure Preview to run on the CA Server.
During the publishing server instance configuration, set the following configuration:
For the base EAC application name, specify the staging version of the base EAC application name, for example,
NewStoreStaging.For the default MDEX host and port, specify the staging server’s authoring MDEX host and port.
For the local preview host and port, specify the publishing server’s host name and HTTP port.
For the application configuration archive path for the default EAC application, specify the archive path for the default staging EAC application, for example,
/usr/local/endeca/Apps/application_export_archive/NewStoreStagingenIMPORTANT: The portion of this path up to but not including the EAC application name must match the application configuration path provided during EAC application creation. This path is described in the EAC Application Configuration section below.
Make sure the new application module is included in the server configuration by adding a custom module, for example,
CommerceAccelerator.Applications.NewStore, to the server after theCommerceAccelerator.Basemodule.
During the production server instance configuration, set the following configuration:
For the base EAC application name, specify the production version of the base EAC application name, for example,
NewStore.For the default MDEX host and port, specify the production server’s live MDEX host and port.
For the application configuration archive path for the default EAC application, specify the archive path for the default live EAC application, for example,
/usr/local/endeca/Apps/application_export_archive/NewStoreenIMPORTANT: The portion of this path up to but not including the EAC application name must match the application configuration path provided during EAC application creation. This path is described in the EAC Application Configuration section below.
Make sure the new application module is included in the server configuration by adding a custom module, for example,
CommerceAccelerator.Applications.NewStore, to the server after theCommerceAccelerator.Basemodule.
During the Staging server instance configuration, set the following configuration:
For the base EAC application name, specify the staging version of the base EAC application name, for example,
NewStoreStaging.For the default MDEX host and port, specify the staging server’s authoring MDEX host and port.
For the application configuration archive path for the default EAC application, specify the archive path for the default staging EAC application, for example,
/usr/local/endeca/Apps/application_export_archive/NewStoreStagingenIMPORTANT: The portion of this path up to but not including the EAC application name must match the application configuration path provided during EAC application creation. This path is described in the EAC Application Configuration section below.
Make sure the new application module is included in the server configuration by adding a custom module, for example,
CommerceAccelerator.Applications.NewStore, to the server after theCommerceAccelerator.Basemodule.
