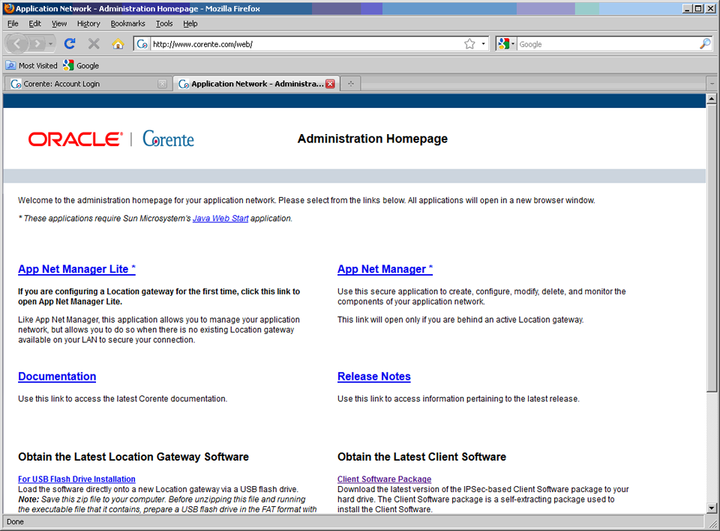
App Net Manager is a secure application that you use to create, configure, modify, delete, and monitor the components of your Corente network.To access this application, access the Corente Administration Homepage at http://www.corente.com/web.
This webpage provides access to all of the tools you might need to manage your Corente application network. To create a Location gateway personality file:
If you do not yet have an active Location in your Corente network, click the hyperlink for App Net Manager Lite. App Net Manager Lite will not allow you to enable more than the basic Location gateway options; however, you can add additional functionality to your Location gateway once it has been activated. For more information about creating Location gateways and using App Net Manager Lite, refer to the I. Corente Services Planning manual.
If you already have an active Location, click the hyperlink for App Net Manager. After the first Location has been activated in your Corente network, all administrative activities must take place across a secure tunnel using App Net Manager.
To access App Net Manager, you must use a computer with:
256MB memory
Oracle Java Web Start application (available for free download at http://www.oracle.com/technetwork/java/javase/javawebstart/index.html).
The latest version of the Java Runtime Environment (JRE), to ensure that the latest security enhancements are installed. Note that version 1.6.0 of the JRE may not be compatible with older versions of Linux. If your OS does not support 1.6.0 or does not appear to be compatible, you must manually download an earlier version (1.5.0_10 or 1.5.0_11)
Additionally, this computer must be on the same LAN as an active Corente Virtual Services Gateway that has a secure connection to the Corente Services Control Point (SCP).
When the security of your browser is set at High, an administrator will not be able to access the Login page, and it will not be obvious why the application is inaccessible. The highest browser security setting supported by App Net Manager is Medium. You can change the security setting of your browser by accessing the Tools menu, selecting Internet Options, and clicking on the Security tab.
If you cannot access App Net Manager and you are using a proxy server on your LAN, refer to Appendix A, Accessing App Net Manager or Gateway Viewer from Behind a Proxy Server for modifications you must make to your web browser.
Complete the following procedure to login to App Net Manager.
Access the Corente Administration Homepage (http://www.corente.com/web) and select the hyperlink labeled App Net Manager . If prompted, open the file with the Java Web Startapplication.
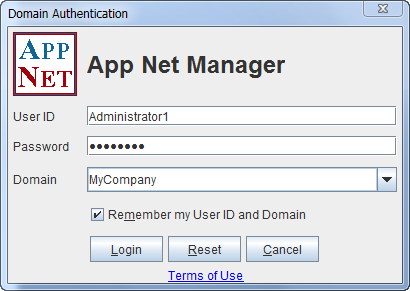
The application will load and initialize, until you are prompted with the Domain Authentication window.
Complete this window by your administrator User ID and Password, as well as the name of your Corente Domain.
If you would like App Net Manager to store the User ID and Domain name that you entered so that you can login from this computer more quickly in the future, select the Remember my User ID and Domain option.
Click Login.
The App Net Manager application will be displayed for your Corente application network. You are now logged in.
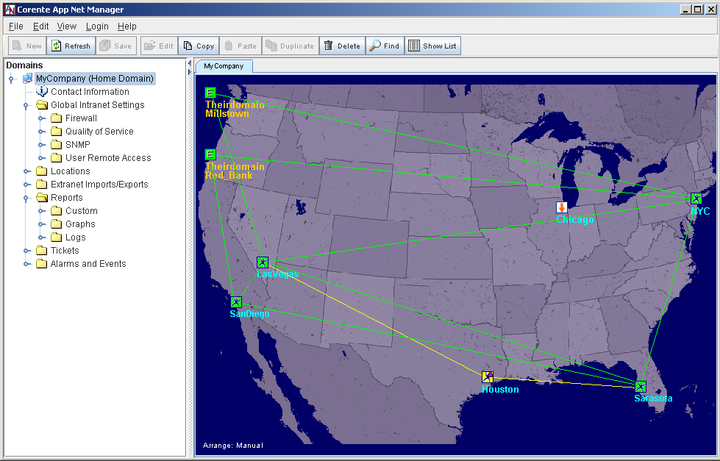
The Corente App Net Manager is a secure application you can use to create, configure, modify, delete, and monitor the components of your application network.The main interface is set up like Microsoft Windows Explorer. It is divided into two main sections: the domain directory that is displayed on the left side of the screen, and the graphical/list interface that is displayed on the right side of the screen, which changes according to what you select in the domain directory (but always displays the map, accessible via the tab at its top). A menu bar and a tool bar are displayed above these two items.
In general, the interface does not refresh automatically. Location and tunnel status are updated automatically on the map, but other features of App Net Manager require a manual refresh. This can be achieved by selecting the feature or specific item you want to update and selecting the Refresh button in the tool bar. Note that when you want to refresh certain items on the interface, you must instead select the category or subcategory of that item to Refresh it. For more information about the tool bar, refer to Section 1.1.8, “Tool Bar”.
Occasionally, data must be loaded onto the interface before you can view it. To view any data marked "Not Loaded", simply select the item and wait for the data to load.
Occasionally, your Corente Virtual Services Gateway may lose contact with the Corente Services Control Point (SCP). This will not affect the status or the security of your Location connections. A disabled Corente SCP connection will only affect your ability to access the App Net Manager application, which will be unavailable until the Corente SCP connection is re-established. The Location gateway will automatically attempt to re-establish its connection to the Corente SCP at regular intervals until it is back up. If you cannot access App Net Manager, try again in a few minutes before following any troubleshooting procedures.
Whenever you add, delete, or modify your domain with the App Net Manager, your changes are loaded locally, but they are not necessarily committed at the Corente Services Control Point (SCP) and distributed to the affected Location(s). To make your changes permanent, you must select Save from the File menu (for more information on the App Net Manager menus, refer to Section 1.1.7, “Menus”) or the Save button on the tool bar (for more information on the App Net Manager tool bar, refer to Section 1.1.8, “Tool Bar”) to commit your changes and propagate them to the affected domains, Locations, or remote users (if applicable). You must save your changes before you exit App Net Manager or your changes will be lost.
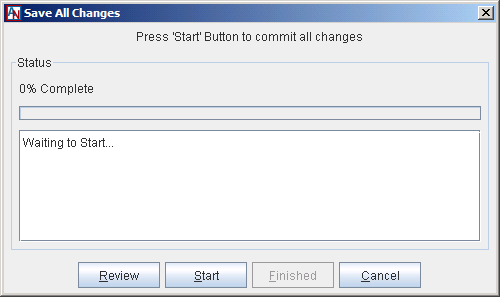
When you select Save, a Save All Changes window is displayed.
This window allows you to:
Review: Select this button to review the changes that have been made by your administrator account since login (or the last time you saved).
Start: Select this button to begin saving all your changes.
Finished: Select this button when App Net Manager has completed saving all your changes.
Cancel: Select this button to close the window without saving your changes.
Whenever you have made changes and have not saved them yet, the corresponding category
on the domain directory will have a red star on the icon ( ![]() ) to remind you about the unsaved changes.
) to remind you about the unsaved changes.
- 1.1.6.1 Map Symbols
- 1.1.6.2 Map View Commands
- 1.1.6.3 Isolating a Location Icon
- 1.1.6.4 Load and Refresh Alarms
- 1.1.6.5 View All or Problems Only
- 1.1.6.6 View Tunnels in Active, Down, Alert or Configuration Alert Status
- 1.1.6.7 Changing Maps
- 1.1.6.8 Manually Arranging Icons
- 1.1.6.9 Automatically Arranging Icons
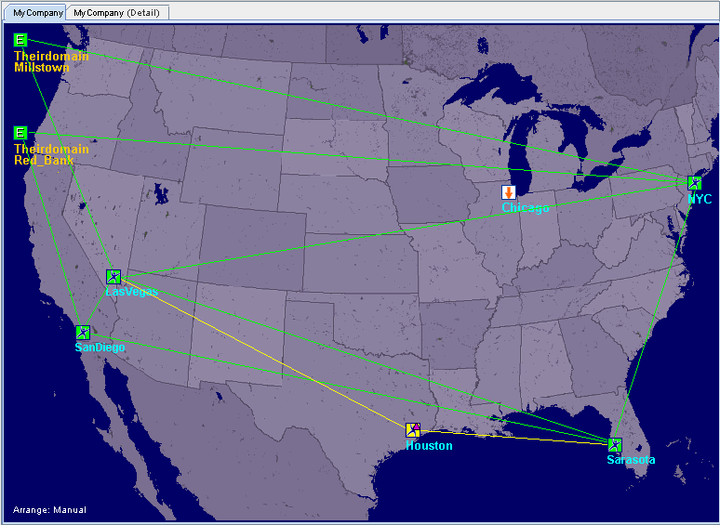
When you log into App Net Manager, you are presented with a map that allows you to view your Corente network at a glance. This map presents a geographical representation of your Corente network overlaying a map, allowing you to monitor Location and tunnel status of each Location gateway. An example of the map is shown below.
The map displays your Corente domain with a set of icons and lines in various colors that represent the state of your Locations and tunnels. Each Location in your Corente network is represented by its Location name and an icon.
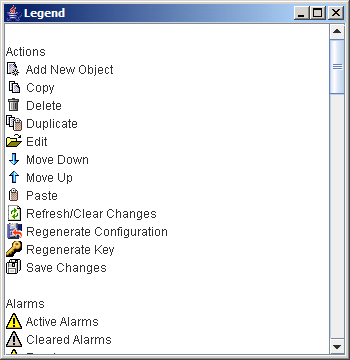
To access a legend that describes the icons used to represent your Locations and the colors used to describe the state of Locations or tunnels, as well as other icons used throughout App Net Manager, open the View menu at the top of App Net Manager and then select Legend.
The table below presents the meaning of each Location icon.
Table 1.1 Guide to Location Icons
Icon | Meaning | Explanation |
|---|---|---|
Intranet Location | This icon designates a Location within your own Corente network | |
Extranet Location | This icon designates a Location that has been imported into your Corente network from another company’s Corente network using the Extranet option. (For more information, refer to Alarm Email Suppression.) | |
Location available for download | This icon designates a Location gateway that has just been added to your Corente network, but its personality file has not yet been downloaded to a floppy disk for installation. This section contains the following options:
| |
Corente Client | This icon designates a Corente Client. |
The table below presents the meaning of each Location icon color.
Table 1.2 Guide to Icon Colors
Icon Color | Meaning | Explanation |
|---|---|---|
Firewalled | An icon with a circular red border means that the Location gateway appears to be operating behind a firewall that restricts access to TCP port 551. It is not possible to create a tunnel between two such restricted Location gateways. | |
Active | This color indicates that the Location has a secure connection with the Corente SCP. It is currently active on the Corente network. | |
Inactive | This color indicates that the Location is currently inactive on the Corente network. The Location gateway has contacted the Corente SCP at least once since it was first activated, but does not currently have a connection with the Corente SCP. The Location gateway has been powered off or is being rebooted safely. | |
Downloaded | This color indicates that the personality file for this Location gateway has been downloaded to a floppy disk, but the Location gateway has not been activated. This could mean that the Location gateway has not yet been installed or started up, or it could mean that the Location gateway was unable to contact the Corente SCP. | |
Disconnected | This color indicates that the Location gateway has suddenly become disconnected from the Corente SCP, without being powered off safely. This could indicate an interruption in Internet service at that location or a problem with the Location gateway hardware. | |
Denied | This color indicates that Corente has determined this Location to be invalid. The Location gateway will be unable to connect to the Corente SCP and your network. If your Location gateway is denied, contact Customer Operations for more information. | |
Upgrade Scheduled | When a purple triangle appears on a Location icon, an upgrade has been scheduled for the Location gateway by Customer Service. | |
Alarm | When a yellow triangle appears on a Location icon, the Location gateway is generating an Active Alarm. |
The table below presents the meanings of each line color.
Table 1.3 Guide to Line Colors
Line Color | Meaning | Explanation |
|---|---|---|
Green | Active | The tunnel between the Locations is secure and active. |
Yellow | Pending | The tunnel between the Locations is inactive. Yellow indicates that the tunnel is currently in the process of being brought up or being brought down. |
Red | Alert | A problem has occurred with the tunnel. An alarm notification identifying the problem has been sent to the email address that you specified at registration. |
Black | Configuration Alert | The Location partners are able to communicate with each other—however, the User Groups that each partner is exporting to the other contain conflicting address spaces. You must use one of the NAT options on the Location form to remap one of the User Groups to a new address space or manually reconfigure one of the conflicting subnets. |
Several commands are available in App Net Manager to customize your map or make administration tasks easier.
Clicking the name of a Location in the domain directory (for more information about the domain directory, refer to Section 1.1.9, “Domain Directory”) will isolate that Location on the right side of the interface and show only the tunnel connections between that Location and its partners, in a hub-and-spoke format. This interface provides several options to make it easier to view a Location and its partners. When you right-click the background, a menu appears with the following options:
View: When you highlight View, you can toggle on/off a variety of different statuses to determine what will be displayed on the interface. To select all toggles at once, choose All. The toggles show the following:
Unadministered Partners: Toggle display of possible partners in the domain that have not been partnered with this Location.
Access Partners: Toggle display of two special partners (LAN to Location Access and LAN to Internet Access). These "partners" allow computers on the LAN to access the Location server for access to Gateway Viewer and provide a firewall between the LAN and the Internet, respectively.
Intranet Partners: Toggle display of partners within the domain.
Extranet Partners: Toggle display of partners from other domains (meaning extranet partners).
Client Group Partners: Toggle display of client groups who have been partnered with the Location.
Partial Partners: Toggle display of possible partners who have been enabled as partners on only one side of the partnership. Location partnerships are reciprocal and must be defined on both sides of the partnership to establish a connection.
Active Tunnels: Toggle display of partners who currently have an active tunnel to the Location.
Down Tunnels: Toggle display of partners whose tunnel to the Location is currently down.
Alert Tunnels: Toggle display of partners whose tunnel to the Location is currently in an alert state.
Configuration Alert Tunnels: Toggle display of partners whose tunnel to the Location is currently in a configuration alert state.
Choose Color: Select this option to open a dialog box that allows you to choose a new background color for this interface. The color that you choose will apply whenever you view a Location and its partners for this domain.
Set Default Color: Save the current background color as your default background color.
Alarms are not loaded or refreshed automatically in App Net Manager. To view alarms on your map when you log into App Net Manager:
Right-click anywhere on the map but a Location icon.
Highlight Alarms.
Select Load Alarms.
Alarms data will be loaded onto your map so that you can see what Locations are
generating alerts. Locations that are generating alerts will display a yellow alarm image
on their icons ( ![]() ).
).
If you have already loaded alarms, are monitoring the status of an alarm in the domain, and would like to view the most up-to-date alarm data on the interface:
Right-click anywhere on the map but a Location icon.
Highlight Alarms.
Select Refresh Alarms.
The most up-to-date alarms data will be displayed on your map and in the domain directory.
For more information about alarms in App Net Manager, refer to Section 1.11, “Alarms and Events”.
If you would like to isolate problems within your domain and view on your map only
those tunnels in the Down, Alert, or
Configuration Alert states and Locations that are currently in the
Denied ( ![]() ) or Alert (
) or Alert ( ![]() ) states:
) states:
Right-click anywhere on the map but a Location icon.
Highlight View.
Select Problems Only. (By default, the map will show All.)
This setting allows you to easily monitor issues within your domain. When Problems Only is selected, any Location or tunnel within your domain that is currently experiencing a problem will be displayed on the map.
To return to displaying all Locations and tunnels:
Right-click anywhere on the map but a Location icon.
Highlight View.
Select All.
If you would like to your domain map to display only those tunnel connections that are currently maintaining certain status(es):
Right-click anywhere on the map but a Location icon.
Highlight View.
Select or deselect any of the following statuses (by default, all of these will be selected):
Active Tunnels
Down Tunnels
Alert Tunnels
Configuration Alert Tunnels
These settings allow you to isolate certain tunnel conditions within your domain in order to view them on your map more easily.
The background map can be toggled between a map of:
the continental United States (default)
Asia/Australia
Europe/Asia
Europe
Japan
the world
custom image
Choose the map that best represents the geographic location of your domain. Your choice will be saved for future administration sessions. To switch between these maps:
Right-click anywhere on the map but a Location icon.
Highlight View, then highlight Set Background.
Select any map from the list that is displayed.
If none of the default maps suit your particular domain, you can provide your own custom background image in App Net Manager. To display a custom image to your domain's App Net Manager interface, open the Domain Preferences window and then select the General tab. You can point to a new image and change certain display colors in the Custom Map Image section of the General tab (see Section 1.7, “Manage Your Corente Account and Domain”.
To display the custom image as your domain map background, right-click the domain map. On the menu that appears, select View, then select Set Background, and then select Custom. The coordinates of each Location icon on the map will be maintained based on the default map size of 795 x 555 pixels, but scaled appropriately based on the custom image aspect ratio. This means that switching between default maps and the custom map should not affect icon placement. If no URL is specified on this tab or the image's URL cannot be loaded, then a message describing the problem will appear in the upper left corner of a blank map background.
Changing the map image affects the map for all administrators of the domain. Remember that only one set of coordinates is stored for each Location. When you switch to a new map, the position of each icon on the interface will remain the same. You will have to move the icons manually to reflect their geographic location on the new map image (see Section 1.1.6.8, “Manually Arranging Icons”).
You can manually position the Location icons on your map to better reflect the physical locations of your Locations. You may move any icon except those that designate an imported Location. Icons for imported Locations will always appear along the left-hand side of the map.
Hold down the
Ctrlkey.Click a Location icon.
When the compass face appears around the icon, drag it to a new location and release the mouse button.
Only one set of coordinates is stored for each Location. If you move an icon and then switch maps (see Section 1.1.6.7, “Changing Maps”), the icons will retain their position from the previous map. To maintain a similar position, you will have to move the icons again.
You can use several options to arrange your Location icons on the map according to the method that you prefer. To access these options:
Right-click anywhere on the map but a Location icon.
Highlight View, then highlight Arrange Locations.
Select any of the following options (by default, the Manual option will be selected):
Manual: This is the default setting. When selected, you can move any icon to any position on the map. To manually position an icon, refer to Section 1.1.6.8, “Manually Arranging Icons”.
When a Location is created with a valid zip code and you are using the U.S. map as the map, the icon will be placed initially at the zip code site. Otherwise, icons will be tiled on the right side of the map. Extranet Location icons will be tiled on the left side of the map and cannot be moved.
By Zip: This option is only available when using the U.S. map. The icons will be arranged according to the zip codes on the Location form for each Location.
When created, Locations that do not have a valid zip code will be tiled on the right side of the map. Extranet Location icons will be tiled on the left side of the map. You cannot manually reposition an icon when this option is selected. If you are using this mode and change your background from the U.S. map to another map, then the mode will switch to Manual arrangement.
Auto: This option will tile the icons along the top of the map, in case-sensitive alphabetical order. Intranet Location icons will appear before Extranet Location icons. As with the By Zip option, users cannot reposition icons when this option is selected.
The menus at the top of the interface provide access to controls for App Net Manager.
Save: Whenever you add, delete, or modify your domain with App Net Manager, your changes are loaded locally, but they are not necessarily committed at the Corente Services Control Point (SCP). To make your changes permanent, you must select Save. For more information about the Save feature, refer to Section 1.1.5, “Saving Your Changes”.
Add New Item: This option changes according to the category of item you have highlighted in the domain directory. It allows you to add a new item for that category.
Wizards: The Wizards feature provides step-by-step instructions and explanations that allow you to easily add one of the following to your domain:
Location: Use this wizard to add a new Location to your domain.
Download Location: Use this wizard to download the personality file for a new Location.
Partner Locations: Use this wizard to connect two Locations as partners.
Tube: Use this wizard to further define an existing connection between Location partners. Tubes allow you to identify a User Group or application on one side and a User Group or application on the other that are allowed to communicate, and firewall rules that will be placed between them.
For more information about the wizards, refer to the Corente Services Policy Definition and Provisioning manual .
Exit: Select this option to logout and exit App Net Manager.
Edit: If you would like to modify the personality of a certain item in your domain (e.g., a Location, Corente Client, administrator account, etc.), highlight that item and select this option. The Edit option will be available only if the item that you have selected can be edited. Certain items within the domain (e.g., certain Firewall Policies) are included by default and cannot be modified.
Refresh/Clear Changes: In general, App Net Manager does not refresh automatically. To view the most up-to-date status or data about certain items in your domain, select the item and then select this option. This option is also useful when multiple administrators are modifying the domain at once. In addition, if you have made any changes in App Net Manager without saving them, this option will discard your uncommitted changes. Note that when you want to refresh certain items on the interface, you must instead select the category or subcategory of that item to Refresh it.
Copy: The Copy and Paste options mimic the drag and drop functions in App Net Manager. If you select an object in the domain directory and then select Copy, this mimics the drag function. You can then select another object and select Paste, which mimics the drop function. For more information about drag and drop, refer to Section 1.1.9.1, “Drag and Drop”.
Paste: The Copy and Paste options mimic the drag and drop functions in App Net Manager. If you select an object in the domain directory and then select Copy, this mimics the drag function. You can then select another object and select Paste, which mimics the drop function.
Duplicate: Administering a domain can be a tedious process if you are adding multiple items with similar personalities. The Duplicate option allows you to add a new item by selecting an existing item and duplicating its personality. You must choose a name for the new item, and may need to modify certain personality variables to make the item unique. App Net Manager will let you know what modifications you must make.
Delete: If you would like to delete a certain item from your domain (e.g., a Location, Corente Client, administrator account, etc.), highlight that item and select this option. The item will be permanently removed from your domain once you save your changes to the domain. The Delete option will be available only if the item that you have selected can be deleted. Certain items within the domain (e.g., certain Firewall Policies) are included by default and cannot be removed.
Delete Cookies: Certain preferences are saved by the App Net Manager interface per administrator login account, such as dialog box sizes, position of the window, and display of the tool bar. If you would like to clear these preferences for your account and return to the default settings, select this option.
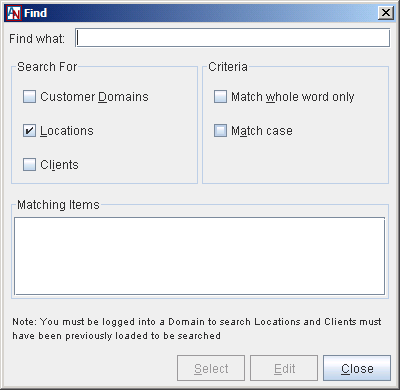
Find: If you would like to locate specific items within your domain, select this option. The Find interface will be displayed.
Use the Find interface as follows:
Search for: Select one or more of the following options, depending on what you are trying to locate: Customer Domains (if you are viewing multiple domains at once), Locations, and/or Clients (Corente Clients only). You must be logged into a domain to search it. Locations and Clients must have been previously loaded in order to be searched.
Criteria: Select Match whole word only if you would like items to appear only when a whole word in their names match what you have entered. Select Match case if you would like items to appear only when the case of their names' letters match what you have entered.
After selecting the appropriate options, begin entering the name of the item you would like to locate in the Find what field. As you enter text, located items will be listed in the Matching Items section. Selecting an item and clicking Select will find and select that item for you in the domain directory. Highlighting an item and clicking Edit will open the personality form for that item (Locations and Clients only).
Click Close to close the window when you are finished.
Logout [administrator name]: Select this option to log out of App Net Manager without exiting the program.
Change Password: Select this option to change the password for this administrator account.
Legend: Select this option to display a legend that displays the definitions of all icons and colors that are used in App Net Manager. For more information about the legend, refer to Section 1.1.6.1, “Map Symbols”.
Tool Bar: Toggles display of the tool bar at the top of the interface. For more information about the tool bar, refer to Section 1.1.8, “Tool Bar”.
Graphical Views: If applicable, toggle between Graphical View and List View for the right side of the interface.
The tool bar provides easy access to many options for App Net Manager that are also available from the menus at the top of the interface.
File menu options:

Edit menu options:

Wizards:

For more information about the menus and these options, refer to Section 1.1.7, “Menus”.
To toggle display of buttons on the tool bar, right-click anywhere on the tool bar. The menu will display the following options:
File Tool Bar: Toggle display of the File menu options on the tool bar.
Edit Tool Bar: Toggle display of the Edit menu options on the tool bar.
Wizard Tool Bar: Toggle display of the Wizards on the tool bar.
Hide Button Text: Toggle display of button names.
Hide Tool Bar: Toggle display of the entire tool bar. You can show the tool bar again by selecting Tool Bar in the View menu.
By default, App Net Manager displays File and Edit options.
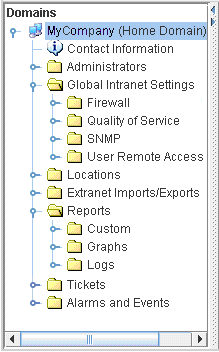
The domain directory of App Net Manager lists each domain that you opened from your administrator account at login.
When you open a domain name in the directory, the following options and categories are displayed:
Contact Information: The Contact Information feature is used to provide Corente with contact and billing information for your organization. By default, when you edit Contact Information, the information you entered during registration will appear on this window, but you can modify it if you would like. For more information about this window, refer to the Corente Services Planning manual.
Administrators: The Administrators feature is used to add new administrators for your domain. For more information, refer to the Corente Services Planning manual.
Global Intranet Settings: When you open this category, the following subcategories are displayed:
Firewall: Open this subcategory to display the Firewall Services and Firewall Policies subcategories. Use these features to create, edit, and manage firewalls for User Groups of your Locations. For more information about these features, refer to the Corente Services Policy Definition and Provisioning manual.
Quality of Service: Use this feature as in previous releases to create, edit, and manage Quality of Service (QoS) entries for use with your Locations. For more information, refer to the Corente Services Policy Definition and Provisioning manual.
SNMP: Open this subcategory to display the SNMP Users and SNMP Views subcategories. Use these features to manage SNMP monitoring of your domain. For more information about configuring SNMP for use with Corente, refer to Section 1.8, “SNMP”.
User Remote Access: Open this subcategory to display the following subcategories:
Client Administration: Open this subcategory to display the following subcategories: Clients and Client Groups. Use these features as in previous releases to create, edit, and manage Corente Client accounts and group them together to partner them with Locations. For more information, refer to the Corente Services Client manual.
SSL Administration: Open this subcategory to display the following subcategories: SSL Services, SSL Clients, and SSL Authorized Groups.Use these features to create, edit, and manage Corente mobile user accounts and group mobile users together to partner them with Locations. For more information, refer to the Corente Services SSL Client manual.
Mobile User Administration: Open this subcategory to display the following subcategories: Mobile Users and Mobile User Groups. Use these features as in previous releases to create, edit, and manage SSL Services, Corente SSL Client accounts, and group SSL Clients together to partner them with Locations. For more information, refer to the Corente Services Mobile User manual.
Locations: Opening this category will display all of the Locations in your domain and those imported into your domain from another domain (through an extranet). Use this feature to create, edit, and delete Locations in your domain. For more information, refer to the Corente Services Policy Definition and Provisioning manual.
Opening a Location in the domain directory will display a set of subcategories that allow you to view and change the personality of that Location. In general, these subcategories correspond to screens on the Location's Location form.
Administered Clients
Administered Mobile Users
Applications
External Authentication
Failover Locations
Installed Specials
Monitored Servers
Network Interfaces
Partners
Routes
SNMP
SSL Remote Access
User Groups
Right-clicking a specific Location will display a menu of options, like the Gateway Menu in previous releases.
Extranet Imports/Exports: Use this feature to create, edit, and delete extranet partnerships with other domains. For more information, refer to Section 1.9, “Create an Extranet”.
Reports: Open this category to display the following subcategories: Custom, Graphs, and Logs. Depending on the level of permissions that your administration account has been granted, the Reports category may not appear in the domain directory. For more information, refer to Section 1.10, “Reports”.
Alarms and Events: Alarms and events allow you to monitor the health of your application network. Depending on the level of permissions that your administration account has been granted, the Alarms and Events category may not appear in the domain directory. For more information, refer to Section 1.11, “Alarms and Events”.
The drag-and-drop functionality of App Net Manager allows you to edit personalities, duplicate existing items, and create new connections with a click of the mouse. Simply click on an item in the domain directory with your mouse, drag that item over another item, and release when you see the plus symbol (+). App Net Manager will confirm your action in a dialog box and launch a wizard or configuration screen, if applicable.
There are sometimes restrictions as to whether an object will accept a drop of another object. For example, the objects must be from the same domain or the object accepting the drop must have been previously loaded on the interface. The objects also must have the correct permissions (i.e., if the Policy Use of a Firewall Policy prevents a Location from using that policy, you cannot drag and drop that Firewall Policy onto one of the Location's User Groups.)
While more specific drag and drop situations are described in applicable sections of this help file, in general, drag and drop can be used to:
Create connections (for example, dragging and dropping one Location onto another Location to launch the Partner Locations Wizard)
Add an item to a group of items (for example, dragging and dropping a Corente Client onto a client group to add it to that group)
Add rules or properties of one item to another similar item (for example, dragging and dropping address ranges from one User Group onto another User Group)
Duplicate an existing item onto its category name to duplicate that item (for example, dragging and dropping a Location onto the Locations category to duplicate that Location)
The Copy and Paste options in the Edit menu and on the tool bar provide the same functionality as drag and drop. If you select an object and then select Copy, this mimics the drag function. You can then select another object and select Paste, which mimics the drop function. These options allow you to drag and drop when objects are too far away from each other in the domain directory.
There are several options available by right-clicking a Location icon (either on the map or in the Locations category of the domain directory). The availability of each of these options depends upon the current status of the Location server. These options include:
Edit: This option allows you to view or modify the Location form of a Location after it has been added to your view. This form contains personality settings unique to the Location that you chose when you created the Location. For more information, refer to Section 1.2, “Edit Location”.
Copy: The Copy and Paste options mimic the drag and drop functions on the interface. If you select an object in the domain directory and then select Copy, this mimics the drag function. You can then select another object and select Paste, which mimics the drop function.
Duplicate: Administering a domain can be a tedious process if you are adding multiple Locations with similar personalities. The Duplicate option allows you to add a new Location by selecting an existing Location and duplicating its personality file. You must choose a name for the new Location, and may need to modify certain personality variables to make the Location unique. App Net Manager will let you know what modifications you must make.
Delete: This option will remove a Location from your domain. For more information, refer to Section 1.3, “Delete Location”.
Schedule Upgrade: When a small purple triangle appears on a Location's icon on the map or in the domain directory (
 ), Customer Care has scheduled an upgrade for that Location at some
point in the future. To view or modify the date and time when this upgrade will occur,
select this option. This will display the Schedule Upgrade window for the Location. For
more information, refer to Section 1.4, “Schedule Upgrade”.
 Refresh / Clear Changes: Select this option to display the most up-to-date data about this Location in App Net Manager. This option is useful, for example, when multiple administrators are modifying the domain at once, or you want to view the up-to-the-minute status of alarms in your domain. In addition, if you have made any changes in App Net Manager without saving them, this option will discard the uncommitted changes.
Download Location: This option is only available when you have created a new Location, but have not yet downloaded the personality file. A Location that appears on your view as this icon (
 ) must be downloaded to be activated on your domain. For more
information, refer to the Corente Virtual Services Gateway Hardware Preparation and Deployment manual.
 Regenerate Key: This option will regenerate the key used to create secure and private tunnels between your Locations and the Corente SCP. For more information, refer to Section 1.5, “Regenerate Key”.
Regenerate Configuration: When an activated Location is in the Disconnected (
 ) or Inactive (
  ) state, this option will return the Location's status in
App Net Manager to the Download state (
  ) so that the personality file for this Location can be
re-downloaded and re-installed. For more information, refer to Section 1.6, “Regenerate Configuration”.
 Alarms: Alarms are not refreshed automatically in App Net Manager. If you are monitoring the status of a Location that is generating an alarm and would like to view the most up-to-date alarm data for that Location, right-click the Location icon and select Alarms/Load Alarms. The most up-to-date data for this Location will be displayed on your map and in the domain directory. For more information about alarms, refer to Section 1.11, “Alarms and Events”.


