
The Simple Network Management Protocol (SNMP) is a protocol used to monitor network performance and certain aspects of network devices. You can use SNMP v1, v2, or v3 to monitor your Corente Virtual Services Gateways and each of their tunnel connections.
To administer SNMP for use with Corente, you must complete the SNMP tab and the Alerts tab in the Location form of each Location gateway that you would like to monitor. You must also use two tools that are available in the SNMP category of the App Net Manager domain directory: SNMP Views and SNMP Users.
To determine how you will configure SNMP for use with your Corente network, review the following summary of the procedure you will need to complete:
Identify the SNMP MIBs and MIB objects that provide the information you need to monitor.
You can view the MIBs that are available for use with Corente Virtual Services Gateways by accessing Gateway Viewer and opening the Download page. Each MIB is listed on this screen with a corresponding text file that you can download. This text file contains the definitions of all objects (i.e., SNMP variables) within that MIB. (For more information about the Download screen in Gateway Viewer, refer to Section 2.19, “Download”.
After identifying the MIBs and/or MIB objects that provide the information you need, you must then create logical groups of these MIBs and MIB objects on the SNMP Views interface (see Section 1.8.2, “SNMP Views”.
Identify the Corente Virtual Services Gateways you will be monitoring (if using SNMP v1 or v2) or the users who will be monitoring the Corente network (if using SNMP v3).
If using SNMP v1 or v2, assemble these Locations into logical groups and give each group a name. Administer an SNMP Community for each group (this requires configuration on the machine that will be performing the polls/receiving the traps).
If using SNMP v3, administer user accounts on the SNMP Users interface (see Section 1.8.3, “SNMP Users”.
Identify the IP addresses of the machines that will be performing the SNMP queries/receiving the SNMP traps (i.e., the SNMP Managers). Create User Groups on the User Group tab of the Location form for these machines. For SNMP Managers that are receiving traps, they must each be placed in their own User Group.
You must make sure that the User Groups containing the SNMP Managers can access this Corente Virtual Services Gateway. This may require the configuration of special tubes to this Location.
To allow local computers on the Location gateway’s LAN the ability to monitor this Location gateway, modify the LAN to Location tube on the Partners tab of the Location form or with the Tubes Wizard.
To allow remote computers behind a Location partner the ability to monitor this Location gateway, you can create a specific tube from a remote User Group to the local Location LAN Address.
Any Firewall Policy that is configured between an SNMP Manager's User Group and this Location gateway must allow the SNMP Firewall Service over the connection.
For more information about configuring tubes, refer to the chapter entitled “Define and Provision Security, Connectivity and QoS” of the Corente Services Policy Definition and Provisioning manual.
Combine the information compiled in the previous steps and decide which views must be used to access which SNMP Communities (if using SNMP v1 or v2) and/or which SNMP Users require the use of which views (if using SNMP v3). Also, decide which SNMP Managers and their respective User Groups need access to which communities (v1/v2) or which users will be using each SNMP Manager and its respective User Group (v3).
Complete the configuration of SNMP by providing this information on each SNMP tab of the Location form for each Location gateway that will be monitored.
Finally, if you are using SNMP traps, you must enable the alerts you would like traps sent for on the Alerts tab of the Location form for each Location.
The SNMP Views feature allows you to define groups of MIBs and MIB objects that can later be allowed or denied on each Corente Virtual Services Gateway (on the SNMP tab of the Location form ) or SNMP User, to limit how SNMP Managers can query or monitor the Location gateway.
To access the SNMP Views feature, open the Global Intranet Settings category of the domain directory, then open the SNMP subcategory, and then select SNMP Views.
When you select SNMP Views, all SNMP Views that have been configured in this domain will be displayed in a table to the right of the domain directory. This table displays:
SNMP View: the SNMP View name
SNMP MIB Subtrees: the SNMP MIB subtree(s) that are included in the view
In Use Locations: whether or not the SNMP View is currently in use by a Location
In Use SNMP Users: whether or not the SNMP View account is currently assigned to a SNMP User account
You can edit or delete any existing SNMP View. To add a new SNMP View, make sure SNMP Views is selected in the domain directory and:
Select the New button in the tool bar.
From the File menu, select Add SNMP View.
Right-click SNMP Views in the domain directory and select Add SNMP View.
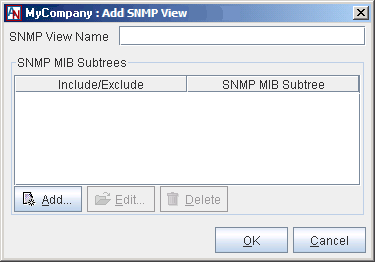
You will be taken to a blank Add SNMP View window.
SNMP View Name: Enter a name for your new view in this field. You may use up to 30 alphanumeric characters. Hyphens and underscores are allowed, but do not use tabs, spaces, or punctuation marks when creating this name.
You can Edit or Delete any existing entries in the table. To add a new entry, click the Add button to display the Add SNMP MIB Subtree window.
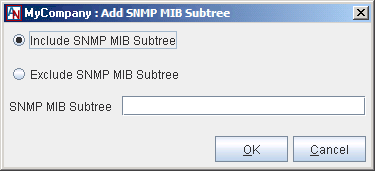
Fill out the following fields:
Include SNMP MIB Subtree/Exclude SNMP MIB Subtree: Select one of these options to include or exclude a MIB (or MIB object) in this view.
SNMP MIB Subtree: Type the name of the MIB (and MIB obect, if applicable) in this field that you are including or excluding in the view. If you are specifying a MIB object, use this format:
MIB name::MIB object name.
When you have completed these fields, click the OK button to store your changes or the Cancel button to close the window without storing your changes.
Each SNMP View can contain multiple entries. When you have completed the definition of your new view, click the OK button to store your changes or the Cancel button to close the window without storing your changes. You must save your changes with the Save button in the App Net Manager tool bar in order for them to take effect.
SNMP v3 requires the use of user accounts to query entities. The SNMP Users feature allows you to add user accounts to your Corente network that can be used to obtain information from a Corente Virtual Services Gateway.
To access the SNMP Users feature, open the Global Intranet Settings category of the domain directory, then open the SNMP subcategory, and then select SNMP Users.
When you select SNMP Users, all SNMP User accounts that have been configured in this domain will be displayed in a table to the right of the domain directory. This table displays:
SNMP User: the SNMP User account name
Authorization Type: the Authorization Type that the account uses
SNMP Views: the number of SNMP Views that have been assigned to them
In Use by Traps: whether or not the SNMP User account is currently in use by a Location
You can edit or delete any existing user. To add a new user, make sure SNMP Users is selected in the domain directory and:
Select the New button in the tool bar.
From the File menu, select Add SNMP User.
Right-click SNMP Users in the domain directory and select Add SNMP User.
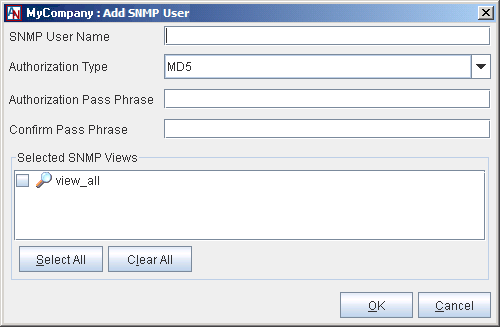
You will be taken to a blank Add SNMP User window.
Fill out this window as follows:
SNMP User Name: Enter the username for this user. You may use up to 30 alphanumeric characters. Hyphens and underscores are allowed, but do not use tabs, spaces, or punctuation marks when creating this name.
Authorization Type: Choose the type of authentication for SNMP users that is being used on your LAN. You can choose either MD5 or SHA.
Authorization Pass Phrase: Enter the pass phrase for this user.
Confirm Pass Phrase: Re-enter the pass phrase to confirm it and avoid mistakes.
Selected SNMP Views: All views that you have created with the SNMP Views feature will be listed. Select the checkbox beside the view that you would like to assign to this user. Select as many views as you would like to assign. Select All will select all views in this list while Clear All will clear all of your current choices.
When you click the OK button and then save your changes with the Save button in the App Net Manager tool bar, the new user will be added to the SNMP Users list in the domain directory.
To use SNMP to query a Corente Virtual Services Gateway, you must access that Location’s Location form (see Section 1.2, “Edit Location”. On each form, you must complete the SNMP tab. This tab allows you to configure how SNMP will be used to retrieve information about this Corente Virtual Services Gateway and its tunnel connections.
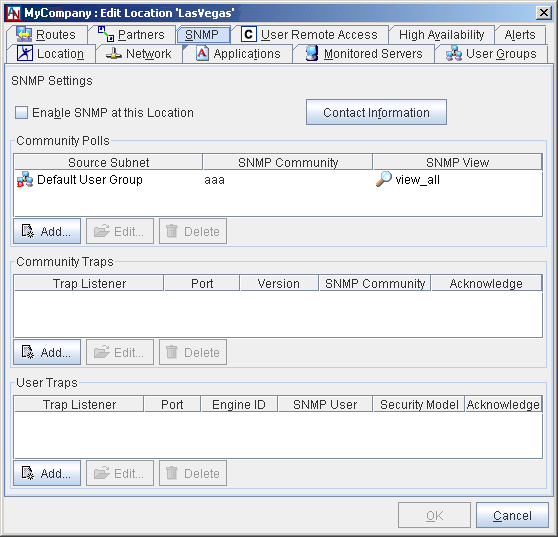
To configure SNMP for this Location, fill out this tab as described in the following sections.
Enable SNMP at this Location: When this option is selected, the Location gateway will become an SNMP-agent and will respond to SNMP 'get' requests to its LAN IP address. It can also be configured to generate SNMP traps that provide alerts about certain alarms and events on the Location gateway.
When SNMP is enabled, click the Contact Information button to fill out contact information for this Location.
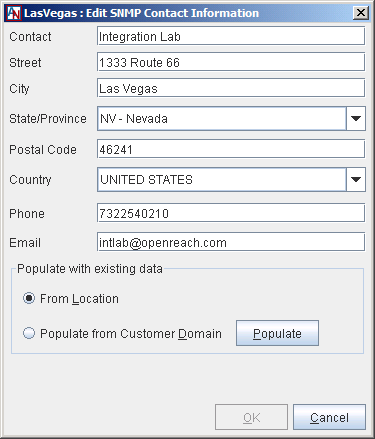
You can choose to populate the fields with existing data from the Location tab for this Location or from the Contact Information screen for this domain by selecting the corresponding option and selecting the Populate button. Otherwise, you can fill out the fields manually:
Contact: Enter the name of the contact for this Location.
Street: Enter the street address of the contact.
City: Enter the city where the contact is located.
State/Province: Enter the state/province where the contact is located, if applicable.
Postal Code: Enter the postal code of the contact, if applicable.
Country: Enter the country where the contact is located.
Phone: Enter the phone number of the contact.
Email: Enter the email address of the contact.
Click OK to store your changes when you are finished.
The tables on the SNMP tab list all of the Community Polls, Community Traps, and User Traps that you have configured for this Location.
SNMPv1 and SNMPv2 use Community Polls to monitor servers. These polls can also be used to poll this Location gateway. This section lists all of the community polls that have been configured for this Location gateway. You can Edit or Delete any existing polls.
To add a new community poll, select Add.
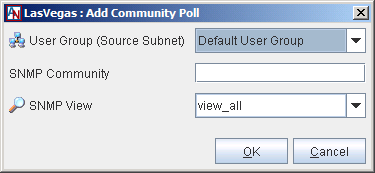
Fill out the screen as follows:
User Group (Source Subnet): Select a User Group that will be allowed to poll this Location gateway with SNMP v1 or v2 "get" requests to its LAN IP address. You may have to configure special tubes to this Location gateway containing this User Group.
SNMP Community: If SNMP communities are in use in your implementation of SNMP, enter the community name for this Location in this field. An SNMP Community name functions like a password, because all queries to this Location must use this community name.
SNMP View: Select a view from this list that specifies what MIBs and MIB objects can be retrieved by the User Group (Source Subnet).
When you have completed these fields, click the OK button. This poll definition will be added to the Community Polls list.
SNMPv1 and SNMPv2 can also use Community Traps to monitor servers. This Location can be configured to send community traps to the SNMP Manager. This section lists all of the community traps that have been configured for this Location. You can Edit or Delete any existing traps.
To add a new community trap, select Add.
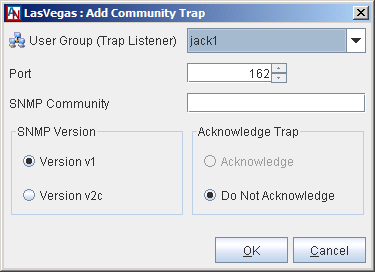
Fill out the screen as follows:
User Group (Trap Listener): Select a User Group that will be allowed to listen to this Location to receive SNMPv1/v2 traps. This User Group must contain only one host. You may have to configure special tubes to this Location gateway containing this User Group.
Port: Enter the port number on the User Group (Trap Listener) to which the Location will send the SNMPv1/v2 traps.
SNMP Community: If SNMP communities are in use in your implementation of SNMP, enter the community name for this Location gateway in this field. An SNMP Community name functions like a password for SNMP, because all queries to this Location gateway must use this community name.
SNMP Version: Choose the SNMP version for this trap. You can choose v1 or v2c.
Acknowledge Trap: Select whether or not the User Group (Trap Listener) will acknowledge receipt of a trap by sending a response packet to the Location gateway. If Acknowledge is selected and the Location gateway does not receive a response from the User Group (Trap Listener) after a trap is sent, the Location gateway will wait 30 seconds and send the trap again. The Location gateway will try three (3) times to send a trap. This option is available only when v2c is selected.
When you have completed these fields, click the OK button. This trap definition will be added to the Community Traps list.
SNMPv3 uses User Traps to monitor servers. This Location gateway can be configured to send user traps to the SNMP Manager. This section lists all of the user traps that have been configured for this Location gateway. You can Edit or Delete any existing traps.
Note that unlike SNMP v1 and v2, SNMP v3 is a user-based system. If you would like to poll Location gateways for information, all that is required to poll any Location gateway on your application network is a username and password that has been administered on the SNMP Users interface that has appropriate SNMP Views administered. However, if you would like to receive traps with SNMP v3, you must complete the fields and options on this screen.
To add a new user trap, select Add.
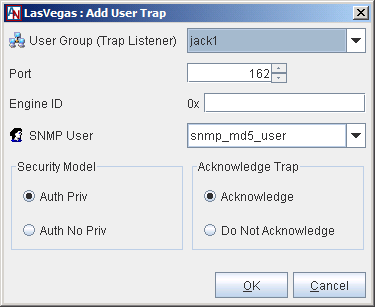
Fill out the screen as follows:
User Group (Trap Listener): Select a User Group that will be allowed to listen to this Location gateway to receive SNMPv3 traps. This User Group must contain only one host. You may have to configure special tubes to this Location containing this User Group.
Port: Enter the port number on the User Group (Trap Listener) to which the Location gateway will send the SNMPv3 traps.
Engine ID: Enter the engine ID of the Trap Listener to help further encrypt the trap. An engine ID is a unique identifier that confirms the identity of both entities when a SNMPv3 trap is sent and received.
SNMP User: Select the user account that will receive these traps.
Security Model: Select the security model that will be used to deliver the traps. Auth No Priv will require authentication of the user, but will not encrypt the traps sent to the SNMP Manager. Auth with Priv will both authenticate the user and encrypt the traps.
Acknowledge Trap: Select whether or not the User Group (Trap Listener) will acknowledge receipt of a trap by sending a response packet to the Location gateway. If yes is selected and the Location gateway does not receive a response from the User Group (Trap Listener) after a trap is sent, the Location gateway will wait 30 seconds and send the trap again. The Location gateway will try three (3) times to send a trap.
When you have completed these fields, click the OK button. This definition will be added to the User Traps list.
After enabling SNMP traps for a Location, you should access the Location's Alerts tab to enable SNMP traps for the conditions about which you would like to be notified.
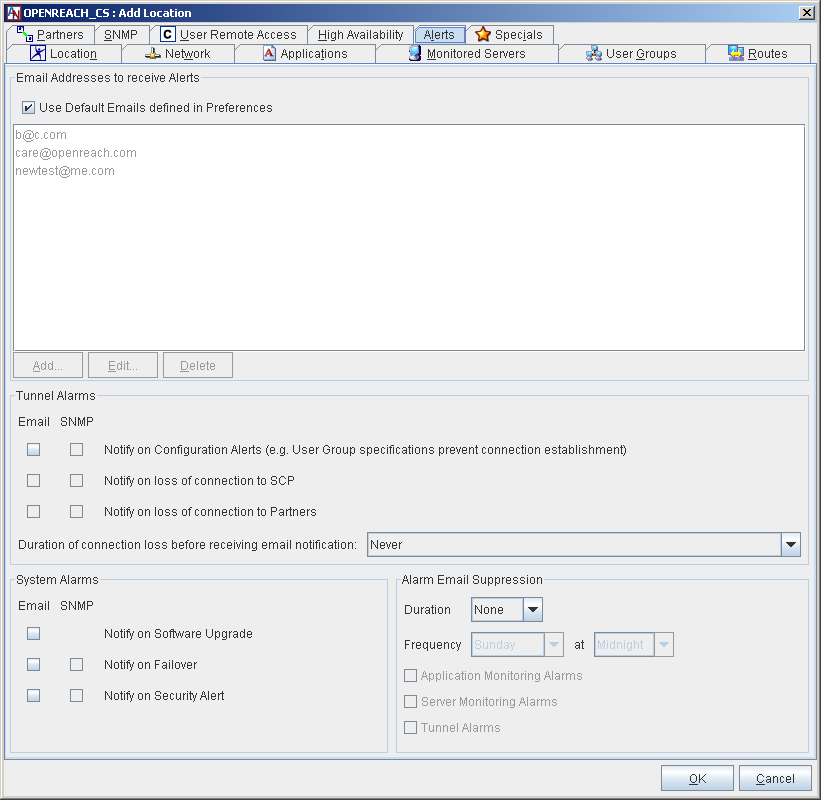
You can enable SNMP traps to be sent for the conditions described in the following sections.
This section contains the following options:
Notify on configuration alerts: When the SNMP box for this condition is selected, the service will send an SNMP trap if a User Group of this Location has a configuration problem. The following configuration problems would cause this alert:
This Location's User Group(s) contain nested subnets (within themselves or within a Location partner's User Group(s)) and the Allow Locations to be configured with nested subnets option is unchecked on the Network tab.
The User Group(s) of this Location overlap with the User Group(s) of one of its partners and no NAT options have been selected by this Location and/or its partners.
The User Group(s) of this Location overlap with the User Group(s) of one of its partners and the wrong NAT options have been set on this Location and/or its partners.
If this Location is configured as a DNS Updater , this Location is unable to update the DNS servers it has been configured to update.
Your Location and its tunnel connections will remain disabled until the configuration problem has been resolved.
Notify on loss of connection to SCP: When the SNMP box for this condition is selected, the service will send an SNMP trap if this Location becomes disconnected from the Corente SCP. The trap will be sent according to the threshold that you have chosen with the Duration of connection loss before receiving email notification pull-down menu.
Notify on loss of connection to Partners: When the SNMP box for this condition is selected, the service will send an SNMP trap if this Location becomes disconnected from any of its Location partners. The trap will be sent according to the threshold that you have chosen with the Duration of connection loss before receiving email notification pull-down menu.
Duration of connection loss before receiving email notification: This option allows you to set the length of time before an SNMP trap notification is triggered, ranging from immediate notification to notification only after 8 hours of downtime. You may also choose to never be notified.
The benefit of immediate notification is that you can respond to any problems as soon as they occur; however, a longer delay prevents unnecessary notifications. For example, your ISP may have an interruption of service for 5 minutes and then re-establish your Internet connection. If you have chosen to be notified immediately, you would receive a trap even though Internet connection is re-established quickly. If you have chosen to be notified in 1 hour, by which time the Location gateway has reconnected to the Corente SCP and its partners, you would avoid this trap.
This section contains the following options:
Notify on Software Upgrade: You cannot choose to be notified of this alarm by an SNMP trap.
Notify on Failover: When the SNMP box is selected for this condition, the service will send an SNMP trap if a hardware switch (when using Redundant Hardware) or traffic failover has occurred for this Location gateway.
Notify on Security Alert: When the SNMP box is selected for this condition, the service will send an SNMP trap if a security alert occurs on this Location or one of its tunnels.
This section contains the following options:
Duration: Select how long the alarm email suppression should last when activated.
Frequency: Select when the alarm email suppression should be activated: daily or on a given day of the week, starting at the time of your choice.
Alarm Categories: Select to which categories of alarms the email suppression applies. When a box for a given category is checked, and the alarm email suppression is active, no email alarms are sent for that category: Application Monitoring, Server Monitoring and/or Tunnel Alarms.