In addition to connecting the world-wide sites of your own organization, you can create connections to other organizations for easy and secure business-to-business transactions. With the Extranet Imports/Exports feature, you can create a secure tunnel from a Location and the computers it serves in your domain to a Location and the computers it serves in the domain of another company (provided that you are both using this service).
When you select Extranet Imports/Exports, all domains involved in an extranet with this domain will be displayed in a table to the right of the domain directory.
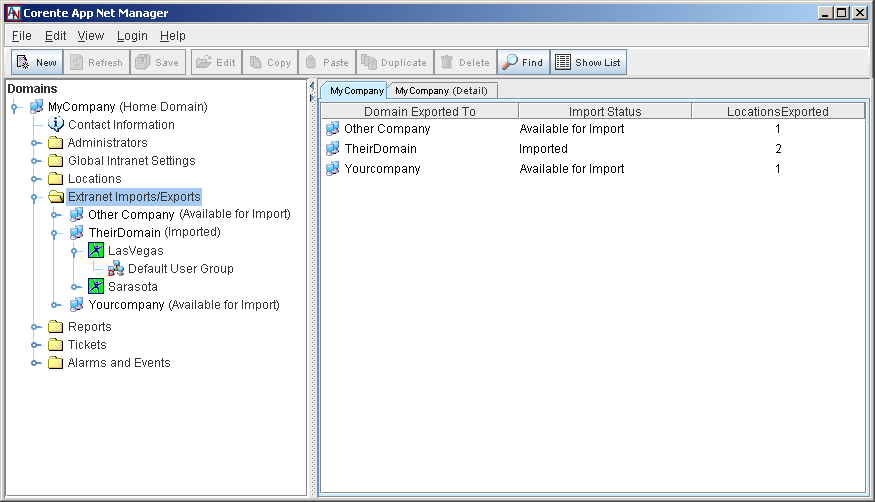
For each Domain Partner, the table lists:
Domain Exported To: the name of the Domain Partner
Import Status: the Domain Partner's Import status. Possible statuses are:
Imported (currently involved in an extranet with one or more of your Locations)
Available for Import (the domain gave permission to your domain for an extranet)
Unavailable for Import (your domain is exporting Locations to the domain, but the domain has not agreed to an extranet connection)
Locations Exported: the number of Locations that you have exported to the Domain Partner
When you open the Extranet Imports/Exports category in the domain directory, a list of all domains involved in an extranet with this domain will be displayed with their Import Status in parentheses. When you select a domain, information about the Domain Partner will be displayed in a table to the right of the domain directory. This table displays:
Export to Domain: the name of the Domain Partner
Domain is Imported: whether or not you have selected to import Locations of the Domain Partner
Exported Location: the Locations that have been exported to the Domain Partner
User Groups: the number of User Groups of each Location that have been exported
Applications: the number of Applications of each Location that have been exported
When you open the branch for a Domain Partner in the domain directory, a list of all the Locations you have exported to that Domain Partner will be displayed. When you open a branch for a Location, a list of all the User Groups or applications from that Location that have been exported to the Domain Partner will be displayed.
The Extranet creation process is a joint procedure. It requires administration by both:
an administrator of your company’s Corente network
an administrator of your Extranet Partner's Corente network
Plan ahead of time which Locations will participate in your Extranet. Only the User Groups/Applications that you export will be able to access the imported User Groups/Applications of your Extranet Partner. Both parties must choose to export the User Groups/Applications that will allow you to connect the appropriate parts of your companies.
Remember that tunnels are always two-way connections. To be granted access to your Extranet Partner's Location, you must allow them to access your own Location as well.
When you create an extranet with another company, you can limit that company's access to specific User Groups or applications within your domain. Furthermore, only the User Groups/Applications that you export will be able to access the imported User Groups/Applications of your partner. This means that it is necessary to plan which User Groups/Applications will participate in your Extranet. Make sure both of you choose to export the User Groups/Applications that will allow you to connect the appropriate parts of your companies.
Finally, remember that Extranet creation is a cooperative process. It requires steps that must be completed in your Corente network as well as steps that must be completed in the Corente network of the other company. Some steps must be completed by both sides of the connection before either of you can move ahead to the next step.
To begin creating an extranet with another domain, you must first choose what Locations and User Groups/Applications that you would like to export to the Domain Partner. Make sure Extranet Imports/Exports is selected in the domain directory and:
Select the New button in the tool bar.
From the File menu, select Add Export.
Right-click Extranet Imports/Exports in the domain directory and select Add Export.
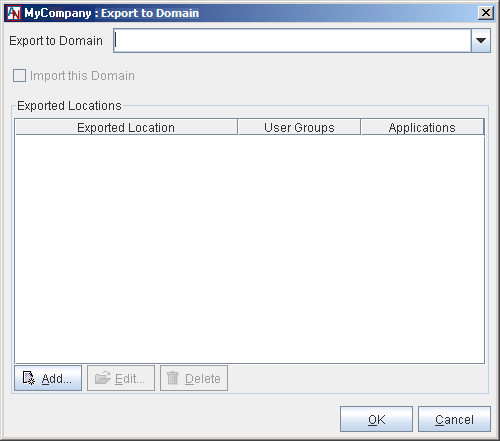
You will be taken to a blank Export to Domain window.
Fill out this window as follows:
Export to Domain: Enter the domain name of the company with which you would like to create an extranet. Make certain that this domain name is typed exactly how the customer entered it during the registration process. For security purposes, the service will not validate the name you supply in this field.
Exported Locations: This list displays all of the Locations that you are exporting to the domain that you entered in the Export to Domain field. You can Edit or Delete existing entries in this list.
To add a new entry, select the Add button. The Export Location window will be displayed.
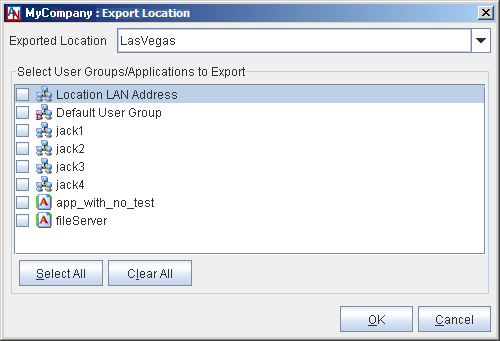
On the screen that is displayed, select a Location from the pull-down menu labeled Exported Location.
The User Groups/Applications configured for that Location will appear in the Select User Groups/Applications to Export list. Select as many of these User Groups and/or applications as you would like to export.
If you choose a User Group, the machines in this User Group will be visible to the other company's Location.
If you choose an application, this application will be available for use by users at the other company's Location.
You can use the Select All button to select all of the User Groups/Applications in the list or the Clear All button to clear your choices. When you are finished, click the OK button to store your changes. You can export as many Locations to your Domain Partner as you would like.
When you are finished choosing Locations and User Groups/application to export to your new Domain Partner, select the OK button to store your changes. You must now save your changes with the Save button in the App Net Manager tool bar in order to continue connecting with your new Domain Partner.
The administrator of your new Domain Partner must fill out the same Add Export form to continue creating an extranet. Once the other administrator has entered your exact domain name and selected the Locations and User Groups/Applications that they will expose in the extranet, you should Refresh your domain in the domain directory. An entry for the new Domain Partner will now be displayed in the Extranet Imports/Exports table with a status of Available for Import.
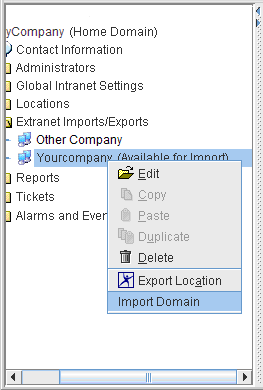
You must now import the domain of the Domain Partner to continue. To do this, make sure the Extranet Imports/Exports branch is open in your domain directory. Right-click the name of your new Domain Partner. In the menu that is displayed, select Import Domain.
By completing this step, you are granting permission to your Domain Partner to access your exported User Groups and applications, and accepting the access that they have granted to you. The administrator of the other domain must also select this option for your domain to establish the extranet.
Click OK to store your changes. Once both you and the other administrator save your changes with the Save button in the App Net Manager tool bar, the extranet will be established. However, no connections between Locations have been established yet. You must continue to form the extranet by partnering together the appropriate Locations, as described in the next section.
After you and your Domain Partner have Imported each other into your respective
domains, icons will pop up along the left side of your map that represent the newly imported
Locations from your Domain Partner (  ). This may take a few seconds to occur. You will not be able to alter
the position of these icons on the map. You will not be able to administer or view the
personalities of these Locations, and your Domain Partner will not be able to administer or
view the personalities of your Locations.
). This may take a few seconds to occur. You will not be able to alter
the position of these icons on the map. You will not be able to administer or view the
personalities of these Locations, and your Domain Partner will not be able to administer or
view the personalities of your Locations.
In order to establish a tunnel between one of your Locations and a Location of your Domain Partner, you must partner the Locations together. To do this, choose one of these options:
Launch the Partner Locations wizard.
Edit your Location and use the Partners tab to establish a connection. when you Add a new partner and select the Extranet option, you will now see the names of the imported Locations in the adjacent menu.
The partnering process includes choosing configuration options to control the behavior of the partnership (in particular, the Connection Sharing and Auto Resolve NAT options are particularly useful for extranets). The process also includes creating tubes. Once you have completed partnering together the Locations, save your changes with the Save button in the App Net Manager tool bar.
It will appear that you can partner together any of your Locations with the imported Locations. However, only the Locations that you exported will be able to create a tunnel to these imported Locations. Furthermore, only the User Groups/Applications you have exported can be shared in a tube with the User Groups/Applications that have been imported from the Domain Partner.
Just like creating tunnels between Locations within your own domain, the other administrator must partner their Location with your exported Location. Make sure that the tubes between each other's User Groups and/or applications match. If you have enabled Auto Resolve NAT for an extranet partner, the partner must also enable Auto Resolve NAT for your Location in order to automatically resolve IP address conflicts on both sides of the tunnel.
When both of you have completed these steps, a line will appear to represent a tunnel between your Locations on the map. Connections between the computers behind your Location and the computers behind the other customer's Location will work exactly as if the imported Location was a part of your own domain.
For more information about establishing Location to Location partnerships, refer to the Corente Services Policy Definition and Provisioning manual.
To modify an existing export, you have several options. You can select the Domain Partner and:
double-click it in the domain directory
select the Edit option from the Tool Bar
from the Edit menu, select the Edit option
right-click the item and select Edit
This will display the Export form for your Domain Partner, which you configured when you first added the Domain Partner. After making your changes to this form, click OK to submit your changes and close the window. Cancel will discard any changes that you have made and close the window.
If you want to export a new Location to an existing Domain Partner, you can simply right-click the Domain Partner's name in your domain directory. In the menu that appears, select Export Location. On the screen that is displayed, select a new Location to export to this partner from the Exported Location pull-down menu. Then select User Groups/Applications from this Location to share with the Domain Partner. After making your changes to this form, click OK to submit your changes and close the window. Cancel will discard any changes that you have made and close the window.
If you want to modify what User Groups/Applications of an exported Location that you are sharing with an existing Domain Partner, you can open the Domain Partner's branch in your domain directory. Select one of the Locations listed under that partner and use the Edit feature. On the screen that is displayed, you can select or unselect User Groups/Applications to export from this Location to your Domain Partner. After making your changes to this form, click OK to submit your changes and close the window. Cancel will discard any changes that you have made and close the window.
You can quickly modify the User Groups/Applications that you are exporting to a Domain Partner on
Remember that, no matter how you make your changes, you must save your changes in order for them to take effect.
When you no longer need an extranet with your Domain Partner, you have two options:
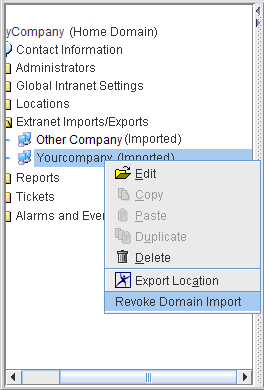
To temporarily suspend an extranet, choose one of these methods:
Right-click the name of your Domain Partner in the domain directory. On the menu that appears, select the Revoke Domain Import option.
Select the Domain Partner in your domain directory and use the Edit feature. On the Export screen that is displayed, deselect the option labeled Import this Domain . Select OK at the bottom of the screen to store your changes.
Save your changes. This method takes down every tunnel between your Locations and the imported Locations of this Domain Partner, but does not delete their profile from your Extranet Exports/Imports list. To re-establish an extranet with a suspended partner, simply right-click the name of the Domain Partner and select the Import Domain option. To re-establish Extranet connections, both you and your Domain Partner must make sure the appropriate extranet Locations are mutually enabled as partners.
To delete a Domain Partner, select the export and choose one of these methods:
Select the Delete option from the Tool Bar.
From the Edit menu, select the Delete option.
Right-click the item and select Delete.
You must save your changes in order for them to take effect. The Export entry for the Domain Partner will be removed from your domain. This method takes down every tunnel between your Locations and the imported Locations of this Domain Partner. You will have to go through the entire extranet creation process with the other company if you wish to re-establish an extranet partnership.