
In addition to providing a firewall, the LAN to Internet Access partner allows you to enable port forwarding for your LAN.
Normally, a Corente Virtual Services Gateway prevents access to the LAN from the Internet/WAN, allowing external connections only from partner Locations or Corente Clients. Sometimes, however, your corporate network contains servers that must be reachable by Internet/WAN traffic (for example, a web server that serves your company’s website, or a mail server that must be reachable by other mail servers so that your employees can get emails from outside your company). Despite the fact that these servers should remain inside your LAN so that they are protected and cannot be compromised by external attacks, they require a public address so that they are reachable by computers on the Internet/WAN when contacted with the permitted type of traffic. Port forwarding allows these servers to use the gateway’s LAN/WAN or WAN interface as their own public interface, with the gateway filtering out the unwanted traffic and passing on only the approved type of traffic to the designated server.
Specifically, port forwarding allows an administrator to forward traffic bound for particular port(s) of the gateway’s WAN address to the appropriate server(s) behind the gateway. For example, port forwarding can be configured so that all traffic pointed at the gateway’s LAN/WAN or WAN address and port 80 (the standard port used for HTTP traffic) is forwarded by the gateway to a web server on your LAN. Your web server is secured safely behind the gateway yet still reachable from the Internet/WAN; the LAN addressing is hidden and the gateway makes certain that only the traffic you choose to allow can reach the server.
In addition, if multiple servers will need to utilize the same port, an administrator can create multiple alias addresses for the gateway’s LAN/WAN or WAN interface and ensure that all incoming traffic through the gateway to that alias address is forwarded to specific server(s) on the private LAN. Aliases are used, for example, when you have two web servers that both use HTTP (port 80). One server can use the LAN/WAN or WAN address of the gateway as its routable address, but each additional server using port 80 will require a distinct routable address to ensure that traffic is routed appropriately. The addresses that you use as aliases must be routable addresses that are otherwise not in use. For more information on alias addresses, refer to Enable Alias Addresses for Port Forwarding.
Configuring port forwarding takes place on the Partners tab of the Location form, via the partner configuration LAN to Internet Access. To edit the LAN to Internet Access partner, select the partner and click Edit. On the Edit Partner screen that is displayed, add new tubes to configure port forwarding. To add a new tube, click Add. The Add Tube screen will be displayed.
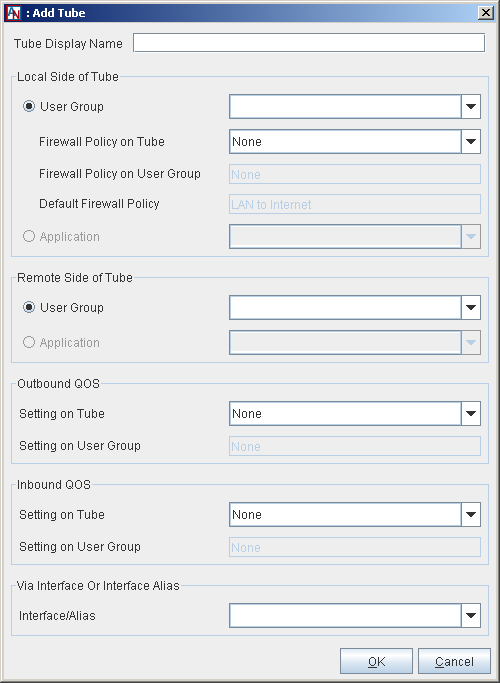
On this screen, create a tube for the LAN to Internet Access partner as follows:
Tube Display Name: If you would like, enter a name for the tube in this field.
Local Side of the Tube: This section defines the local side of the tube.
User Group: Select User Group if you would like a local User Group to participate in this tube. Choose the User Group from the adjacent pull-down menu.
When the User Group option is selected, you can define what traffic you will allow to enter and leave between the User Group and the Internet. The following Firewall Policy option will be available:
Firewall Policy on Tube: Select a Firewall Policy that you would like to apply to traffic traveling between this User Group and the Internet.
Below this option will be two additional fields:
Firewall Policy on User Group: If there is a Firewall Policy that was enabled when defining the selected User Group and always applies to this User Group, the Firewall Policy will be displayed in this field.
Default Firewall Policy: The default firewall policy for this type of connection will be displayed in this field (i.e., LAN to Internet.).
All three Firewall Policies are listed here to remind you that Firewall Policies will be enforced on the connection in this order: Tube Firewall Policy, User Group Firewall Policy, and then Default Firewall Policy.
Application: Select Application if you would like a local application to participate in this tube. Choose the application from the adjacent pull-down menu.
Remote Side of Tube: This section defines the remote side of the tube. For a LAN to Internet Access tube, the remote side is either the Internet or local User Groups/applications that are not participating in the Corente network.
User Group: Select User Group if you would like a remote User Group to participate in this tube. The pulldown menu will list two kinds of User Groups: an “All Internet” User Group and local User Groups that are defined for this Location that are not participating in the secure Corente network.
Application: Select Application if you would like a remote application to participate in this tube.
Outbound QoS: This section allows you to enable Quality of Service (QoS) settings to the outbound traffic on this tube (i.e., traffic from the DMZ to the Internet). QoS settings are viewable and configurable with the Quality of Service feature in App Net Manager.
Setting on Tube: Choose a QoS entry from the pull-down menu to specify the priority of traffic outbound on this tube.
NoteAs when performing any sort of QoS configuration, administrators must be careful when assigning QoS levels because if there is too much high priority traffic, any other traffic with a lower level of priority may become too slow or even be dropped. In addition, you cannot use QoS to prioritize traffic to or from a Corente Client.
Setting on User Group: If there is an Outbound QoS Setting that was enabled when defining the selected User Group/application and always applies to this User Group/application, the Outbound QoS Setting will be displayed in this field. This field is displayed to remind you that QoS settings will be enforced on the connection in this order: Tube QoS setting and then User Group QoS setting.
Inbound QoS: This section allows you to enable QoS settings to the inbound traffic on this tube (i.e., traffic to the DMZ from the Internet).
Setting on Tube: Choose a QoS entry from the pull-down menu to specify the priority of traffic inbound on this tube.
Setting on User Group: If there is an Inbound QoS Setting that was enabled when defining the selected User Group/application and always applies to this User Group/application, the Inbound QoS Setting will be displayed in this field. This field is displayed to remind you that QoS settings will be enforced on the connection in this order: Tube QoS setting and then User Group QoS setting.
Via Interface or Interface Alias: Choose the WAN interface or a WAN interface alias from the Interface/Alias pull-down menu. This will enforce the rules of this tube only for traffic that is destined for the interface or address that you have chosen. If necessary, you can create alias addresses on the Network tab as described in Enable Alias Addresses for Port Forwarding.
When you have finished defining the tube, select OK to store your changes or Cancel to close the screen and discard your changes. The new tube will appear in the Tubes table.
For more information on what features can and cannot be used when port forwarding has been configured, refer to Interaction of High Availability Features.
This section should help you review the basic considerations you need to keep in mind when configuring port forwarding when you are not using a DMZ.
You have two web servers and a mail server on your corporate network behind your Location gateway, and would like them to be accessed both by machines on the LAN and machines on the Internet/WAN.
On the Network Interfaces section of the Network tab, edit the WAN interface and register at least one alias that can be used for one of the web servers. (If you have multiple servers that will be using the same port number(s) to receive traffic, one of these servers can use the WAN address of the gateway to receive traffic, but you must obtain a routable address for each additional server.)
Next, for the web traffic, register an HTTP application on the Applications tab for each web server (using the web servers' private IP addresses). For mail traffic, register two mail server applications on the Applications tab using the mail server's private address (one that allows POP traffic and one that allows SMTP traffic).
To ensure that traffic from the Internet/WAN can reach these servers, on the Partners tab, the LAN to Internet Access partner should have at least three tubes: one for the first web server application via the WAN interface of the gateway, one for the second web server application via the alias address, and one for the SMTP mail server application via the WAN interface of the gateway.