
The Applications tab allows you to register applications with this , which can then be shared with any location in your Corente network and monitored via the Reports feature of App Net Manager and Gateway Viewer (for more information on these monitoring interfaces, refer to the III. Corente Services Administration manual). You can monitor not only to view the status and availability of the applications, but also usage, bandwidth, and latency/packet loss statistics both per application and per application server. Corente application monitoring was designed to be used as follows: to confirm to both users and administrators that applications are functioning correctly; to facilitate communication between both parties when they are not; to provide reports to help with capacity planning; and to provide diagnostic capabilities to locate bad actors within the network.
You can share and monitor any TCP-based application, as well as any of the following types of applications: Email (SMTP, IMAP, and POP), Web (HTTP and HTTPS), Authentication (LDAP), FTP, DNS, and Microsoft File Shares. If the applications you would like to register are not deployed on local servers, the Location gateway must be able to communicate with the servers either over the Internet or through alternate methods (i.e., via a private backbone or alternate connection).
The main screen of the Applications tab displays a table of all applications that you have already added.
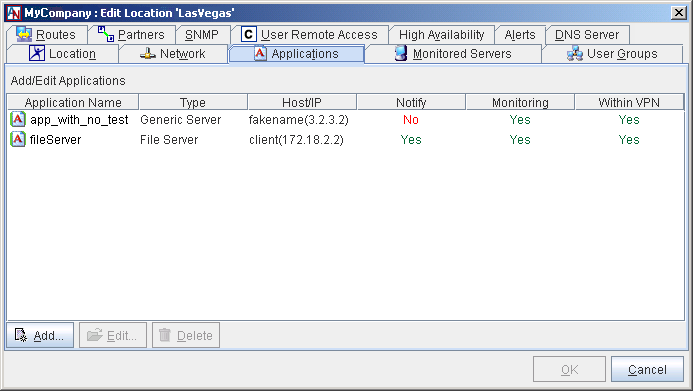
You may Edit or Delete any application listed in the table. To add a new application to this table, follow the instructions on the next page.
Select the Add button on the main screen of the Applications tab. The Add Application screen will be displayed.
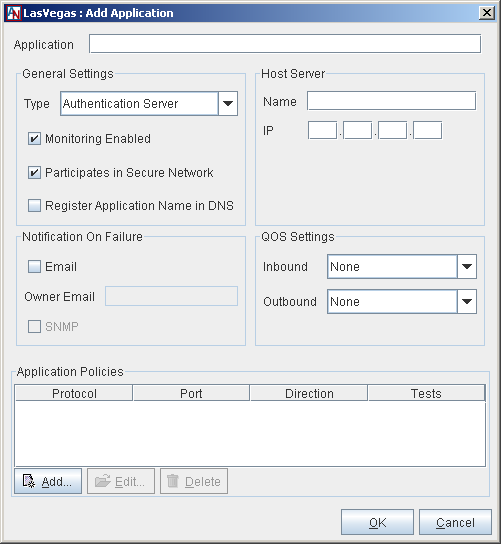
Fill out the fields and options as follows:
Application: Enter the name of the application as you would like it to appear to users and administrators.
Type: Select the type of application that you are registering with the Location gateway. The following choices are available: Authentication Server, DNS Server, FTP Server, File Server, Generic Server, Mail Server, or Web Server. (Select Generic Server when the application you are registering does not fit into the other categories.) Your choice will affect the protocols that you may choose from when you add Application Policies.
Monitoring Enabled: Select this option to enable monitoring of this application. If you do not select this option, this application can be shared with other locations, but will not be monitored via Reports or in Gateway Viewer.
Participates in Secure Network: Select this option to allow this application to be shared over your Corente application network. If this option is not selected, you will not be able to share this application like a User Group with other locations. Note that on the Monitoring interface in Gateway Viewer, the application will be listed in the Service Availability Summary section to designate this application as a locally-used application and to differentiate this application from those being shared over the application network (which are listed in the Application Status Summary section).
Register Application Name in DNS: If you have configured your Location as a DNS Server or DNS Updater on the DNS Servers tab, select this option to register this application with Corente DNS. The DNS name of the application will be the DNS zone name of this Location prepended by the application name (for example, an application named "fileserver" in a zone named "here.corente.com" could be accessed by computers in partner Locations using the DNS name "fileserver.here.corente.com"). For more information about Corente DNS, refer to Section 1.15, “DNS Server”.
Notification on Failure: Email: Select this option if you would like the application's administrator to receive an email notification if this application should fail. The notification will be sent to the email address supplied in the Owner Email field. If no email address has been entered that field, the notification will instead be sent to the address(es) supplied on the Alerts tab for this Location. For more information on alerts, refer to Section 1.14, “Alerts”.
Owner Email: Enter the email address of the administrator of this application. All email notifications will be sent to this address. Additionally, this email address will be published to any user in Gateway Viewer that has the appropriate permissions to use this application, so that they can communicate directly with the appropriate administrator, if necessary.
Notification on Failure: SNMP: Select this option if you would like to receive an SNMP trap if this application should fail. The SNMP trap will be sent according to the SNMP version and parameters that you specify on the SNMP tab of this Location form. For more information on using SNMP with your Corente Virtual Services Gateways, refer to the III. Corente Services Administration manual.
Host Server Name: Enter the DNS name of the server providing this application.
Host Server IP: Enter the IP address of the server providing this application.
NoteThe following network addresses are restricted and cannot be assigned to any hosts on the LAN:
1.1.1.0
1.1.1.1
1.1.1.2
1.1.1.3
QoS Settings Inbound: If you would like, choose a QoS entry from the pulldown menu to specify the priority of traffic inbound through the Location gateway to this application. QoS entry definitions in this menu can be viewed or modified with the Quality of Service feature. For more information on QoS, refer to Section 2.2, “Quality of Service (QoS)”.
QoS Settings Outbound: If you would like, choose a QoS entry from the pulldown menu to specify the priority of traffic outbound through the Location gateway from this application. QoS entry definitions in this menu can be viewed or modified with the Quality of Service features.
NoteAs when performing any sort of QoS configuration, administrators must be careful when assigning QoS levels because if there is too much high priority traffic, any other traffic with a lower level of priority may become too slow or even be dropped. In addition, you cannot use QoS to prioritize traffic to or from a Corente Client.
After providing basic information about the application, you must use the Modify Application Policies section to register the policies of this application. A policy is essentially a combination of protocol and port number that the application's server uses to communicate with the machines that connect with it, or that the machines use to communicate with the server.
The Application Policies table lists all the policies that you have already added. You may Edit or Delete any policy listed in the table. Click Add to create a new policy.
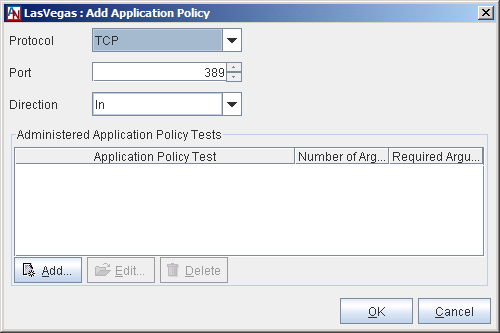
On the screen that is displayed:
Protocol: Select the protocol for this policy. The protocols that are available depend on to the Application Type that was chosen for this application.
Port: Enter the port number for this policy.
Direction: Select the direction of the traffic that you are regulating with this policy (i.e., traffic that travels in through the Location gateway to the server, out through the Location gateway from the server, or both).
Administered Application Policy Tests: Application policy tests are tests that are used by the Location gateway to monitor the application and determine if it is functioning correctly or not. Depending on the test chosen, you will choose thresholds that cause a WARNING alarm and a CRITICAL alarm. The types of tests that are available depend on the protocol that you chose for this Application Policy. Each test that you enable will be performed on the application’s traffic once a minute.
The table lists all the tests that you have already added. You may Edit or Delete any test listed in the table. Click Add to create a new test.
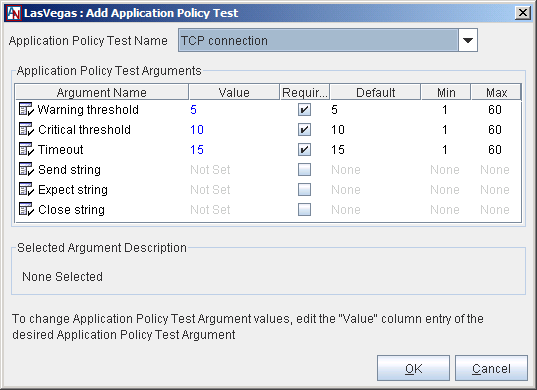
On the screen that is displayed:
Application Policy Test Name: Select the test you would like to enable from the pull-down menu.
Application Policy Test Arguments: When an Application Policy Test Name is selected, this table lists all of the arguments for that test. To modify the variable for an argument, select the argument and click the blue text in the Variable column. You can enter a new value in the field that is provided.
All Application Types allow you to create policies for ICMP, TCP, and UDP protocols. The following table describes the Policy Tests that you may choose for each of these protocols and what they monitor:
Table 1.1 Policy Tests for ICMP, TCP, and UDP Protocols
Protocol | Test Types | What Test Monitors |
|---|---|---|
ICMP | ICMP PING | This is a standard test that checks the application server for availability. Warning and critical alarms are based on the latency and loss of test packets. |
Roundtrip Latency | This test monitors the average round trip latency of packets sent to and from the applications server. | |
IP Network Quality | This test estimates network quality by measuring a combination of latency, jitter, and packet loss on traffic samples in an interval. The administrator sets acceptable thresholds for latency (in milliseconds) and loss (in percent of packets in the interval). In addition, the length of the jitter buffer (in milliseconds) is also set as the jitter threshold. Each traffic sample is evaluated as acceptable or defective in the following manner:
Administrators can specify or use defaults for: Warning and Critical alarm thresholds based on percentage of defective samples in an interval. Interval in seconds over which the percentage of defective samples will be computed. Acceptability threshold (excess packet loss squared times four plus excess latency). Latency threshold. Jitter threshold. Loss threshold. | |
TCP | ICMP PING | See ICMP PING above. |
Roundtrip Latency | See Roundtrip Telephony above. | |
IP Network Quality | See IP Network Quality above. | |
TCP Connection | This test monitors the TCP connection of the application. | |
UDP | ICMP PING | See ICMP PING above. |
Roundtrip Latency | See Roundtrip Telephony above. | |
IP Network Quality | See IP Network Quality above. | |
UDP Connection | Like the TCP Connection test, but for the UDP protocol. |
In addition to the protocols above, some of the Application Types allow you to create policies for application-specific protocols. In addition to the ICMP PING, Roundtrip Latency, IP Network Quality, and occasionally the TCP Connection test, these protocols each have a protocol-specific test:
Table 1.2 Policy Tests for Application-Specific Protocols
Application Type | Protocol | Test Types | What Test Monitors |
|---|---|---|---|
Authentication Server | LDAP | LDAP Lookup | This test monitors the response time for LDAP packets sent to the LDAP server. |
DNS Server | DNS | DNS Lookup | This test monitors accuracy of the DNS server: you supply a DNS hostname and the IP address that should be returned by the server. In addition, the test monitors the response time and raises a critical alarm when the request has timed out. |
FTP | FTP | FTP Handshake | This test monitors the response time for FTP packets sent to the FTP server. |
File Server | NETBIOS | File Share | This test measures disk usage percentage. You must supply a share name, username, and password to allow the Location gateway to log onto the File server. |
Mail Server | IMAP | IMAP Handshake | This test monitors the response time for IMAP packets sent to the IMAP server. |
POP | POP Handshake | This test monitors the response time for POP packets sent to the POP server. | |
SMTP | SMTP Handshake | This test monitors the response time for SMTP packets sent to the SMTP server. | |
Secure IMAP | Secure IMAP Handshake | This test monitors the response time for Secure IMAP packets sent to the IMAP server. | |
Secure POP | Secure POP Handshake | This test monitors the response time for Secure POP packets sent to the POP server. | |
Web Server | HTTP | HTTP Transaction | This test monitors the response time of HTTP packets sent to the HTTP server by accessing a specified web page. When an optional Expected Status (string to expect in the first status line of server response) is specified, this test can be used to look for specific HTTP error codes [i.e. 400]. If the string is not found, a CRITICAL alarm is raised. When an optional Expected Expression is specified, the test will search the page returned by the web server for a case-insensitive regular expression. If the specified pattern is not found, a CRITICAL alarm is raised. When an optional Redirection Handling option is specified and the test results in a redirect to another webpage, you can choose to generate no alarm, a WARNING alarm, a CRITICAL alarm, or the redirection can be followed. |
HTTPS | Secure HTTP Transaction | Similar to the HTTP Transaction test, but for HTTPS. |
When you have finished configuring an Application Policy Test, click OK to store your changes or Cancel to close the window and discard your changes. You may add as many tests to an Application Policy as you would like.
When you have finished configuring an Application Policy, click OK to store your changes or Cancel to close the window and discard your changes. You may add as many Application Policies to a monitored application as is required by that application.
When you have finished configuring an Application, click OK to store your changes or Cancel to close the window and discard your changes. The application will be added to the main screen of the Applications tab.