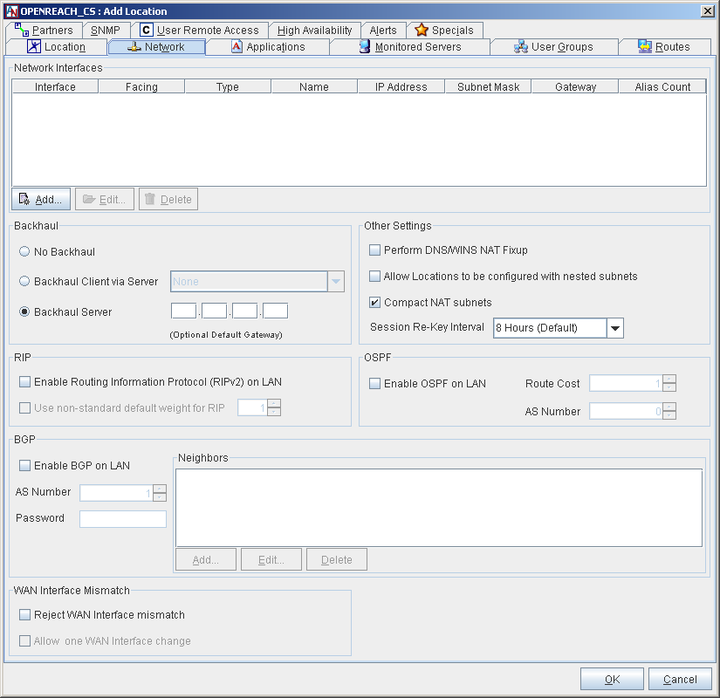
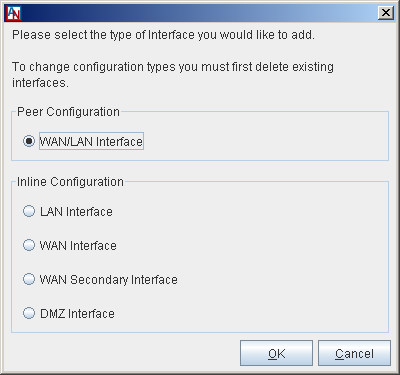
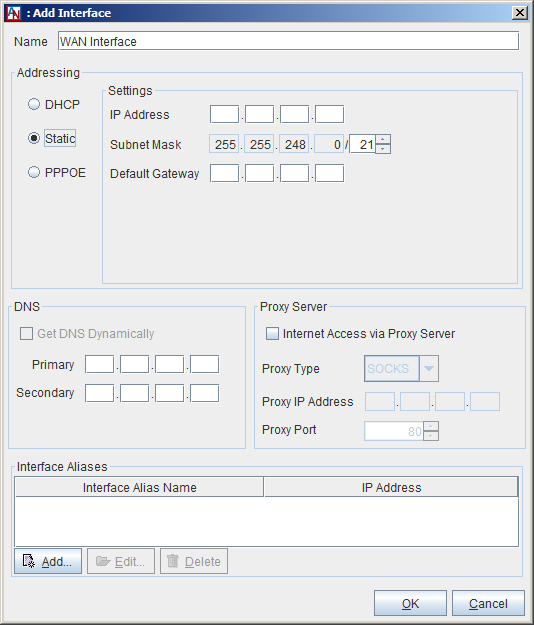
This section allows you to modify the network address(es) that were assigned to the Ethernet interface(s) of this Location gateway. All addresses that have been defined for the Ethernet interface(s) of the Location gateway will be listed in the table in this section. To add a new network interface to this list, select the Add button. You can also Edit or Delete an existing interface. When Add is selected, you must select the type of configuration that your Location gateway will use and/or the interface that you want to define.
Peer
The Peer configuration is a Location gateway with a single Ethernet interface. The Peer Location gateway is added to an already existing LAN consisting of the machines that will be participating in the application network. It requires additional routing or server configuration to ensure that packets destined for a partner Location get routed to the local Location gateway first.
If your Location gateway is a Peer, select the WAN/LAN interface option and click OK to add or edit the interface.
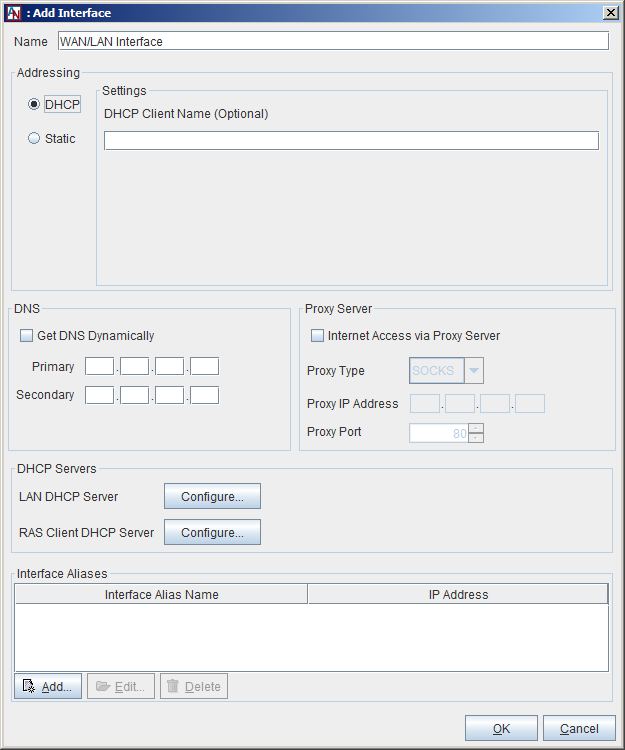
You supplied your addressing and DNS preferences in the Location Wizard. These preferences will appear in this window, but can be changed at any time.
In addition to assigning addressing information, this window allows you to indicate whether or not a proxy server is installed between this Location gateway and the Internet. There are two types of proxy supported, SOCKS and Web.
Internet Access via Proxy Server: Check this box if your Location gateway connects to the Internet from behind a proxy server.
Proxy Type: In the drop-down list, select SOCKS or Web. Select SOCKS if your proxy server provides SOCKS V4/V5 server support in order to interoperate with the Location gateway. When this is selected, the Proxy IP Address and Port fields will be enabled and must be filled in. If the proxy server is a web proxy, select Web and the Proxy IP Address and Port fields will be enabled and must be filled in.
Proxy IP Address: If you check Internet Access via Proxy Server, enter the IP address of the proxy server that your Location gateway operates behind. Even if your Location gateway is a DHCP client, you must determine the address of the proxy and enter it here.
Proxy Port: If you check Internet Access via Proxy Server, you must enter the port number that your proxy server uses. This must be specified to allow the automatic Location gateway software updates to occur on your Location gateway. The default port is 80, which is used by most proxy servers.
Additional configuration is required when your LAN includes a proxy server. You must make sure that all the computers on the same subnet as your Location gateway change the settings of their web browser to bypass the proxy server for local addresses and to specifically exclude the IP Address of the Corente Virtual Services Gateway.
Similarly, if you need to access the App Net Manager from a computer operating behind a proxy server, you must exclude the address of this application in your browser as well.
If you are operating behind a proxy server, (for example) in Internet Explorer:
Select the Tools menu and choose Internet Options.
In the new window that opens, select the Connections tab.
Click the LAN Settings button when it appears. Make sure that the Use a proxy server checkbox is marked.
Enter the LAN IP Address and port number of the proxy server in the fields provided, and then make sure that the Bypass proxy server for local addresses checkbox is marked.
Click the Advanced... button right next to these fields and enter the IP Address of your Location gateway in the Exceptions list. Traffic destined for admin.corente.com (the App Net Manager) should not be routed to the proxy server, either. If you are granting access to the App Net Manager application, enter the address admin.corente.com into the Exceptions list as well.
Click OK twice and your browser settings will be stored.
This process must be performed on each computer’s web browser in order for the computers to access the Corente Virtual Services Gateway and application network.
This window also allows you to configure the Location gateway DHCP server that can distribute IP addressing information to computers on the Location gateway’s LAN, as well as to its Corente Client partners. For information on configuring the LAN DHCP server, click the LAN DHCP Server Configure button and refer to Section 1.5.3, “Enable DHCP Server for LAN”. For information on configuring the RAS Client DHCP Server, refer to the VI.Corente Services Client manual.
Finally, this window allows you to assign alias addresses to the LAN/WAN interface of the gateway. Alias addresses are used with the port forwarding feature, which directs traffic from the Internet/WAN through the gateway to servers on the LAN or in the DMZ. For more information on port forwarding and when alias addresses are used, refer to Enable Alias Addresses for Port Forwarding.
Inline
The Inline configuration is a Location gateway with two Ethernet interfaces. One Ethernet interface is connected to the internal local area network (LAN). The other interface is connected to an external interface, which is typically the Internet access device for that location. All traffic must pass through the Location gateway in order to reach into and out of the internal local network.
If your Location gateway is an Inline, you must configure both a LAN and a WAN interface. You also have the option of configuring a secondary WAN interface, if you would like to use the Dual WAN feature, or a DMZ interface, if you will be using your Corente Virtual Services Gateway to implement a DMZ. For more information on enabling a secondary WAN interface and using the Dual WAN feature, refer to WAN Secondary Interface. For more information on implementing a DMZ with Corente, refer to Section C.2, “Implement a DMZ with Corente”.
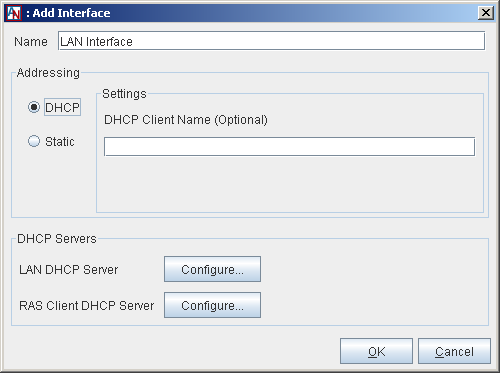
You supplied your addressing and DNS preferences for both the LAN and the WAN interfaces in the Location Wizard. These preferences will appear each interface’s window, but can be changed at any time.
In addition to assigning an address or addressing method to the LAN interface of the Location gateway, the Edit LAN Interface window allows you to configure the Location gateway DHCP server that can distribute IP addressing information to computers on the Location gateway’s LAN, as well as to its Corente Client partners. For information on configuring the LAN DHCP server, click the LAN DHCP Server Configure button and refer to Section 1.5.3, “Enable DHCP Server for LAN”. For information on configuring the RAS Client DHCP Server, refer to the VI. Corente Services Client manual.
In addition to assigning addressing information, this window allows you to indicate whether or not a proxy server is installed between this Location gateway and the Internet. There are two types of proxy supported, SOCKS and Web.
Internet Access via Proxy Server: Check this box if your Location gateway connects to the Internet from behind a proxy server.
Proxy Type: In the drop-down list, select SOCKS or Web. Select SOCKS if your proxy server provides SOCKS V4/V5 server support in order to interoperate with the Location gateway. When this is selected, the Proxy IP Address and Port fields will be enabled and must be filled in. If the proxy server is a web proxy, select Web and the Proxy IP Address and Port fields will be enabled and must be filled in.
Proxy IP Address: If you check Internet Access via Proxy Server, enter the IP address of the proxy server that your Location gateway operates behind. Even if your Location gateway is a DHCP client, you must determine the address of the proxy and enter it here.
Proxy Port: If you check Internet Access via Proxy Server, you must enter the port number that your proxy server uses. This must be specified to allow the automatic Location gateway software updates to occur on your Location gateway. The default port is 80, which is used by most proxy servers.
Additional configuration is required when your LAN includes a proxy server. You must make sure that all the computers on the same subnet as your Location gateway change the settings of their web browser to bypass the proxy server for local addresses and to specifically exclude the IP Address of the Corente Virtual Services Gateway.
Similarly, if you need to access the App Net Manager from a computer operating behind a proxy server, you must exclude the address of this application in your browser as well.
If you are operating behind a proxy server, (for example) in Internet Explorer:
Select the Tools menu and choose Internet Options.
In the new window that opens, select the Connections tab.
Click the LAN Settings button when it appears. Make sure that the Use a proxy server checkbox is marked.
Enter the LAN IP Address and port number of the proxy server in the fields provided, and then make sure that the Bypass proxy server for local addresses checkbox is marked.
Click the Advanced... button right next to these fields and enter the IP Address of your Location gateway in the Exceptions list. Traffic destined for admin.corente.com (the App Net Manager) should not be routed to the proxy server, either. If you are granting access to the App Net Manager application, enter the address admin.corente.com into the Exceptions list as well.
Click OK twice and your browser settings will be stored.
This process must be performed on each computer’s web browser in order for the computers to access the Corente Virtual Services Gateway and application network.
Finally, the Edit WAN Interface screen allows you to assign alias addresses to the WAN interface of the gateway. Alias addresses are used with the port forwarding feature, which directs traffic from the Internet/WAN through the gateway to servers on the LAN or in the DMZ. For more information on port forwarding and when alias addresses are used, refer to Enable Alias Addresses for Port Forwarding.
WAN Secondary Interface
The Dual WAN feature allows customers to set up WAN failover for a Corente Virtual Services Gateway from a primary WAN connection to a secondary WAN connection, to ensure continued access to the secure Corente network and Internet in the event of a WAN failure. After failover, the gateway will detect when the primary WAN connection has recovered and will automatically failback. Note that this feature does not currently support load balancing across the two WAN connections.
The Dual WAN feature can be used with Corente Virtual Services Gateways in the Inline configuration that contain at least three (3) Ethernet cards (one for the LAN connection, one for the primary WAN connection, and one for the secondary WAN connection).
Dual WAN cannot be enabled on a gateway that is using the following features:
Hardware failover.
WAN interface alias addresses for port forwarding on either the primary WAN interface or secondary WAN interface.
For more information on what features can and cannot be used when Dual WAN is enabled, refer to Interaction of High Availability Features.
If you plan to enable Dual WAN for gateway already in use, it is recommended that you perform a new installation of the Corente Virtual Services Gateway Software and personality file on your hardware due to several specific installation steps that are required. In particular, ensure that the gateway to which you are adding this feature is turned off before starting installation of the personality file.
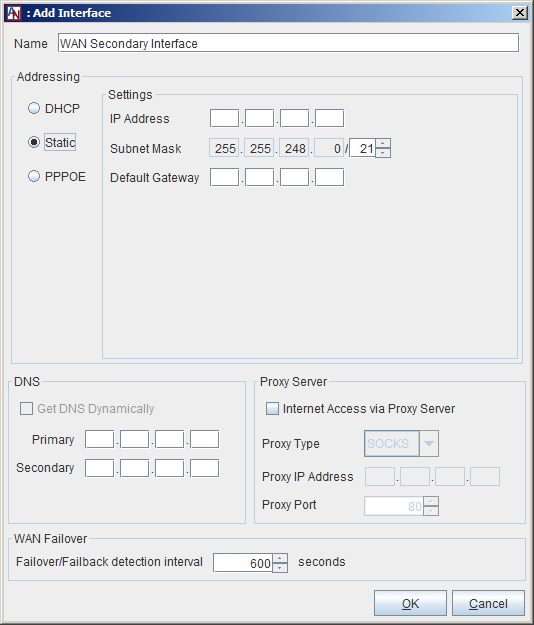
To configure the secondary WAN interface, select WAN Secondary Interface on the Add Network Interfaces dialog box. In the Addressing section on the window that appears, select how an IP Address, Subnet Mask, and Default Gateway will be assigned to this secondary WAN interface.
DHCP: Select this option to allow a DHCP Server to automatically assign an IP Address, Subnet Mask, and Gateway address to the secondary WAN interface of this gateway.
Static: When this option is selected, you must manually enter addressing information for this interface.
PPPoE: Select this option if your gateway will use PPPoE to connect to the secondary WAN connection from this interface.
In the WAN Failover section, fill out the field as follows:
Failover/Failback detection interval: Enter the period of time (in seconds) that the gateway will wait before an outage of the primary WAN connection causes a failover to the secondary WAN connection. Once the primary WAN connection comes up again, failback will be delayed for the same interval or 300 seconds, whichever is less. This ensures that the primary WAN connection is operational and prevents flapping of the interface. The default failover interval is 600 seconds, but can be between 30 seconds and 86,400 seconds (24 hours). The default failback interval is 300 seconds, but will use the same interval you have set for the failover interval, up to a maximum of 300 seconds. Note that failover and failback will each cause a restart of the gateway service (but not of the gateway hardware itself).
After installing (or re-installing) the Corente Virtual Services Gateway software onto your gateway, make sure the gateway hardware is turned off. Connect the Ethernet cable for the primary WAN to one of the gateway’s Ethernet interfaces. It does not matter which Ethernet interface this cable is plugged into, as the gateway will itself designate that particular interface as the primary WAN interface. Do not connect the secondary WAN connection to an Ethernet interface yet.
Once the gateway has started up and connected to the SCP over the primary WAN connection, connect the Ethernet cable for the secondary WAN connection to an Ethernet interface of the gateway. You should then access the Control page of Gateway Viewer and force a failover to the secondary WAN connection to ensure that it is working.
After you add a WAN Secondary Interface, the interface identified as WAN Interface will function as the primary WAN interface.
Enable Alias Addresses for Port Forwarding
Normally, a Corente Virtual Services Gateway prevents access to the LAN from the Internet/WAN, allowing external connections only from partner Locations or Corente Clients. Sometimes, however, your corporate network contains servers that must be reachable by Internet/WAN traffic (for example, a web server that serves your company’s website). Port forwarding allows these servers to use the gateway’s LAN/WAN or WAN interface as their own public interface, with the gateway filtering out the unwanted traffic and passing on only the approved type of traffic to the designated server.
Specifically, port forwarding allows an administrator to forward traffic bound for particular port(s) of the gateway’s LAN/WAN or WAN address to the appropriate server(s) behind the gateway. For example, port forwarding can be configured so that all traffic pointed at the gateway’s WAN address and port 80 (the standard port used for HTTP traffic) is forwarded by the gateway to a web server in your DMZ.
If multiple DMZ servers will need to utilize the same port, an administrator can create multiple alias addresses for the gateway’s LAN/WAN or WAN interface and ensure that all incoming traffic through the gateway to that alias address is forwarded to specific server(s) on the private LAN of the DMZ. Aliases are used, for example, when you have two web servers in your DMZ that both use HTTP (port 80). One server can use the LAN/WAN or WAN address of the gateway as its routable address, but each additional server using port 80 will require a distinct routable address to ensure that traffic is routed appropriately. The addresses that you use as aliases must be routable addresses that are otherwise not in use.
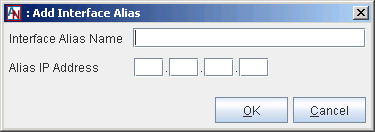
To configure alias addresses, edit the LAN/WAN or WAN interface of the Location gateway. Click the Add button in the Interface Aliases section.
Fill out the fields as follows:
Interface Alias Name: Enter a name for this alias. This name will be used for administration purposes in App Net Manager.
Alias IP Address: Enter the alias IP address for the interface. The address that you enter here must be a routable address that is otherwise not in use.
Click OK to save the alias. The alias will now be listed in the Interface Aliases section.
Click OK again when you have finished adding alias addresses. You will use the aliases you have entered to forward traffic from the gateway to the appropriate server(s) via tube definitions for the DMZ to Internet Access partner or LAN to Internet Access partner on the Partners tab of the Location form (see Section 2.3, “Partners”).
Port forwarding and aliases are not necessarily used only with a DMZ; they can also be used whenever you have multiple servers using the same port and you would like them all to be reachable from the Internet/WAN. These multiple servers may not reside in your DMZ, but directly on your LAN.
For more information about configuring port forwarding, refer to Appendix B, Additional Tube Configurations. For more information about implementing a DMZ with your Corente Virtual Services Gateway, refer to Appendix C, Implementing a DMZ with Corente.
Dynamic Host Configuration Protocol (DHCP) is a TCP/IP standard that reduces the complexity of administering address configurations by using a server to centrally manage IP addresses and other related configuration details used on the internal network. If you do not already have a DHCP server on your internal network, the Corente Virtual Services Gateway itself can provide DHCP services. This is convenient for those businesses that want to use as few network devices as possible. Each Location gateway can act as a DHCP server to computers on its LAN, as well as to its Corente Client partners.
For LAN DHCP, the DHCP server in a Corente Virtual Services Gateway will only serve computers on its own subnet. If you have included any other subnets on the User Groups and Routes screen of this form, they will not be served by the Location gateway's DHCP server.
To enable and configure the DHCP server:
If your Location gateway is using the Peer Configuration, edit the Location gateway’s WAN/LAN Interface in the Network Interfaces section of the Network tab.
If your Location gateway is using the Inline Configuration, edit the Location gateway’s LAN Interface in the Network Interfaces section of the Network tab.
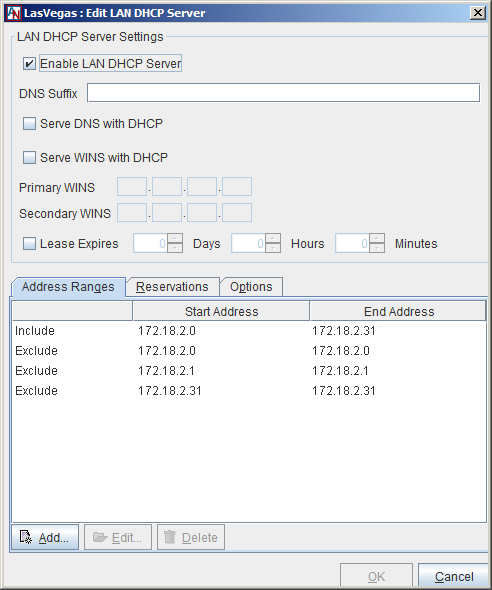
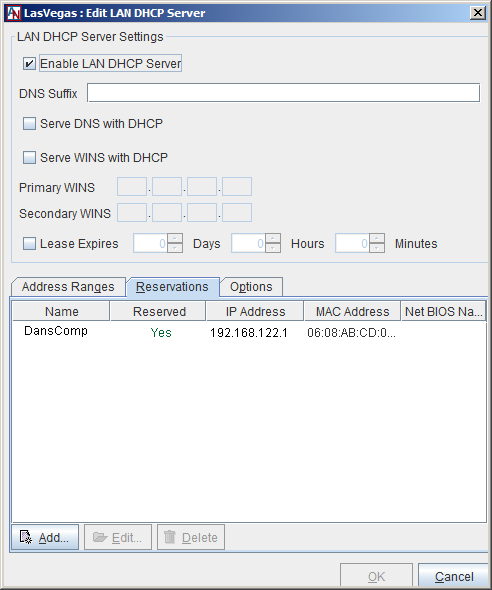
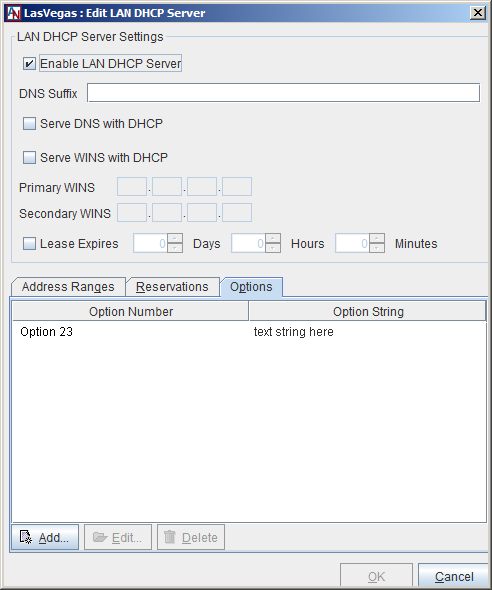
When you click the LAN DHCP Server button on either of these windows, the Edit LAN DHCP Server window will be displayed.
Select the Enable LAN DHCP Server option and fill out this window as follows to configure how DHCP leases are served to computers on the Location's LAN:
DNS Suffix: If you would like, enter a DNS suffix to be served to LAN computers by DHCP. When these computers submit a name for DNS name resolution, this DNS suffix will be appended to that name.
Serve DNS with DHCP: This option allows you to select whether or not to pass the DNS Server IP addresses with the DHCP leases. When this box is selected, the computers on your LAN will be passed the DNS server addresses that are on the Network tab of this Location form.
Serve WINS with DHCP: This option allows you to select whether or not to pass WINS Server IP addresses with the DHCP leases. WINS is the network protocol used in Windows networking; the computer names you see in Network Neighborhood are all resolved into IP addresses, and vice versa, using WINS. When this box is checked, you must enter the IP addresses of the WINS server on your network. These are the addresses that will be passed.
Primary WINS: Enter the IP address of the primary WINS server used to resolve WINS names on your local network.
Secondary WINS: Enter the IP Address of the secondary WINS server that will be used to resolve names if the primary WINS server does not respond. You cannot enter a Secondary WINS address if you have not entered a Primary WINS entry.
Lease expires: If this box is unchecked, the leases that the DHCP server assigns to local computers will be infinite. An address will not change unless the computer reboots. However, if this box is checked, the IP addresses will be temporary assignments. You must then specify in the fields that follow the number of days, hours, and minutes that the addresses should be used. When the specified amount of time is over, the lease is renewed. A lease is also renewed when a computer reboots. The renewed lease may or may not contain the same addresses.
A DHCP Server saves you from the task of manually assigning IP addresses to computers on the Location's subnet. However, each user computer must be configured to obtain IP addresses automatically. In Windows, for example, this can be accomplished easily using the Network option in the Control Panel.
DHCP Address Ranges
When you select the Address Ranges tab in the lower half of the window, this section allows you to create the address pools that will be served by the Location.
The ranges that you create here must correspond with address range(s) that are included in the Default User Group on the User Groups tab of this Location’s Location form, to ensure that these computers can participate in the application network.
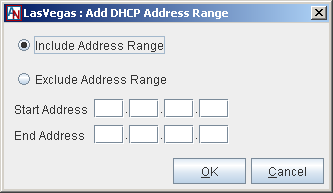
To begin creating address pools, select the Add button.
On this screen that is displayed:
Include Address Range: Select this option to indicate that the entire range you enter here will be served by DHCP.
Exclude Address Range: After defining an Included range, you can exclude certain addresses from that address pool with this option. Enter the range of IP addresses that you would like to exclude from the included range in the Start Address and End Address fields. These addresses will not be served by DHCP. Note that the address of the Location gateway is automatically excluded and does not need to be entered here.
After selecting Include or Exclude:
Start Address: Enter the lowest value of the address range in this field.
End Address: Enter the highest value of the address range in this field. If the range you would like to create contains only one IP address, you do not have to enter anything in this field.
Select the OK button to store this pool. Select Cancel to discard your changes and close the window.
DHCP Reservations
When you select the Reservations tab in the lower half of the window, you can reserve specific IP addresses for machines on the LAN that receive their addressing from the Location's DHCP server.
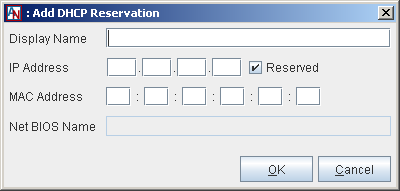
To begin reserving addresses, select the Add button.
Display Name: Enter a name that will be used to identify this reservation on the App Net Manager interface.
IP Address: Enter the IP address that will be reserved by the Location's DHCP server for use by this machine only. The machine will always receive this address from the DHCP server.
Reserved: When this checkbox is selected, the IP address you entered will be saved and assigned to the machine whenever it receives its addressing via the Location's DHCP server.
MAC Address: If this field is not already filled in, enter the MAC address of the machine for which the reservation is being made. This is how the DHCP server will identify the machine that will receive the reserved IP address.
NetBIOS Name: If the Location has received information from the backend about the machine for which you are reserving an address, this field will display the Net BIOS name of the machine. This field will not accept manual input.
Select the OK button to store this reservation. Select Cancel to discard your changes and close the window.
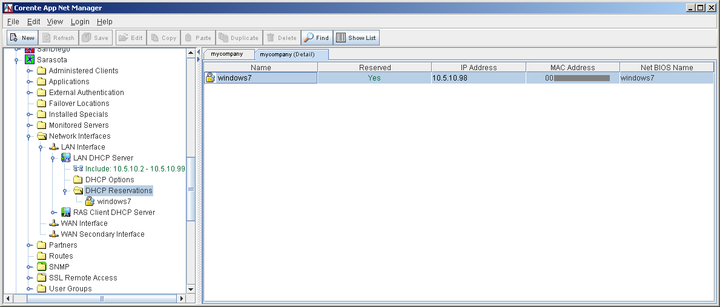
The Location may receive MAC address information from the backend about clients on the LAN. In that case, those machines will be listed on the table on the right side of the App Net Manager interface when you open the Location in the domain directory, open the Network Interfaces entry, open LAN DHCP Server or RAS Client DHCP Server, and click on DHCP Reservations.
Double click on any entry in this table and the Edit DHCP Reservation dialog box will be displayed for that machine. Simply click the Reserved checkbox for this machine to ensure that the machine is served the IP address that you enter on this dialog box every time it receives addressing information from the gateway’s DHCP server.
DHCP Options
When you select the Options tab in the lower half of the window, you can include DHCP options that will be delivered along with addressing information by the Location's DHCP server. These options will be delivered to every device on the LAN that receives its addressing information via DHCP. The receiving device itself will determine whether or not it will use the option string. A typical use for option strings is for configuring handsets for IP telephony.
To begin reserving addresses, select the Add button.
Option Number: Enter the option number that defines this option.
Option String: Enter the string for this option. Only text string options are supported by Corente. Select the OK button to store this option. Select Cancel to discard your changes and close the window.
Backhaul is a feature that allows you to aggregate all of your application network locations' Internet traffic and have it exit outbound to the Internet and enter inbound to your network via a single location (or multiple locations, if you prefer). Backhaul requires at least two active Locations in your Corente domain. One must be designated as a Backhaul Server and the other as a Backhaul Client.
A Corente Virtual Services Gateway that is administered as a Backhaul Client will encrypt all Internet traffic and send it to a Location gateway designated as a Backhaul Server. The Backhaul Server will route Internet traffic from these Location(s) to the Internet. This traffic will be routed through whatever devices exist on the Backhaul Server’s network to filter Internet traffic. All application network traffic will continue to use the appropriate tunnels for each partner.
No Backhaul: This Location will not participate in backhaul. This is the default setting for backhaul.
Backhaul Client via server: If you select this option, you must select a Backhaul Server from the selection box beside this option. All Internet traffic for this Corente Virtual Services Gateway’s LAN will be routed to and from the selected Backhaul Server. Routers behind this Location gateway will need to be modified to send all outgoing Internet packets to the Location gateway. The Location gateway will then send the packets to the Corente Virtual Services Gateway designated as the Backhaul Server.
Backhaul Server: This will be a Location to which the Locations designated as Backhaul Clients will send and receive Internet traffic.
Optional Default Gateway: When the Backhaul Server option is selected, you can supply an IP address or DNS name of a server that this Corente Virtual Services Gateway will send all of the Internet traffic that has been routed to it. This allows you to specify the server that the traffic will be sent to for filtering and other such services, so that you do not have to change the default Internet Gateway for this Corente Virtual Services Gateway in the Network Interfaces section of the Network tab.
If you enable Backhaul, it is important to define a Special Internal Network Description User Group on the User Groups tab that includes all IP addresses on the corporate network. This will allow the Location gateway to distinguish between the Internet, subnets participating in the application network, and subnets not participating in the application network, so that traffic will not have the opportunity to be routed to the wrong location and create a security risk. For example, if a Special User Group is not defined, a Location gateway designated as a Backhaul Server might route non-application network traffic from a Backhaul Client to one of its own non-participating subnets, mistaking the subnet's address as part of the Internet.
If a subnet behind a Location gateway is on world-routable (i.e., public) IP address space, then NAT must occur some place outside the Location gateway at the Backhaul Server site. If NAT does not occur, return packets will not flow back through the server and tunnels properly to the subnet.
Routing Information Protocol (RIPv2), Open Shortest Path First (OSPF), and/or Border Gateway Protocol (BGP) can be enabled on your Corente Virtual Services Gateway to automate routing if your LAN is divided into multiple subnets and you would like more than one of these subnets to participate in your Corente application network. RIPv2, OSPF, and BGP are useful in environments where routes to these different subnets are changing dynamically. If you enable RIPv2, OSPF, and/or BGP, you do not need to add static routes for the subnets on the Routes tab of this Location’s Location form (see Section 1.9, “Routes”). However, you must have entr(ies) on the User Group screen for these subnets so that the machines on the subnets can participate in the application network. You must also make sure that there are routers on your local network that know about these subnets and you must configure the routers to respond to RIPv2, OSPF, and/or BGP.
RIPv2
RIPv2 is a protocol widely used for routing traffic. It is an interior gateway protocol (IGP), which means that it performs routing within a single autonomous system; i.e., the local area network (LAN). RIPv2 works by sending routing-update messages to computers on the LAN at regular intervals and whenever the network topology changes. RIPv2 identifies how routing on a network has changed by measuring the “hop” of a RIPv2 packet from its source to its destination. Each hop in a path from source to destination is noted and distributed. When a computer receives a RIPv2 routing-update that includes changes to an entry, it updates its routing table to reflect the new route.
The Corente Virtual Services Gateway will support RIPv2 multicast and unicast messages without authentication. The Corente Virtual Services Gateway does not support RIPv1 broadcast messages.
To enable RIPv2 on a Corente Virtual Services Gateway, the RIP section on the Network tab of the Location’s Location form must be filled out:
Enable Routing Information Protocol (RIPv2) on LAN: When this option is selected, the Location gateway will use RIPv2 to announce routes on the LAN that can used to reach remote application network subnets.
Use non-standard default weight for RIP: To use a non-standard default weight for RIPv2, select this option and enter the weight in the field provided. The default weight is 1. Valid values for this option are 1 - 16. All RIP routes will be assigned this weight.
The Corente Virtual Services Gateway implementation of RIPv2 complies with RFC 2453.
OSPF
Open Shortest Path First (OSPF) is a protocol that, like RIPv2, is used for routing IP traffic. It is a link-state protocol. A link can be considered an interface on the router, and the state of the link is a description of that interface and of its relationship to its neighboring routers. The collection of all these link-states forms a link-state database. OSPF uses a link-state algorithm in order to build and calculate the shortest path to all known destinations.
The Corente Virtual Services Gateway will support OSPF multicast messages. The Location gateway can accept unicast messages from routers, but will multicast the responses.
To enable OSPF on a Corente Virtual Services Gateway, the OSPF section on the Network tab of the Location’s Location form must be filled out:
Enable OSPF on LAN: When this option is selected, the Location gateway will use OSPF to announce routes on the LAN that can used to reach remote application network subnets.
Route Cost: To change the cost of routes advertised by OSPF on the Corente Virtual Services Gateway, enter a new value in this field. The default cost is 1.
ASN Number: The default ASN number is 0. If you would like, you can enter a new value in this field.
The Corente Virtual Services Gateway implementation of OSPF complies with RFC 2328.
BGP
Like RIP and OSPF, Border Gateway Protocol (BGP) is a protocol that is widely used for routing IP traffic. BGP is especially useful in very large private IP networks where routes to these different subnets are changing dynamically. In general, it is more secure than RIP or OSPF, as it reduces the risk of middle man attacks by requiring that you specifically identify routing neighbors of the Location gateway rather than relying on them to announce themselves.
Enable BGP on LAN: When this option is selected, the Location gateway will use BGP to announce routes on the LAN that can used to reach remote application network subnets.
AS Number: Enter the AS number of the LAN on which this Location gateway is installed.
Password: Enter the password that the Location gateway will use when receiving BGP packets from its neighbors.
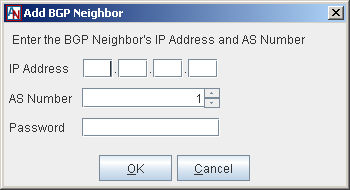
Neighbors: This Location gateway's current BGP routing neighbors are listed in this table. When you enable BGP, you must add at least one neighbor in this table. Click Add to add a new neighbor, Edit to edit an existing neighbor, or Delete to remove an existing neighbor.
On the screen that is displayed, enter the IP address of the BGP neighbor on the Location gateway's LAN, the AS number of the other network it routes to, and, if applicable, the password to be used by the Location when sending packets to this neighbor. When you are finished, click OK to store this neighbor. Note that you can enter duplicate neighbor IP addresses in this table if they have different AS Numbers.
Using RIP, OSPF, and BGP on your Corente Virtual Services Gateway
RIPv2, OSPF, and BGP can be used simultaneously on the same network, and can both be enabled on your Corente Virtual Services Gateway at the same time. They are enabled individually for each Location gateway.
If RIPv2 and/or OSPF are enabled, when a tunnel is successfully established to a remote Corente Virtual Services Gateway partner, the local Corente Virtual Services Gateway will send RIPv2 and/or OSPF packets to routers on its LAN interface only that announce the most appropriate routes to the tunnel. All computers on a subnet within the LAN will use the same route to access the tunnel and the appropriate subnet on the other side. When tunnels are brought down, the local Corente Virtual Services Gateway will send RIPv2 and/or OSPF packets to routers on its LAN announcing that the routes are no longer valid.
BGP differs from the other protocols in that, when a tunnel is successfully established to a remote Location partner, the local Location gateway will send BGP packets only to the routers on its LAN interface that are explicitly listed as neighbors, announcing the most appropriate routes to the tunnel. Like RIPv2 and OSPF, all computers on a subnet within the LAN that has a router with BGP enabled and which is also listed as a neighbor of the Location gateway will use the same route to access the tunnel and the appropriate subnet on the other side. When tunnels are brought down, the local Location gateway will send BGP packets to its neighbors announcing that the routes are no longer valid.
The Corente Virtual Services Gateway will use its LAN interface only to send and honor RIPv2, OSPF, and BGP messages from local routers. RIPv2, OSPF, and BGP will not be sent from or honored by the Location gateway's WAN interface, and will not be sent over or received from application network tunnels and the Internet.
Additionally, the Location gateway will only advertise routes that can be used to reach remote application network subnets. RIPv2, OSPF, and BGP will not be used to advertise routes from one local subnet to another local subnet. Normally, the Location gateway will not use RIPv2, OSPF, or BGP to advertise routes that can be used to reach Corente Clients, unless the client is using a private (non world-routable) IP address (such as if it connects to the application network from a LAN). The Corente Virtual Services Gateway will never advertise routes for a subnet if the reachable address of the Location gateway falls into that subnet.
Routes advertised from the Location gateway with RIPv2, OSPF, or BGP will override routes that you have entered on the Routes tab (see Section 1.9, “Routes”) if the weight of the dynamic route is equal to or less than the weight of the static route. If the weight of the dynamic route is greater than the weight of the static route, the static route will be used first. A lower weight gives greater precedence to routes.
If you enable RIPv2, OSPF, and/or BGP, you do not need to add routes to the subnets on the Routes tab. However, you must have an entry on the User Groups tab for these subnets so that the machines on the subnets can participate in the application network. You must also make sure that there are routers on your local network that know about these subnets and you must configure these routers to respond to RIPv2, OSPF, or BGP messages.
Turning on RIPv2, OSPF, and BGP on your network routers
If you plan to use RIPv2, OSPF, and/or BGP to advertise routes on your multiple subnet LAN, you must turn on RIPv2, OSPF, and/or BGP on the appropriate network routers. For more information about turning on RIPv2, OSPF, and BGP, refer to documentation provided with your router.
To prevent the possibility of intruders duplicating one of your Locations and gaining access to your domain, you can enable the Reject WAN Interface Mismatch security feature. If this feature is enabled for a Location and it attempts to connect with the SCP when the IP address and/or MAC address of its WAN interface (or WAN/LAN interface) are not the same as the IP address and MAC address that were used the last time the Location was in contact with the SCP, an alarm will be generated and the Location will be denied from contacting the SCP. You should contact Corente Customer Care if this occurs.
If a WAN Interface mismatch occurs because you moved or swapped the hardware for the Location without selecting the Allow one WAN Interface change option (as described below), simply select that option and save your changes to the Location form. This Location will then be allowed to connect to the SCP and function as usual.
Fill out the fields as follows:
Reject WAN Interface Mismatch: When this option is selected, if the Location contacts the SCP and the IP address and/or MAC address of the WAN interface (or WAN/LAN interface) have changed, the Location will be denied from contacting the SCP and an alarm will be generated.
When this option is selected, the following checkbox will be made available:
Allow one WAN Interface Change: If you plan to move or change this Location's gateway hardware, before you do, ensure that this option has been selected. This will allow the new hardware to establish a secure connection with the SCP with its new IP address and MAC address, which will be recorded at the SCP. Once the new IP address and MAC address are recorded, this option will be deselected and the Reject WAN Interface Mismatch feature will function as described above. You must re-select this option the next time you would like to change the hardware.
The Other Settings section captures your preferences regarding nested subnets, remote access to Gateway Viewer, and the session re-key interval.
Enable any of the following options, if you would like:
Perform DNS/WINS Fixup: If a computer has name services (DNS and/or WINS) configured on the system, the name used by the computer to make a connection will be resolved by DNS or WINS. For name resolution, the IP address of a computer that is stored on a DNS or WINS server is usually the computer's real IP address. If NAT-ting occurs between two Corente Virtual Services Gateway partners within the application network, computers on one network of the application network will not be able to use the real IP address returned from DNS/WINS to connect to remote computers on the other network.
The problem can be solved with DNS/WINS Fixup. If the Perform DNS/WINS Fixup option is checked, computers behind this Corente Virtual Services Gateway will always use the correct IP address to connect to another computer across the application network (either its real or NATed IP address). To provide this service, all packets from DNS/WINS servers within the application network are re-directed to the DNS/WINS proxy on the Location gateway. Every name query response packet is checked and, if necessary, its contents are updated. The final DNS/WINS response packet with correct IP information is then forwarded to the original requester. The fixup is done automatically and is completely transparent to the end users. This feature allows all computers behind the Location gateway (including Corente Clients) to connect by name to remote NATed computers within the application network, using any application (e.g., ftp, http, telnet, ping, etc).
NoteThe DNS/WINS Fixup will work only when name resolution requests are made via the Corente Virtual Services Gateway. This means that the DNS/WINS servers cannot reside on the same subnet as the computers using this service. Also, the fixup applies only to DNS/WINS packets within the application network. Therefore, a computer using DNS/WINS servers on the Internet will not benefit from this feature. Computers behind the Location gateway can have different DNS/WINS configurations as long as the Corente Virtual Services Gateway is in the name service request path.
By default, this option is disabled.
Nested Subnets: When you create a User Group for your Location during Location gateway creation in the Location Wizard (or on the User Groups tab, as in Section 1.8, “User Groups”), you indicate one or more ranges of IP addresses in your local network that will participate in the application network. Each Location gateway has one or more User Groups.
By default, the service will not permit ambiguous handling of any IP address. For example, this means that no conflicting rules are permitted where the same IP address exists in a User Group for the local Location gateway and also exists in a User Group for this Location's remote Location partner.
However, many network administrators make use of the fact that normal IP routing rules are ordered so that a more specific rule applies before a more general one. If there are conflicting rules for certain IP addresses, the rule describing the smaller subnet would take precedence. For example, a central site might have a User Group that includes all of 172.16.0.0/16 and a remote Location partner might have a User Group that includes 172.16.1.0/24. The remote Location partner's User Group description would override the central site's User Group because it contains a more specific range of addresses. Notice that the remote partner's User Group is completely contained inside the central site's User Group—this is what is referred to as a "nested subnet". Address ranges that overlap each other entirely are never permitted between Locations.
When this option is checked, nested subnets (as described above) will be permitted by this Location gateway. It is recommended that you do not check this option, as nested subnets can cause routing problems that are difficult to diagnose.
By default, this option will be unchecked for new Location gateways. When this option is unchecked, nested subnets will cause a Configuration Alert and no tunnels will be established between this Location and its partners (see Section 1.14, “Alerts” for more information on Configuration Alerts).
A Configuration Alert for nested subnets can be prevented between two Locations that are partners, if you:
enter mutually exclusive IP address ranges in the User Groups
enable Allow Locations to be configured with nested subnets for both Locations
enable Auto Resolve NAT on both Location gateways for each other (see Appendix A, Corente Advanced Network Address Translation (NAT) and Your Corente Virtual Services Gateway, for more information on Auto Resolve NAT). Auto Resolve NAT is enabled by a Location on a per partner basis. If any conflicts occur between a Location and its partner when Auto Resolve NAT is enabled, the Location gateway will automatically translate the IP addresses of the partner's User Group to new subnets to prevent the conflicts.)
Compact NAT Subnets: When this option is selected, the Location will sort addresses largest to smallest in order to keep the NAT table to a minimum. This feature applies to both Inbound NAT and Auto Resolve NAT. By default, Locations that were created pre-version-8.4 will have this option disabled and NAT will behave as it has in past releases. Locations created Corente Virtual Services Gateway using the 8.4 release and after will have this option enabled by default.
Session Re-Key Interval: Session keys are used by a Corente Virtual Services Gateway to encrypt the data that is being sent over each of its application network tunnels. A Location gateway will automatically regenerate its session keys according to the interval that you select with this pull-down menu. The default interval is 8 hours, the interval that has been used in previous releases of the Corente Virtual Services Gateway Software. You may choose a shorter interval (between 30 minutes and 8 hours).


