
The Monitored Servers tab allows you to register servers with this Location gateway in order to monitor the availability of these servers and the usage of certain resources on these servers (CPU, physical memory, disk space, and/or swap space). You can define thresholds and will be alerted when usage exceeds these thresholds. In addition, all monitored data can be viewed in Gateway Viewer and with the Reports feature.
Corente Virtual Services Gateways use the Simple Network Management Protocol (SNMP) to monitor servers. Any servers to be monitored must have an SNMP agent installed on them (for Windows, the SNMP Windows component is required; for all other operating systems, Corente recommends the NET-SNMP agent, but you can use any other agent as long as it supports the Host Resources MIB as defined in RFC 2790).
You can monitor any server that meets the following requirements:
The monitored server must support SNMP Version 1 (as defined in RFC 1157) and be able to respond to polls from SNMP network management stations.
The monitored server must support the Host Resources MIB (as defined in RFC 2790).
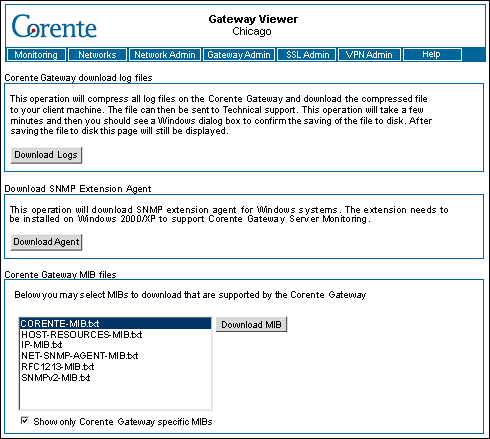
If the monitored server is running Windows 2000/XP/Vista/7/8, it requires installation of a special SNMP extension agent called the Windows Performance MIB. The InstallShield package for this agent (perfmib.exe) can be downloaded from the Download screen in Gateway Viewer. Details are available below.
If the monitored server is not on the same LAN as this Location gateway, the Location gateway must be able to communicate with the server either over the Internet or through alternate methods (i.e., via a private backbone or alternate connection).
The Download SNMP Extension Agent section on the Download screen in Gateway Viewer allows you to download the required SNMP monitoring component for servers running Windows 2000/XP/Vista/7/8.
To monitor a Windows 2000/XP server, you must first make sure that the Windows component Managing and Monitoring Tools is installed on the server. To install this component on the server, access Add/Remove Programs on the server’s Control Panel and then select Add/Remove Windows Components. A list of components will be displayed. Make sure Managing and Monitoring Tools is selected in this list. You may be required to insert the Windows Operating System CD when installing this component.
To monitor a Windows Vista/7/8 server, you must be logged in as an administrator or a member of the Administrators group. Click Start and go to the Control Panel, double-click Programs and Features, then click Turn Windows features on or off in the left-hand side of the page. Select the Simple Network Management Protocol check box, and click OK, then click Next. You may be required to insert the Windows Operating System CD when installing this component.
To configure the SNMP agent, access the Control Panel. Double-click Administrative Tools and then double-click Computer Management. In the console tree, click Services and Applications and then click Services. In the details pane, scroll down and click SNMP Service. From the Action menu, click Properties. On the Security tab, select Send authentication trap if you want a trap message to be sent whenever authentication fails. Under Accepted community names, click Add. Under Community Rights, select a permission level for this host to process SNMP requests from the selected community. In Community Name, type a case-sensitive community name, and then click Add. Specify whether or not to accept SNMP packets from a host:
To accept SNMP requests from any host on the network, regardless of identity, click Accept SNMP packets from any host.
To limit acceptance of SNMP packets, click Accept SNMP packets from these hosts, click Add, type the appropriate host name and IP or IPX address, and then click Add again.
Click Apply to apply the changes.
After the component has been installed and configured, you must access Gateway Viewer from the server and download the SNMP Extension Agent by clicking the Download Agent button. An InstallShield package called perfmib.exe will be downloaded to the hard disk. Install the agent by double-clicking the downloaded package and following the prompts. When this agent has been installed, you can now monitor this server from a Corente Gateway using server monitoring. Next, you must register the server in the Location form of the local Location gateway.
The main screen of the Monitored Servers tab in the Location form presents a table of all servers that you have already added to be monitored. You may Edit or Delete any server listed in the table.
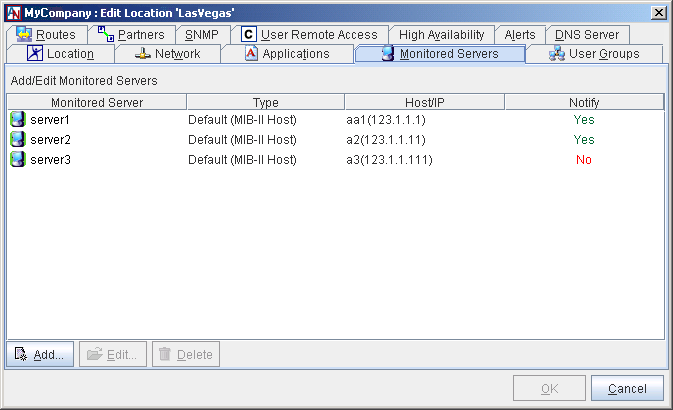
You may Edit or Delete any server listed in the table. To add a new server to this table, follow the instructions below.
Select the Add button on the main screen of the Monitored Servers tab. The Add Monitored Server window will be displayed.
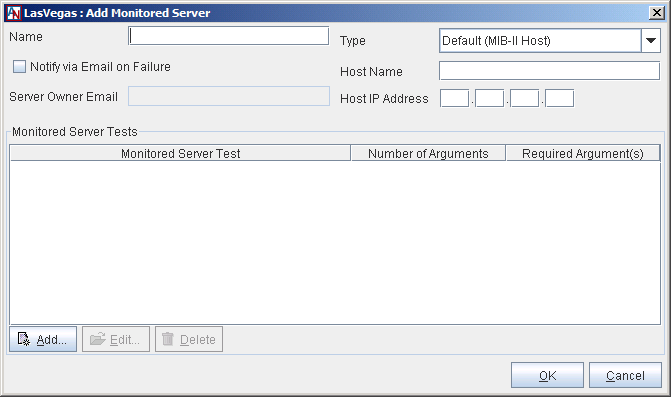
Fill out the fields and options as follows:
Name: Enter the name of the server as you would like it to appear to administrators in Gateway Viewer.
Notify via Email on Failure: Select this option if you would like the server's administrator to receive an email notification if this server reaches its warning or critical thresholds, or if it should fail. The notification will be sent to the email address supplied in the Server Owner Email field. If no email address has been entered that field, the notification will instead be sent to the address(es) supplied on the Alerts tab for this Location.
Server Owner Email: Enter the email address of the administrator of this server. If you have selected the Notify via Email on Failure option, all email notifications will be sent to this address.
Type: Select the type of server that you are registering with the Location gateway. The following choices are available: Default (MIB II Host), FreeBSD NET-SNMP, LINUX Net-SNMP, NET-SNMP OS Independent, Solaris NET-SNMP, Windows 2003 Server, Windows Server 2008, Windows Server 2012, Windows Vista, Windows 7, and Windows 8.
NoteIf your server uses an operating system other than Windows and is using an SNMP agent other than the NET-SNMP agent, you must choose the Default (MIB II Host) server type. Make sure that the SNMP agent you are using on the server supports the Host Resources MIB (aka MIB II Host) as defined in RFC 2790.
Host Name: Enter the DNS name of the server.
Host IP: Enter the IP address of the server.
After providing basic information about the server, you must use the Monitored Server Tests section to register the tests of this application. Server tests are tests that will be performed on the server to identify usage statistics for different resources: CPU load, disk space, memory usage, and/or swap space. This table lists all the tests that you have already added. You may Edit or Delete any test listed in the table. Click Add to add a new server test.

On the screen that is displayed:
Monitored Server Test Name: Choose from four resources that can be monitored: CPU Usage, Disk Usage, Memory Usage, and Swap Usage.
Monitored Server Test Arguments: When a Monitored Server Test Name is selected, this table lists all of the arguments for that test. To modify the variable for an argument, select the argument and click the blue text in the Variable column. You can enter a new value in the field that is provided.
When you have finished defining a server test, click OK to store your changes or Cancel to close the screen and discard your changes. You can enable as many of the tests for a server as you would like. When you have finished defining a monitored server, click OK to store your changes or Cancel to close the screen and discard your changes. Your new monitored server will now appear on the main screen of the Monitored Servers tab.