
The User Groups tab lets you identify groups of machines on the local network (computers, servers, printers, etc.) that will be allowed to participate in your application network.
To begin, you must edit the Default User Group, which provides the Corente Virtual Services Gateway with a list of all machines on the LAN that are participating in the application network. You first created this group when you used the Location Wizard to create the Location.
Next, if applicable, you should define your Default User Group – DMZ, which informs the Location gateway what subnet is designated as the DMZ on your LAN. (For more information on implementing a DMZ with Corente, refer to Appendix C, Implementing a DMZ with Corente.
Then, you should define the Internal Network Description group, which should contain all of the subnets at your site. This allows the Location gateway to distinguish between computers on the Internet and computers on the LAN that are not participating in the application network.
After you define these User Groups, you can create additional named User Groups, which will divide the IP addresses on the LAN into smaller groups. Each named User Group consists of machines that will have the same permissions on the domain or LAN. You can create any number of named User Groups for this Location.
On the Partners tab or with the Tube Wizard, you can further define and restrict permissions by including your User Groups in tubes. Tubes allow you to specify a set of local machines, a set of remote machines (or a remote application), and the firewall policy to be used when these machines communicate. Instructions for enabling partners and creating tubes are available in Chapter 2, Define and Provision Security, Connectivity and QoS.
The following network addresses are restricted and cannot be assigned to any hosts on the LAN:
1.1.1.0
1.1.1.1
1.1.1.2
1.1.1.3
Instead of using the User Groups tab to include application servers on the LAN in your application network, you may want to register these servers on the Applications tab. For more information, refer to Section 1.6, “Applications”.
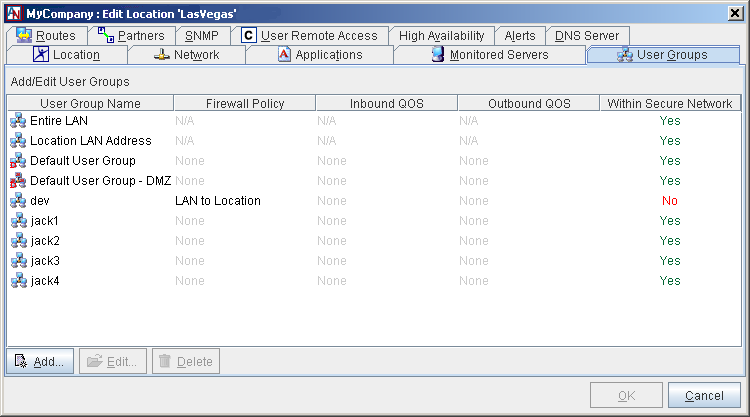
The main screen of the User Groups tab displays the User Groups that have already been configured for this Location. Three placeholder User Groups appear by default:
Entire LAN Group: This group is used on the Partners tab exclusively when creating a LAN to Internet Access or LAN to Location Access partnership. It is pre-defined and cannot be modified. For more information, refer to Section 1.10, “Partners”.
Location LAN Address: This group is used on the Partners tab when creating a LAN to Location Access partnership or a partnership that allows partners to access the Gateway Viewer application for this Location. It is pre-defined and cannot be modified.
Default User Group: This group contains every IP address on the LAN that will participate in the application network. It is not pre-defined and must be configured before a new Location gateway can be installed.
Default User Group - DMZ: (appears only when a DMZ interface has been configured for this Location on the Network tab) This group contains every IP address on the LAN that is participating in the DMZ. Depending on the choices you made when configuring the DMZ interface, this group may or may not be pre-defined. This group is used exclusively when configuring the DMZ to Internet Access and/or LAN to DMZ Access partnerships on the Partners tab. (For more information on implementing a DMZ with Corente and configuring the Default User Group - DMZ, refer to Appendix C, Implementing a DMZ with Corente.
Each Location must have a Default User Group. The Default User Group must contain every IP address on the LAN that will participate in the application network. You created a Default User Group in the Location Wizard when you created your Location gateway personality, but you can modify this group using the following procedure. To configure the Default User Group, select the Default User Group entry on the main screen of the User Groups tab and select the Edit button. The Edit User Group 'Default User Group' screen will be displayed
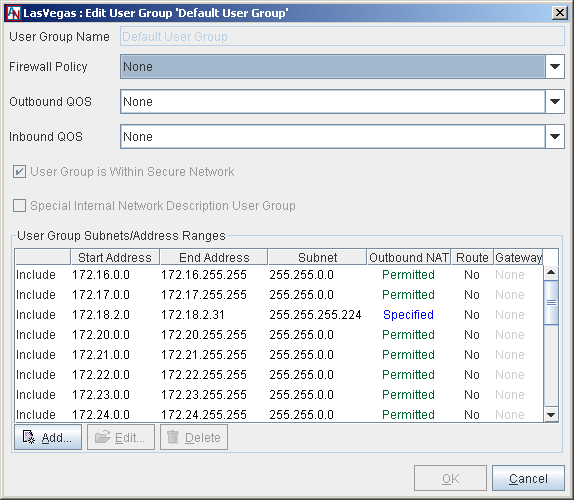
On this screen, you must define which computers on the local network will participate in the application network by specifying subnets of IP addresses.
Firewall Policy: If you would like, you can choose an optional Firewall Policy that will apply to all traffic to and/or from the Default User Group. For more information about Firewall Policies, refer to Section 2.1, “Corente Virtual Services Gateway Security and Firewalls”.
Inbound QoS: If you would like, you can choose optional Quality of Service (QoS) settings for traffic inbound to the default User Group. To specify the priority of traffic inbound through the Location gateway to the default User Group, choose a QoS entry from the Inbound QoS pulldown menu. For more information on the Quality of Service feature, refer to Section 2.2, “Quality of Service (QoS)”.
Outbound QoS: If you would like, you can choose optional QoS settings for traffic outbound from the default User Group. To specify the priority of traffic outbound through the Location gateway from this User Group, choose a QoS entry from the Outbound QoS pulldown menu.
NoteAs when performing any sort of QoS configuration, administrators must be careful when assigning QoS levels because if there is too much high priority traffic, any other traffic with a lower level of priority may become too slow or even be dropped. In addition, you cannot use QoS to prioritize traffic to or from a Corente Client.
User Group is Within Secure Network: This option will be chosen by default and cannot be changed.
Special Internal Network Description Group: This option will not be chosen by default and cannot be changed.
User Group Subnet/Address Ranges: This section allows you to define the subnets/ranges that you would like to include in the Default User Group. The table lists all the ranges that you have already added. You may Edit or Delete any range listed in the table.
To add a new subnet/range, select the Add button.
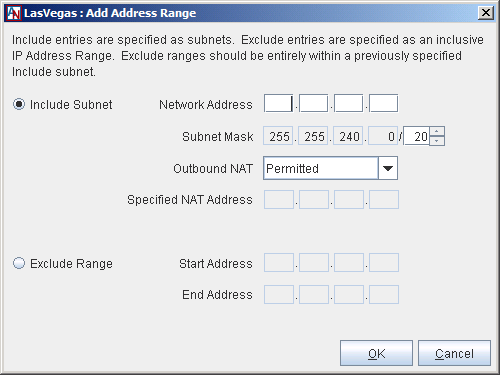
Include Subnet: Select this option to specify a range that will be included in the group. Fill out the available fields as follows:
Network Address: Enter the first address of the subnet in this field.
Subnet Mask: Enter the net mask of the subnet in this field, which will define the range of addresses within this subnet.
NoteIf you include a range of IP addresses that is not contained within the same subnet of the LAN IP Address of the Location gateway or not distributed by the Location gateway’s DHCP server, you must provide routing information to this subnet on the Routes tab (see Section 1.9, “Routes”) or enable RIPv2 or OSPF on the Network tab) see Section 1.5, “Network” of this form.
Outbound NAT: You must set the appropriate Outbound NAT settings for this subnet. Network Address Translation (NAT) is used to map the real IP address of each machine in a subnet to an IP address within another subnet. The translated IP addresses become the visible IP addresses of the machines. NAT can be used to organize a network or prevent routing problems caused by duplicate IP addresses. When Outbound NAT is enabled for a Location, the Location gateway will translate the subnet of IP addresses to another subnet before the Location gateway makes the addresses visible to remote partners. The administrator must specify the new subnet to which the real IP addresses will be translated. Each address within the real subnet will be mapped to an address in the specified subnet. For all remote partners, these specified addresses will become the visible IP addresses of the machines.
The Outbound NAT settings in your User Group will interact with the Auto Resolve NAT and Inbound NAT settings that a Location partner has chosen for your Location. For more information on Auto Resolve NAT and Inbound NAT, refer to Appendix A, Corente Advanced Network Address Translation (NAT) and Your Corente Virtual Services Gateway.
Prohibited: This setting forbids all partners to perform NAT on this Location’s User Group. If Prohibited has been set on a range in the local User Group and a partner has enabled Auto Resolve NAT (and there is an address conflict) or Inbound NAT for this Location, the tunnel will not be brought up and a Configuration Alert will be generated. In other words, the Prohibited setting will bring down any tunnel to a partner if that partner attempts to NAT this User Group. The primary use for this setting is to prevent NATing on a connection that is transporting a protocol containing embedded IP addresses for which the Location gateway does not have a fixup module. The Location gateway includes a fixup module that allows active FTP, normally forbidden on a NATed subnet.
Permitted: This is a passive setting. The Location gateway will not NAT the address range, but it will not prevent the address range from being NATed by a partner. (This is the default setting.)
Specified: This setting allows an administrator to specify a new subnet of IP addresses to which this address range will be mapped. The new addresses within the specified subnet will become the visible IP addresses of the local computers in this range to all remote partners. After enabling this option, enter the new subnet in the Specified NAT Address field. This address space must be unique in the application network.
The Specified setting is a useful way of organizing an entire domain, where each User Group in the domain is mapped to a distinct set of address ranges so that there are no address conflicts. The traffic from each site can then be identified by the range into which it has been mapped. Of course, it is the administrator's responsibility to guarantee that there are no conflicts between the addresses that have been Specified for each subnet. Therefore, it is usually preferable to specify Inbound NAT for conflicting addresses (configurable on the Partners tab) rather than use Outbound NAT, because Inbound NAT does not require a global solution and there are no chances for conflicting addresses after the solution has been applied.
Exclude Range: If there are IP addresses or ranges of addresses within the subnets that you have already Included that you do not want to be in your Default User Group, you can use the Exclude Range option to remove these addresses. Select this option to specify a range that will be excluded in the group. Fill out the available fields as follows:
Start Address: Enter the first address of the range that you would like to be excluded from an existing included range.
End Address: Enter the last address of the range that you would like to be excluded from an existing included range. If the range includes only one address, you do not need to fill in this field.
Click OK to add this definition to your Default User Group or Cancel to close the window and discard your changes. Repeat this process for as many subnets as you would like to add to your Default User Group. Remember that you must have at least one IP address listed as an include in the Default User Group even if you are using DHCP (i.e., DHCP is selected for a network interface on the Network tab of this form).
When you are finished defining your Default User Group, click the OK button to store your changes and return to the main User Groups tab.
After defining the Default User Group, you should map out the entire local corporate network—even those computers that are not participating in the application network. You will transfer this information onto your Location gateway on the User Groups tab, using the Special Internal Network Description User Group option. To configure the Internal Network Description User Group, click the Add button. The Add User Group screen is displayed.
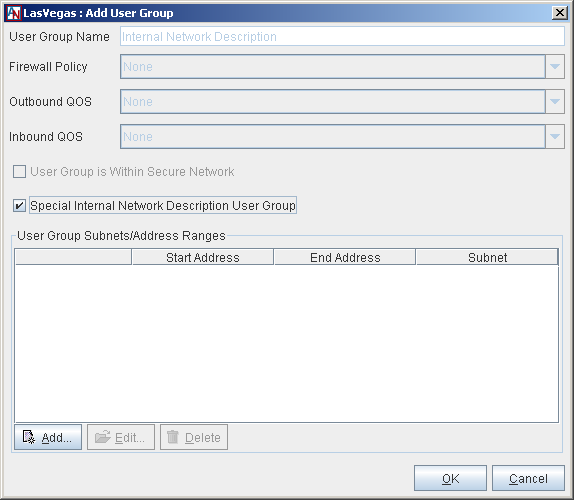
Fill out the screen as described above in the Default User Group section. (Note that you will not be able to select NAT settings for Included subnets.) You must add all subnets within your LAN to this User Group, because this definition includes the entire network—even machines that are not participating in the application network. Select the Special Internal Network Description User Group option and make sure the User Group is Within Secure Network option is not selected.
When you are finished, click the OK button to save your changes and return to the main User Group screen. The Internal Network Description User Group will now be displayed on this screen.
This User Group allows the Location gateway to distinguish between the corporate network and the Internet, which is especially important when this Location gateway is acting as a Backhaul Server or SSL Client access to the LAN is enabled. It prevents traffic being sent from or received by computers on the LAN that are excluded from the application network for security reasons. For example, if an Internal Network Description User Group is not defined, a Location designated as a Backhaul Server might route non-application-network traffic from a Backhaul Client to one of its own non-participating subnets, believing the subnet's address to be part of the Internet.
After defining the Default User Group, look at your LAN and decide what groups of IP addresses will need similar permissions in your domain and in any of your extranets. This means deciding what remote computers and/or applications each local computer will need to access or be accessed by, and what protocols must be allowed or denied over their secure connections. Divide your LAN's IP addresses and subnets into groups based on these criteria.
On the User Groups tab, you must configure these groups into named User Groups. You can define as many named User Groups as you need. Named User Groups in a Location can overlap with each other; however, you cannot create two named User Groups that contain the exact same set of IP addresses.
To configure a named User Group, click the Add button. The Add User Group screen will be displayed.
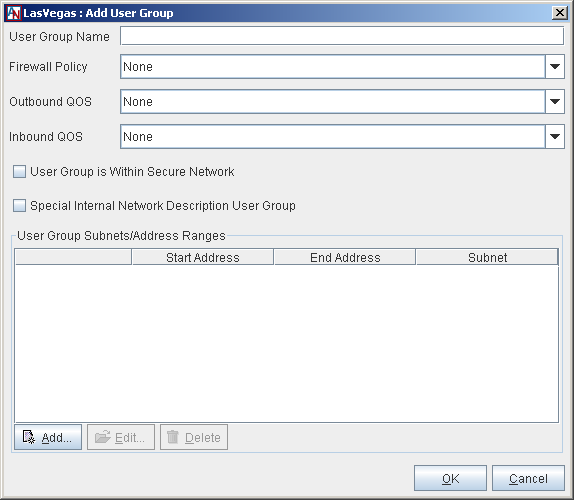
Fill out the screen as follows:
User Group Name: Enter a name for this User Group.
Firewall Policy: If you would like, you can choose an optional Firewall Policy that will apply to all traffic to and/or from this User Group. For more information about Firewall Policies, refer to Section 2.1, “Corente Virtual Services Gateway Security and Firewalls”.
Inbound QoS: If you would like, you can choose optional QoS settings for traffic inbound to this User Group. To specify the priority of traffic inbound through the Location gateway to this User Group, choose a QoS entry from the Inbound QoS pulldown menu. For more information on the Quality of Service feature, refer to Section 2.2, “Quality of Service (QoS)”.
Outbound QoS: If you would like, you can choose optional QoS settings for traffic outbound from this User Group. To specify the priority of traffic outbound through the Location gateway from this User Group, choose a QoS entry from the Outbound QoS pulldown menu.
NoteAs when performing any sort of QoS configuration, administrators must be careful when assigning QoS levels because if there is too much high priority traffic, any other traffic with a lower level of priority may become too slow or even be dropped. In addition, you cannot use QoS to prioritize traffic to or from a Corente Client.
User Group is Within Secure Network: Select this option if you would like this User Group to participate in the secure network. This option is selected by default. There are occasionally reasons to create User Groups that are not within the secure application network (for information on these reasons, refer to Section 1.8.4, “Other User Groups”. Remember that named User Groups within the application network must be subsets of the Default User Group (i.e., they can only include addresses that are also included in the Default User Group).
Special Internal Network Description Group: This option will not be chosen by default and cannot be changed.
User Group Subnet/Address Ranges: This section allows you to define the subnets/ranges that you would like to include in this User Group. The table lists all the ranges that you have already added. You may Edit or Delete any range listed in the table. To add a new subnet/range, select the Add button.
NoteWhen capturing the IP addresses to be included in a User Group, the Include Subnet and Exclude Range options cause the definition of the User Group to differ:
When all groups of IP addresses in the User Group are specified as Included, the User Group will contain only those IP addresses listed.
When all groups of IP addresses in the User Group are specified as Excluded, the User Group will contain all IP addresses within the Default User Group except for the excluded IP addresses.
When some groups of IP addresses are specified as Included and some as Excluded, the User Group will contain only those IP addresses listed as Includes except for the excluded IP addresses.
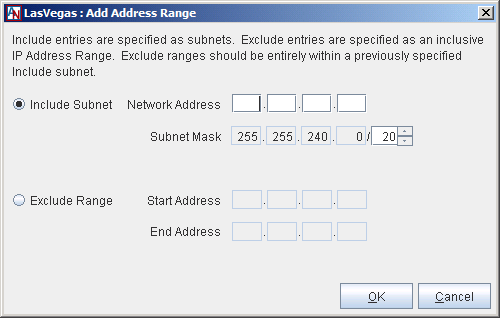
Include Subnet: Select this option to specify a range that will be included in the group. Fill out the available fields as follows:
Network Address: Enter the first address of the subnet in this field.
Subnet Mask: Enter the net mask of the subnet in this field, which will define the range of addresses within this subnet.
NoteIf you include a range of IP addresses that is not contained within the same subnet of the LAN IP Address of the Location gateway or not distributed by the Location gateway’s DHCP server, you must provide routing information to this subnet on the Routes tab (see Section 1.9, “Routes”) or enable RIPv2 or OSPF on the Network tab (see Section 1.5, “Network”) of this form.
Exclude Range: Select this option to specify a range that will be excluded in the group. Fill out the available fields as follows:
Start Address: Enter the first address of the range that you would like to be excluded from an existing included range.
End Address: Enter the last address of the range that you would like to be excluded from an existing included range. If the range includes only one address, you do not need to fill in this field.
Click OK to add this definition to your User Group or Cancel to close the window and discard your changes. Repeat this process for as many subnets as you would like to add to your User Group.
When you are finished defining your User Group, click the OK button to save your changes and return to the main User Groups tab. The named User Group will now be displayed in the table.
There are certain circumstances in which you may want to deselect the User Group is in Secure Network option when creating a User Group.
User Groups that are configured without the User Group is in Secure Network option selected can contain both machines that are participating in the application network and those that are not.
Using the Location Gateway for Local Routing
In addition to serving as an application network router, a Location gateway also serves as a local router. To use this Location gateway to route local traffic to and from a subnet, add the subnet to a User Group on the User Groups tab. If the User Group contains any machines that are not participating in the application network, make sure the User Group is in Secure Network option is not selected for the User Group. Then, configure static routes between the Location gateway and subnet(s) in the User Group on the Routes tab of this form or enable RIPv2/OSPF on the Network tab and the subnet router(s).
The Location gateway will route traffic between this User Group and any other local subnets that are also included as User Groups.