Quick Start : Triggering Abandon Cart Emails with Infinity and Responsys
Introduction
This tutorial details how to trigger an abandon cart email through Oracle Responsys by using Oracle Infinity to track when users have added an item to their cart but have not purchased.
Tip! In this tutorial, we’ll be providing you with a test website* so you can complete the tutorial without any development work:
*The test site was built using Oracle Content Management - a powerful solution to allow marketers to build their own websites quickly without any coding knowledge)
Objectives
The objectives of the tutorial are to:
- Generate a CX Tag to deploy Infinity to your website: We’ll be deploying the CX Tag to the test website in this example.
- Understand the required Infinity tracking: The test website will already be pre-configured to trigger the relevant tracking calls on your website (so you will not need to implement any tracking in this tutorial).
- Set up an Oracle Infinity Connection to Oracle Responsys: This is necessary to allow Infinity to send messages to Oracle Responsys to trigger the abandon cart emails.
- Set up an Oracle Infinity Action: This will trigger the message to Oracle Responsys when a user abandons their cart.
- Configure Oracle Responsys to send an email: You will configure Oracle Responsys to send a simple abandon cart email.
- Push live: You will push this live in Infinity and Responsys and be able to trigger an abandon cart email for yourself.
Prerequisites
In order to complete this tutorial, you must have the following in place:
-
Oracle Infinity: You must have an Oracle Infinity account.
-
Oracle Responsys: You must have an Oracle Responsys account (there are further prequisites within Oracle Responsys you must also complete).
Step 1: Create, Configure and Implement the Oracle CX Tag on our Test Website
The Oracle CX Tag is used to implement Infinity on your website. Please follow these instructions to deploy this on the test website:
1.1 Create your Oracle CX Tag
-
Log in to the Infinity user interface.
-
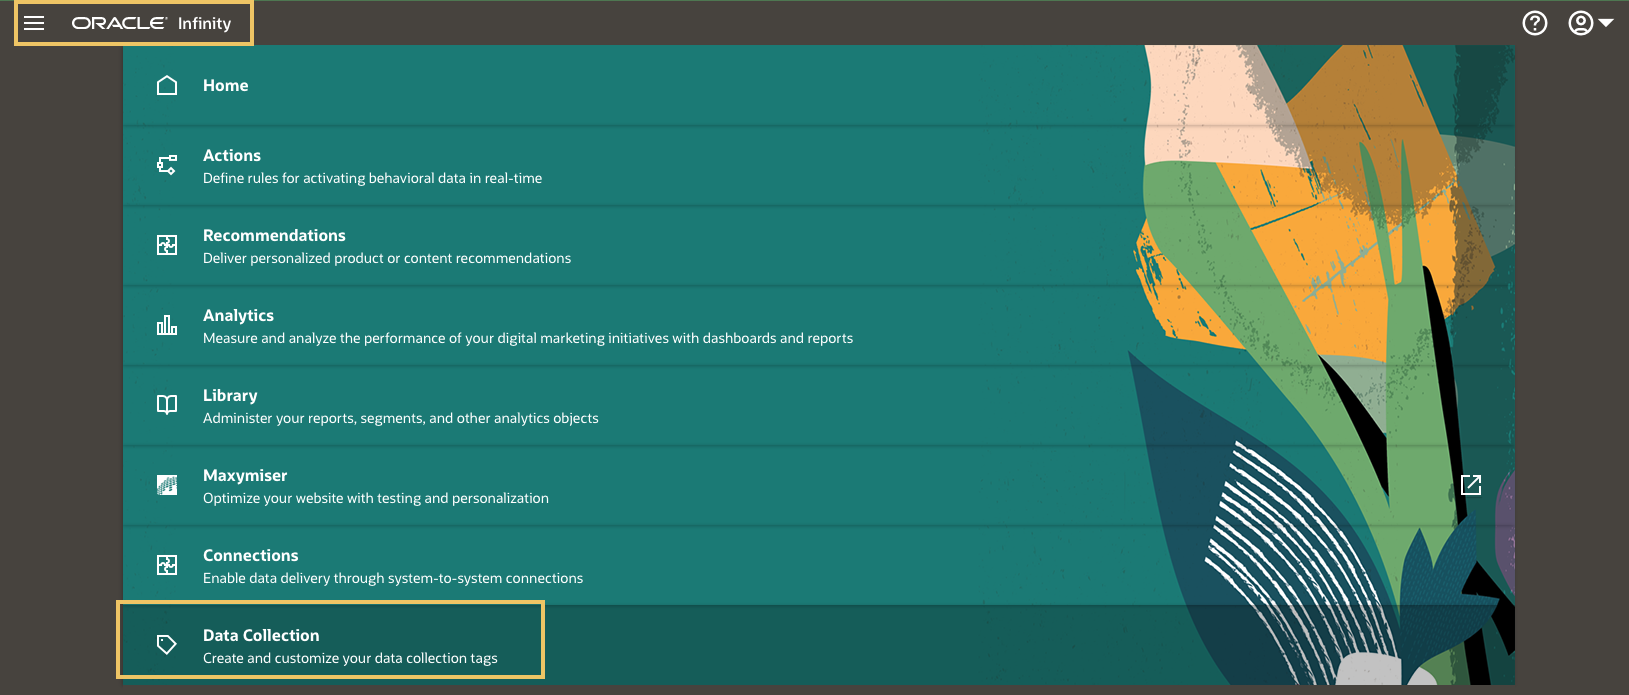
Go to Data Collection in the top-left navigation menu:
Data Collection Application
-
Click on Create Tag.
-
Enter the name
Demo Website Tutorial.
1.2 Configure the Infinity Module
We now need to configure the Infinity Module to deploy the Infinity on the test website.
-
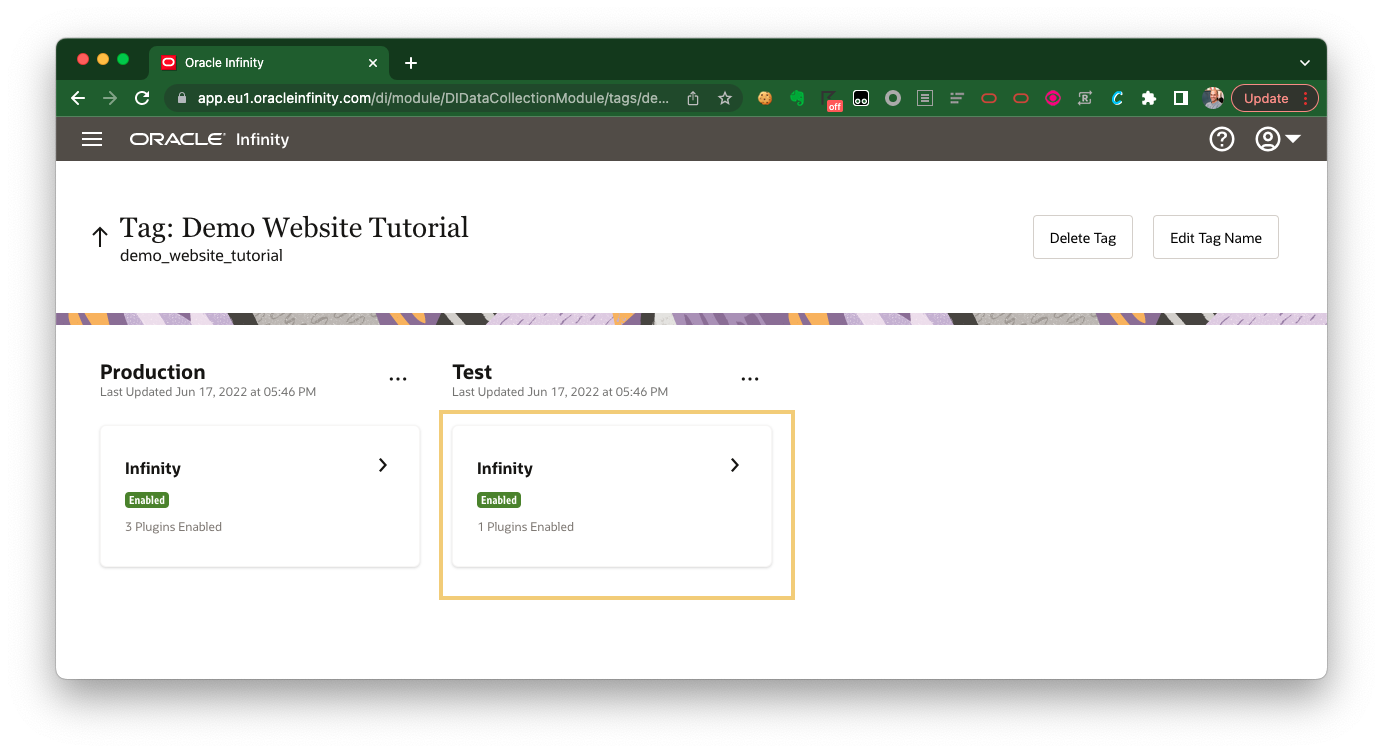
Click the Infinity Module.
Editing the Infinity Module
-
Go to the Plugins Added tab.
-
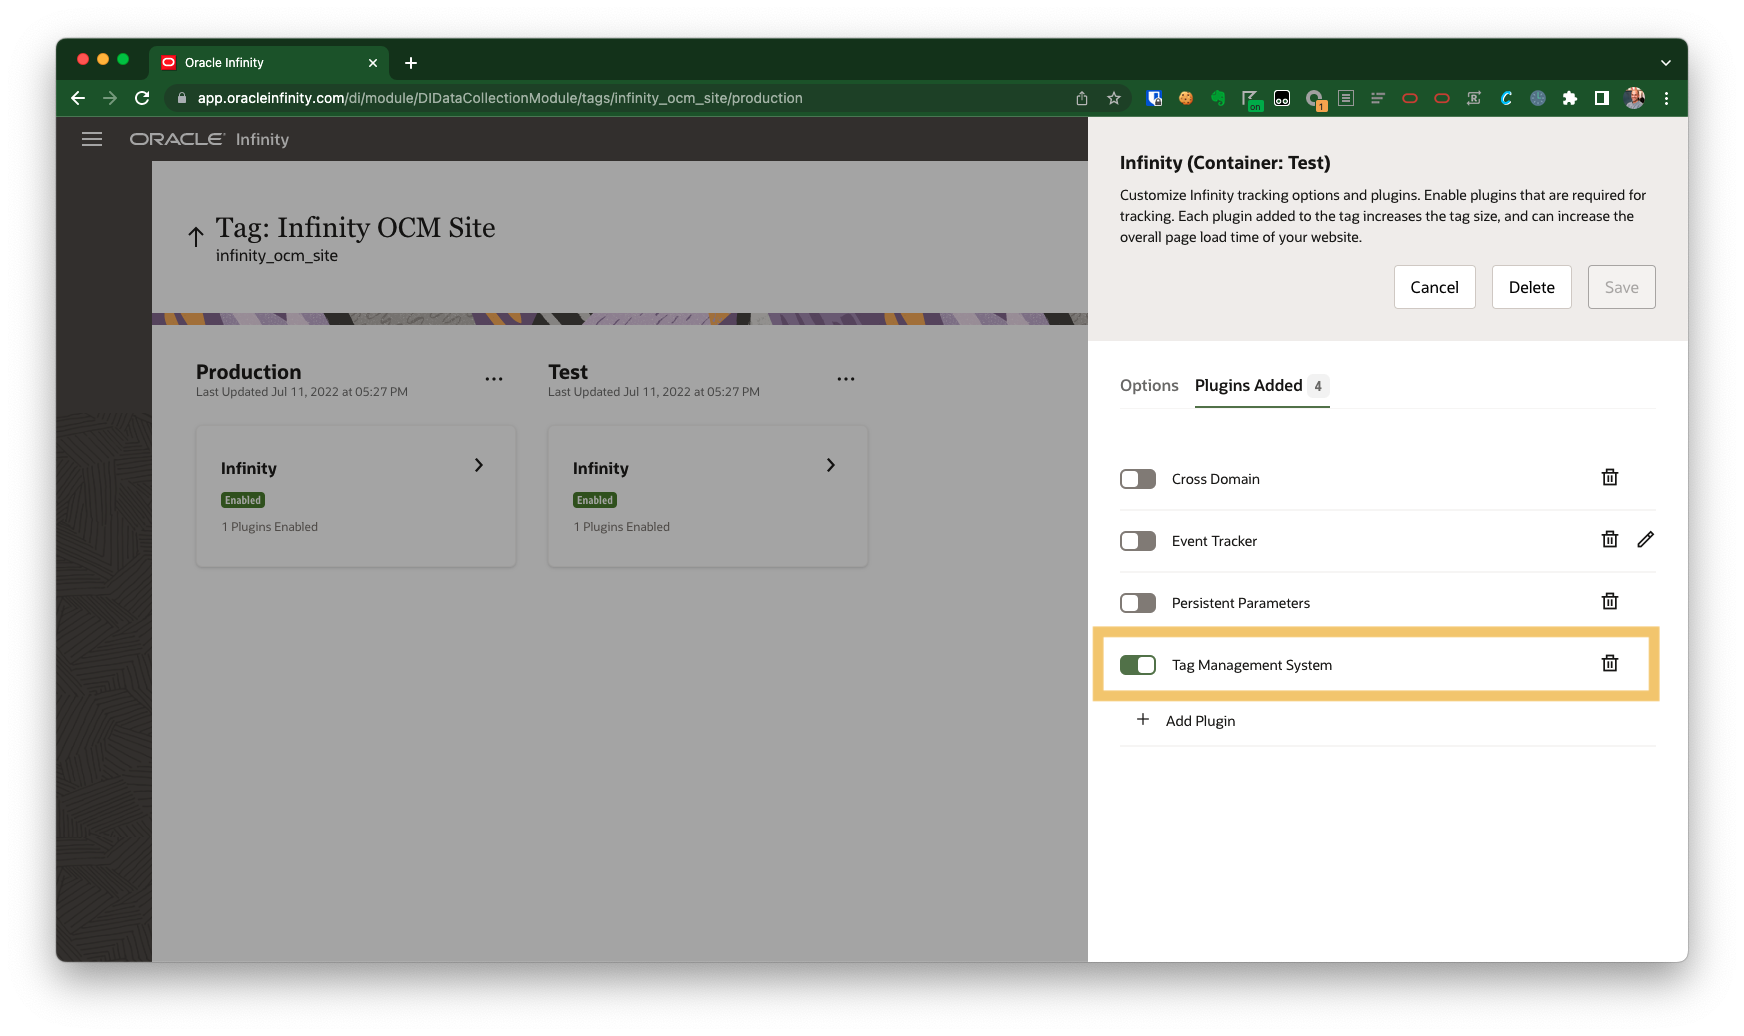
Click + Add Plugin and add the Tag Management System plugin.
-
Ensure you Enable the Tag Management System plugin then click Save.
Enabling the Tag Management System Plugin
-
Publish this to production by clicking on Publish to Production:
Publish to Production
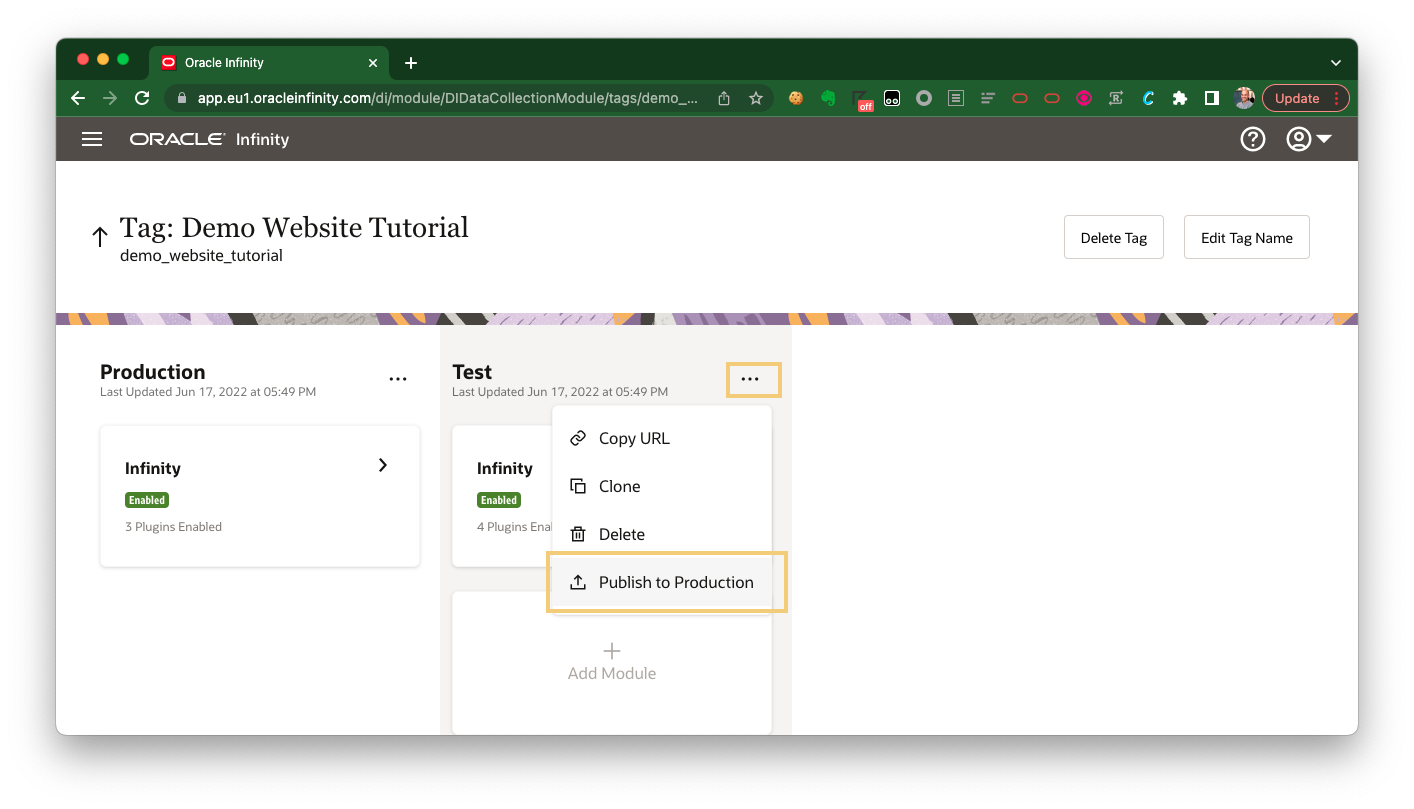
-
Accept all of the options in the prompt and click Publish.
1.3 Deploy the Oracle CX Tag on the Test Website
Normally, we could be implementing the Oracle CX Tag on your website as per the implementation guidelines. However, as we are going to be using a pre-built test website, we will not need to do this so will be skipping this step.
Our test website is especially built to allow us to use any CX tag of our choice without needing to implement the normal CX Tag code (for your browser only - it won’t load the CX Tag for other visitors).
Please complete the following steps to do this:
-
In the Data Collection application, we are going to take the the CX Tag URL that we will use to deploy the tag on our website:
Getting your CX Tag URL
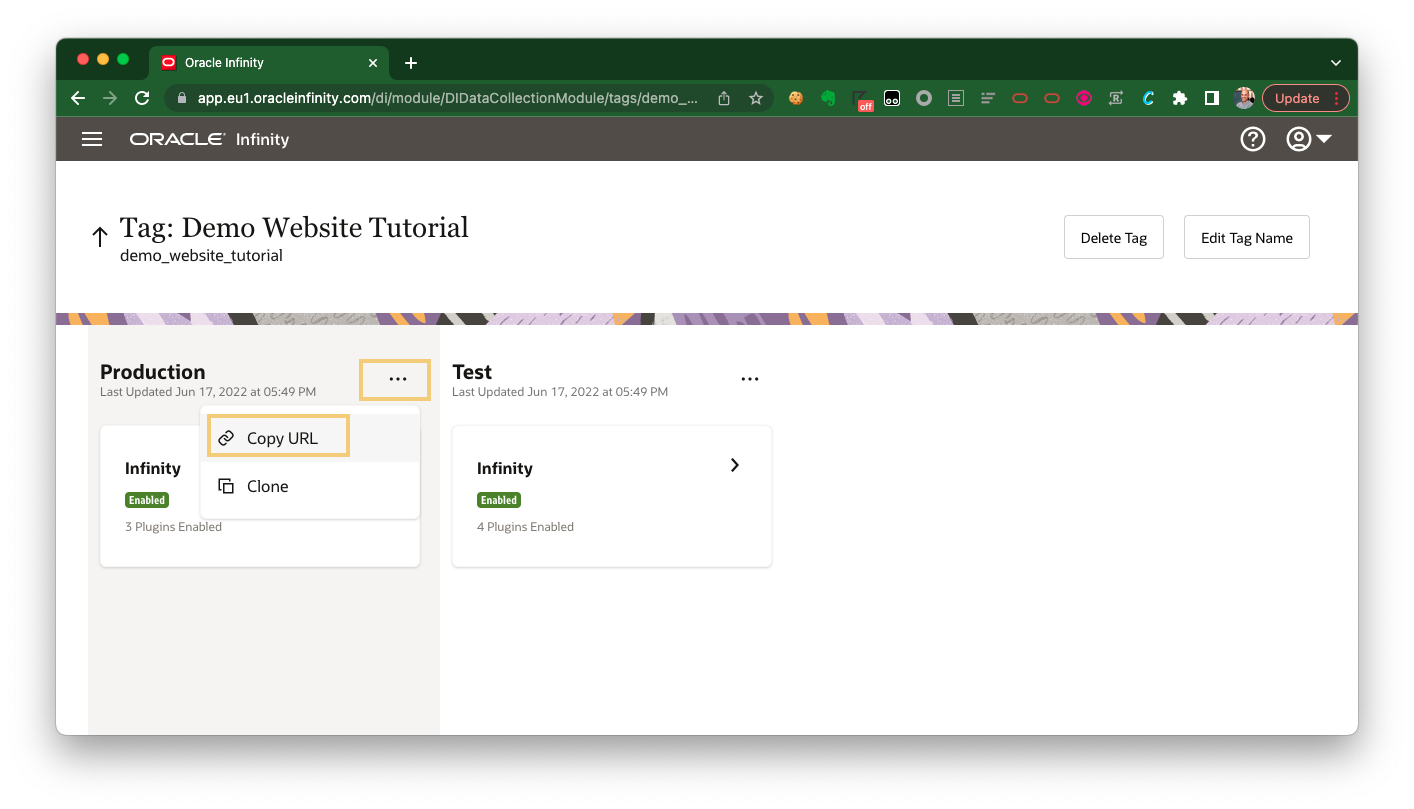
-
The URL you have copied should be similar to
//d.oracleinfinity.io/infy/acs/account/ACCOUNTGUID/js/TAGID/odc.jswhereACCOUNTIDis your Account GUID andTAGIDis the unique ID for the tag we will be using. -
Note down the
ACCOUNTIDandTAGID. -
We can use this CX Tag by editing the website URL as follows:
Step 2: Implement the Infinity Tracking on your Website
Tip! We can skip this step in our tutorial as the test website we will be using is pre-configured to have this tracking implemented but the required tracking calls are detailed below.
Now that the Oracle CX Tag deployed on your website, you would need to implement tracking calls to tell Infinity when users have added products to their cart and when they have purchased.
2.1 Implement Add Product to Cart Tracking
To understand what products have been added to our users’ cart, we will need to implement the following tracking code when someone adds a product to their cart:
Tips!
- Your website developer will be able to implement this for you on the website (or through a tag manager if you have one).
<script>
// Send Data
var cxDataObject = {
  "wt.tx_e":"a", // required : Denotes 'add product to cart'
  "wt.pn_sku":"ENTER SKU", // required* : e.g. 'BJN1'. Delimit multiple values with ';' ('BJN1;PSK2')
  "wt.email_sha256":"ENTER SHA256 HASHED EMAIL IF LOGGED IN" // required** : e.g. "267648f5401c5ee1b94acc79b7a0ab4d76d0b0980af7958284566b4867aea44a"
};

// DO NOT EDIT BELOW THIS LINE - ORA.click()
window.ORA = window.ORA || {productReady: []};
ORA.productReady.push(['analytics', function(cxDataObject) {return function() {return ORA.click({"data": cxDataObject})}}(cxDataObject)]);
</script>
Notes:
*We’ll be adding a list of product SKUs to a Responsys Supplemental Table in this tutorial later - these SKU values must match.
**If the customer is logged in, you must declare an ID which will later match the
EMAIL_SHA256_HASH_field in the Responsys Profile List we will be creating later.
2.2 Implement Purchase Product Tracking
To understand when a user has made a purchase, we will need to implement the following tracking code when someone makes a purchase (for example, on your order confirmation page):
Tips!
- Your website developer will be able to implement this for you on the website (or through a tag manager if you have one).
<script>
// Send Data
var cxDataObject = {
  "wt.tx_e":"p", // required : Denotes 'purchase product'
  "wt.email_sha256":"ENTER SHA256 HASHED EMAIL IF LOGGED IN" // required** : e.g. "267648f5401c5ee1b94acc79b7a0ab4d76d0b0980af7958284566b4867aea44a"
};

// DO NOT EDIT BELOW THIS LINE - ORA.click()
window.ORA = window.ORA || {productReady: []};
ORA.productReady.push(['analytics', function(cxDataObject) {return function() {return ORA.click({"data": cxDataObject})}}(cxDataObject)]);
</script>
Note: *If the customer is logged in, you must declare an ID which will later match the
EMAIL_SHA256_HASH_field in the Responsys Profile List we will be creating later .
2.3 Implement Page Tracking (including User Identifier Tracking)
In order to understand who to target with Responsys, a match key is required. We will be collecting your SHA 256 Hashed Email Address for each user and sending this to Infinity.
Notes:
- This will be present for each record within our Responsys Profile List as
EMAIL_SHA256_HASH_.- We could use alternative match keys (for example,
RIIDorCUSTOMER_ID_) but in our tutorial we will be usingEMAIL_SHA256_HASH_).
On our test website, we will be declaring the user’s SHA256 Hashed Email on every call (as per steps 2.1 and 2.2 as wt.email_sha256. We will also be declaring this on every page view using the following code:
<script>
// Send Data
var cxDataObject = {};

// If logged in, declare your user's SHA 256 Hashed Email Address
cxDataObject["wt.email_sha256"]:"ENTER SHA256 HASHED EMAIL" // e.g. "267648f5401c5ee1b94acc79b7a0ab4d76d0b0980af7958284566b4867aea44a"

// DO NOT EDIT BELOW THIS LINE - ORA.click()
window.ORA = window.ORA || {productReady: []};
ORA.productReady.push(['analytics', function(cxDataObject) {return function() {return ORA.click({"data": cxDataObject})}}(cxDataObject)]);
</script>
Step 3: Validate Infinity Tracking on your Website
We can now test our website to see whether the required tracking has been implemented as follows:
Tip! Please see Verifying Data Collection for more information around validating Infinity Tracking with the Oracle CX Tag.
3.1 Validate the Oracle CX Tag and Infinity Modules are firing on your website
Visit your test site ensuring that you update the URL with your ACCOUNTGUID and TAGID (as per above).
In your browser:
-
Open the developer tools (DevTools in Google Chrome), open the Network then refresh the page.
-
Filter for
odc.jsto check the CX Tag is firing:odc.js
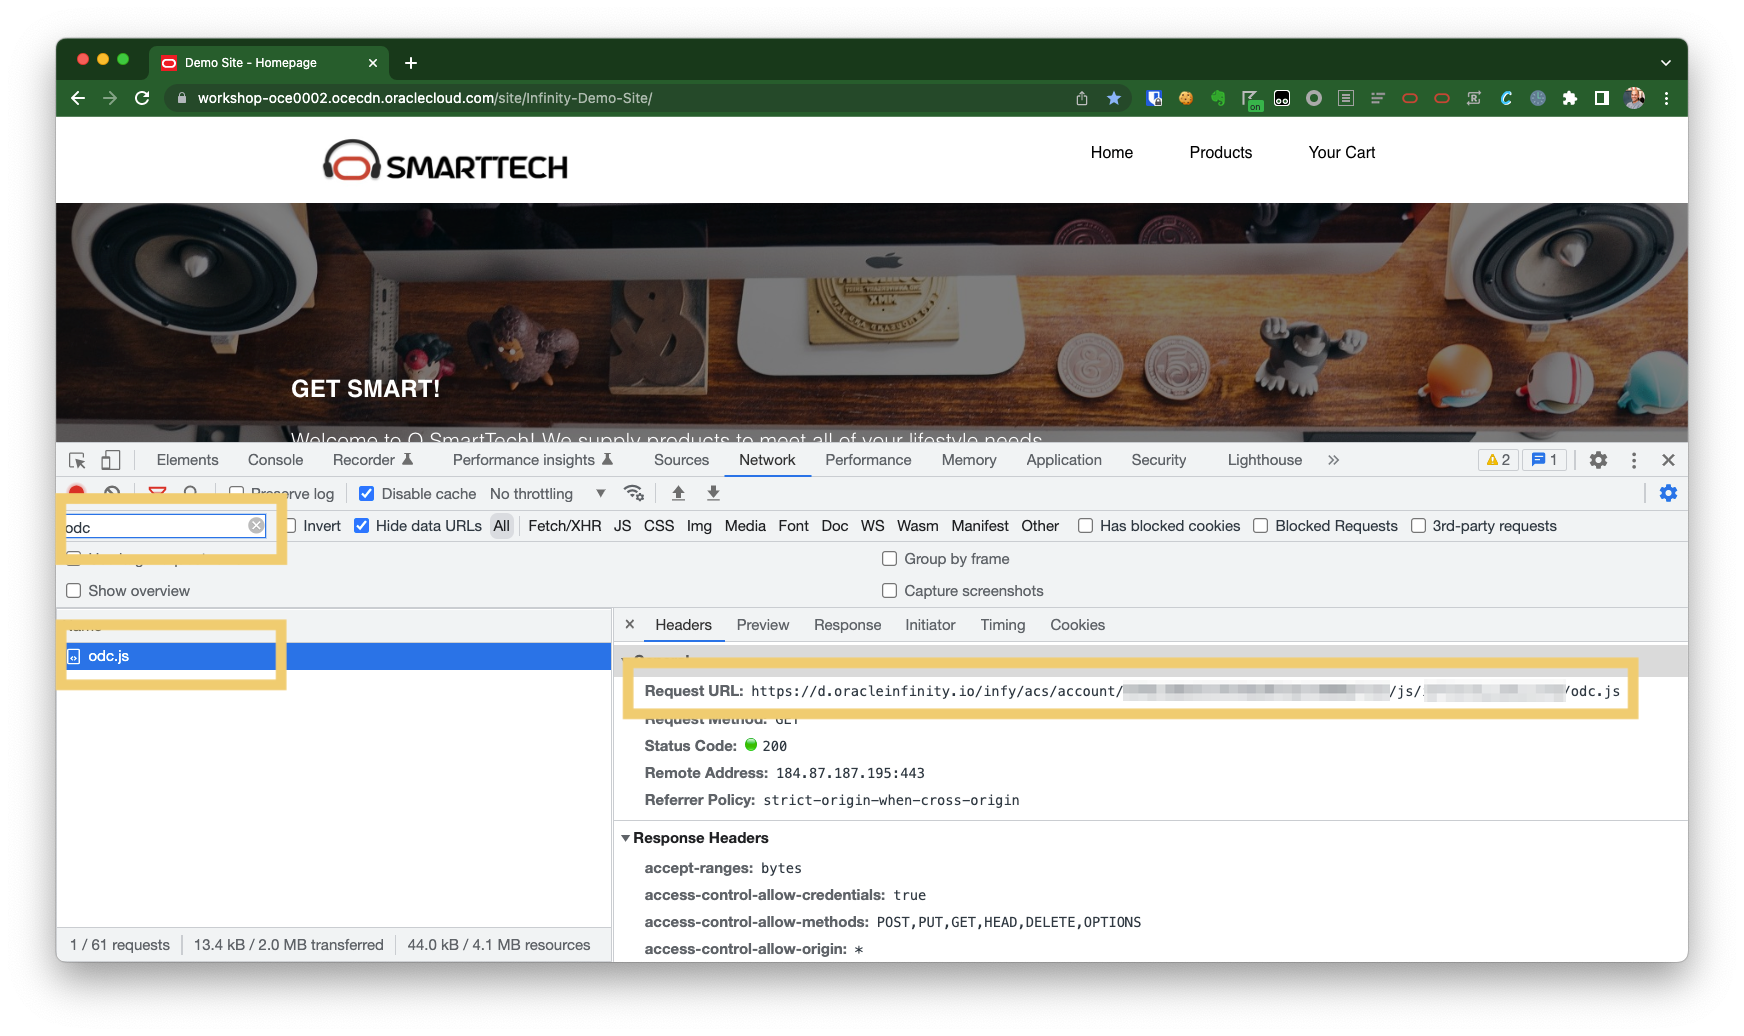
-
Filter for
dc.orac- you should see at least onedcs.gifrequest (this is a tracking request to Infinity to capture user behavior):dcs.gif
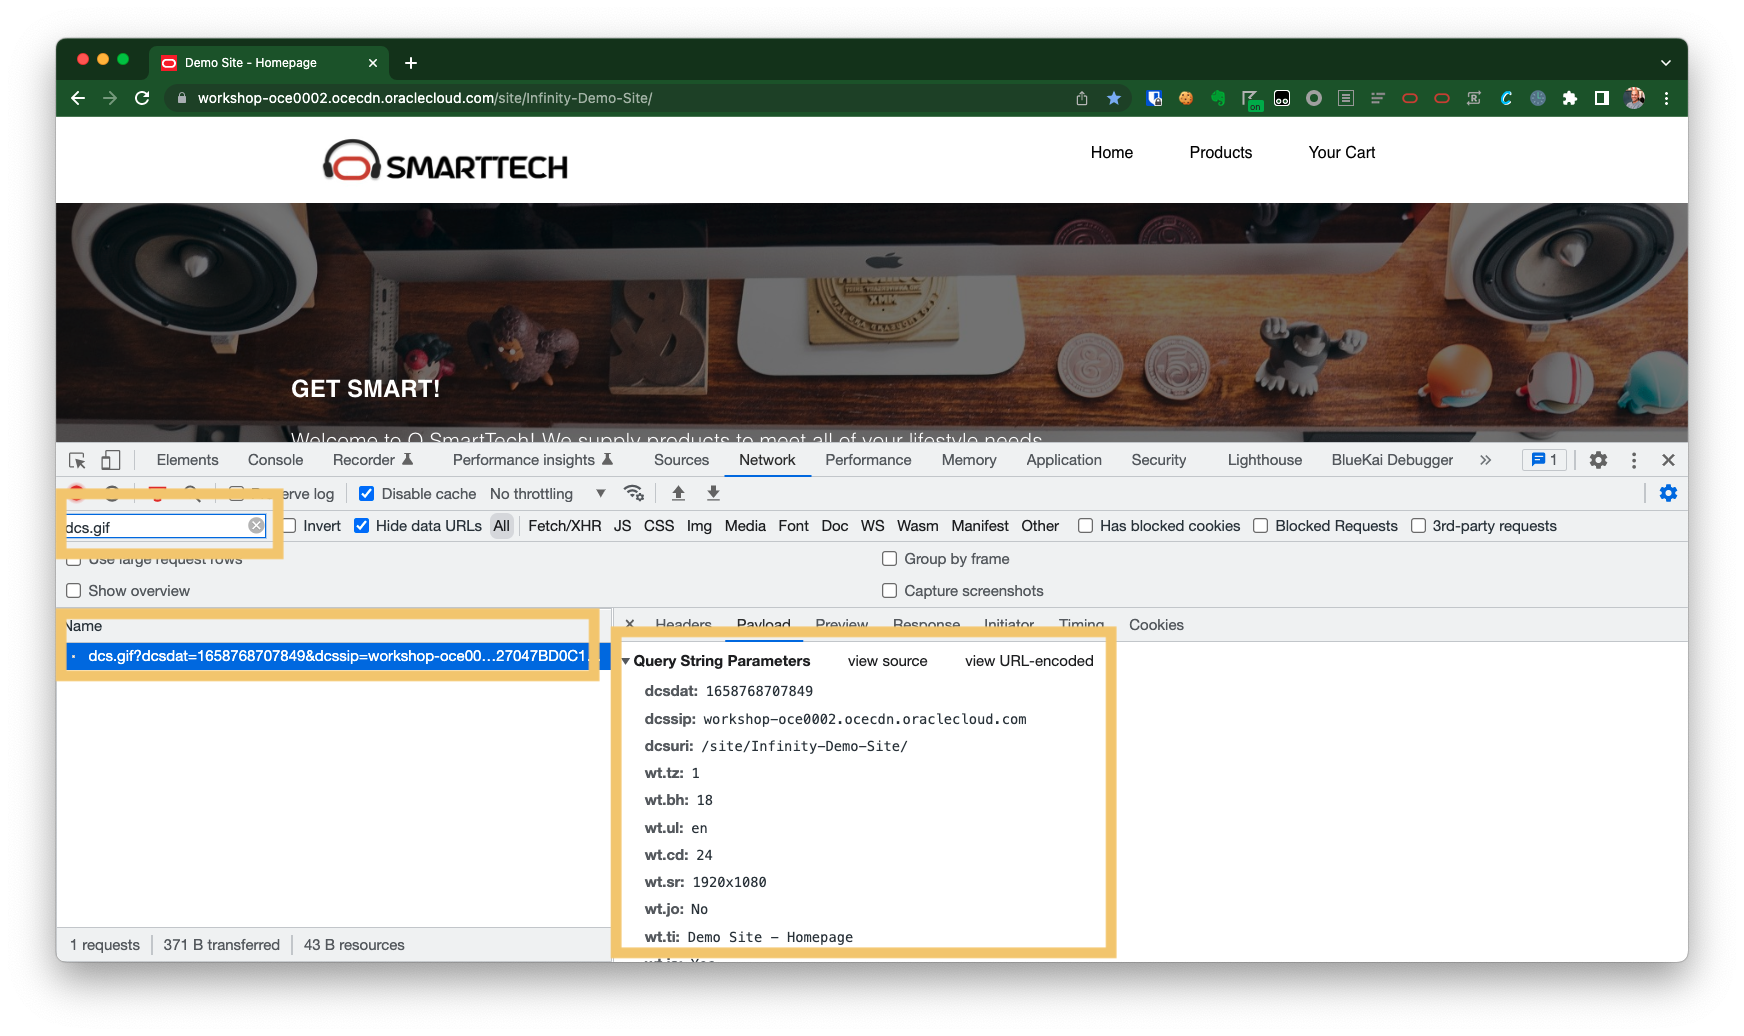
3.2 Validate Add Product to Cart Tracking
Next, we will test whether adding products to your cart is tracked:
-
Browse to a page where you can add a product to your cart (for example, the Health & Fitness Watch)
-
Open the developer tools (DevTools in Google Chrome), open the Network then refresh the page.
-
Click ADD TO CART.
-
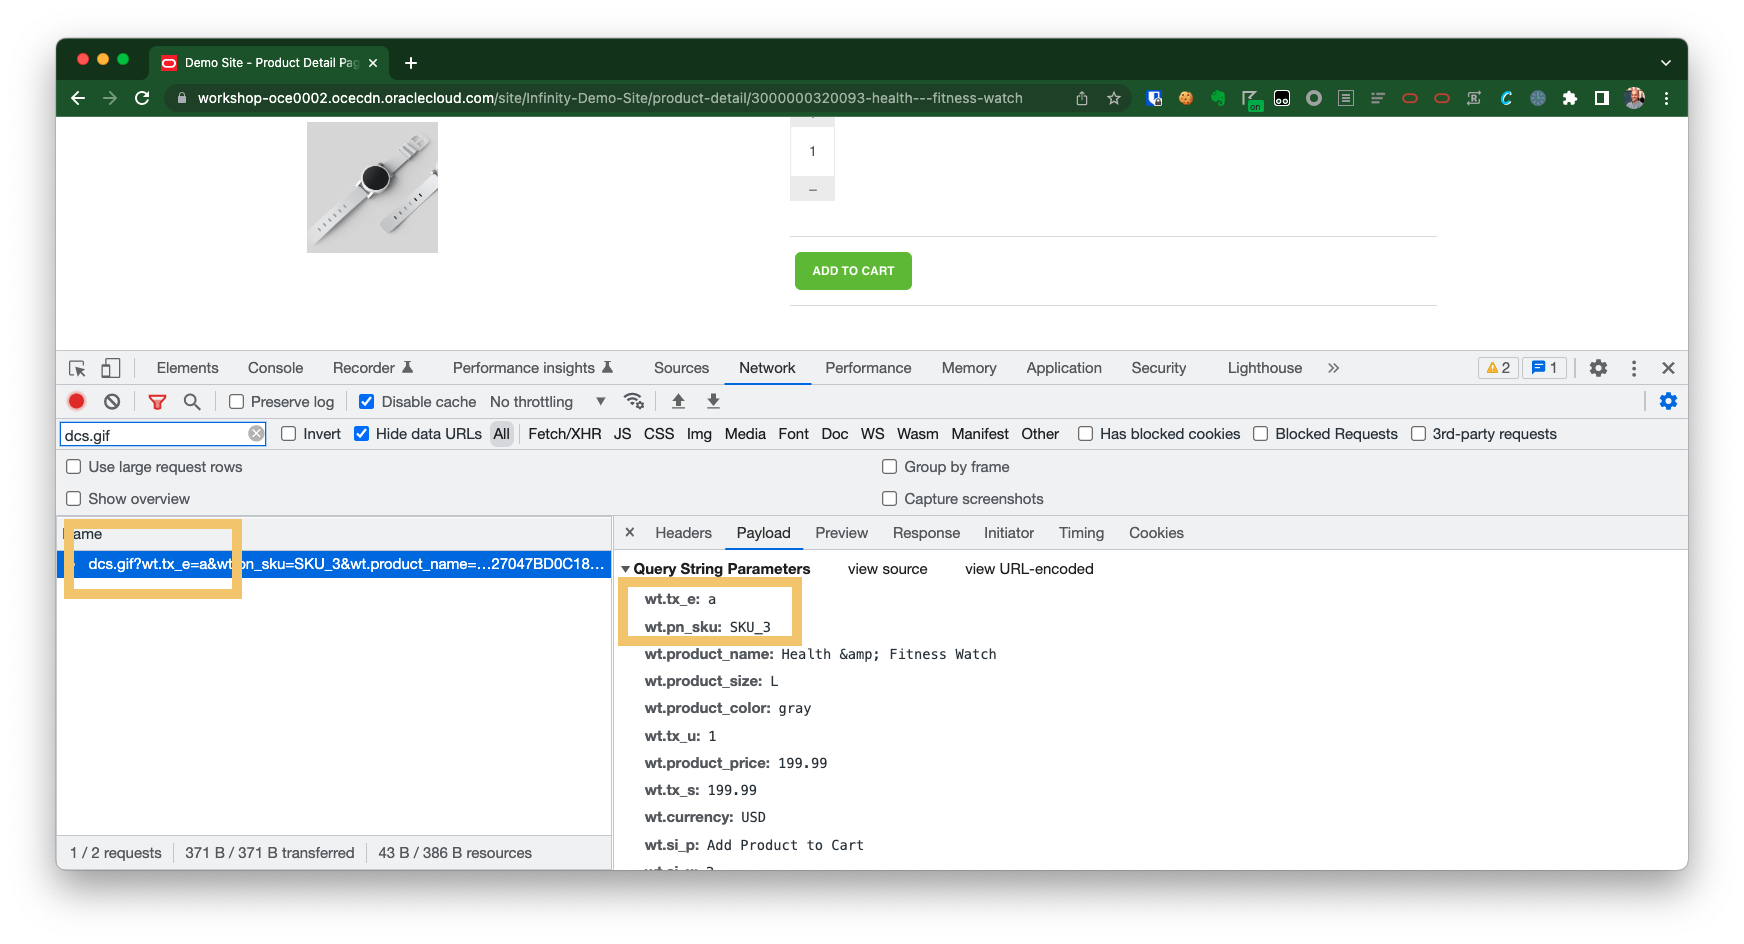
Filter for
dc.orac- you should see at adcs.gifrequest with at least the following parameters declared:dcs.gif - add to cart
3.3 Validate Purchase Product Tracking
To check whether purchases are tracked, you can follow similar steps to the previous test:
-
Open the developer tools (DevTools in Google Chrome) and open the Network.
-
Add one or more products to your cart and complete the checkout process.
-
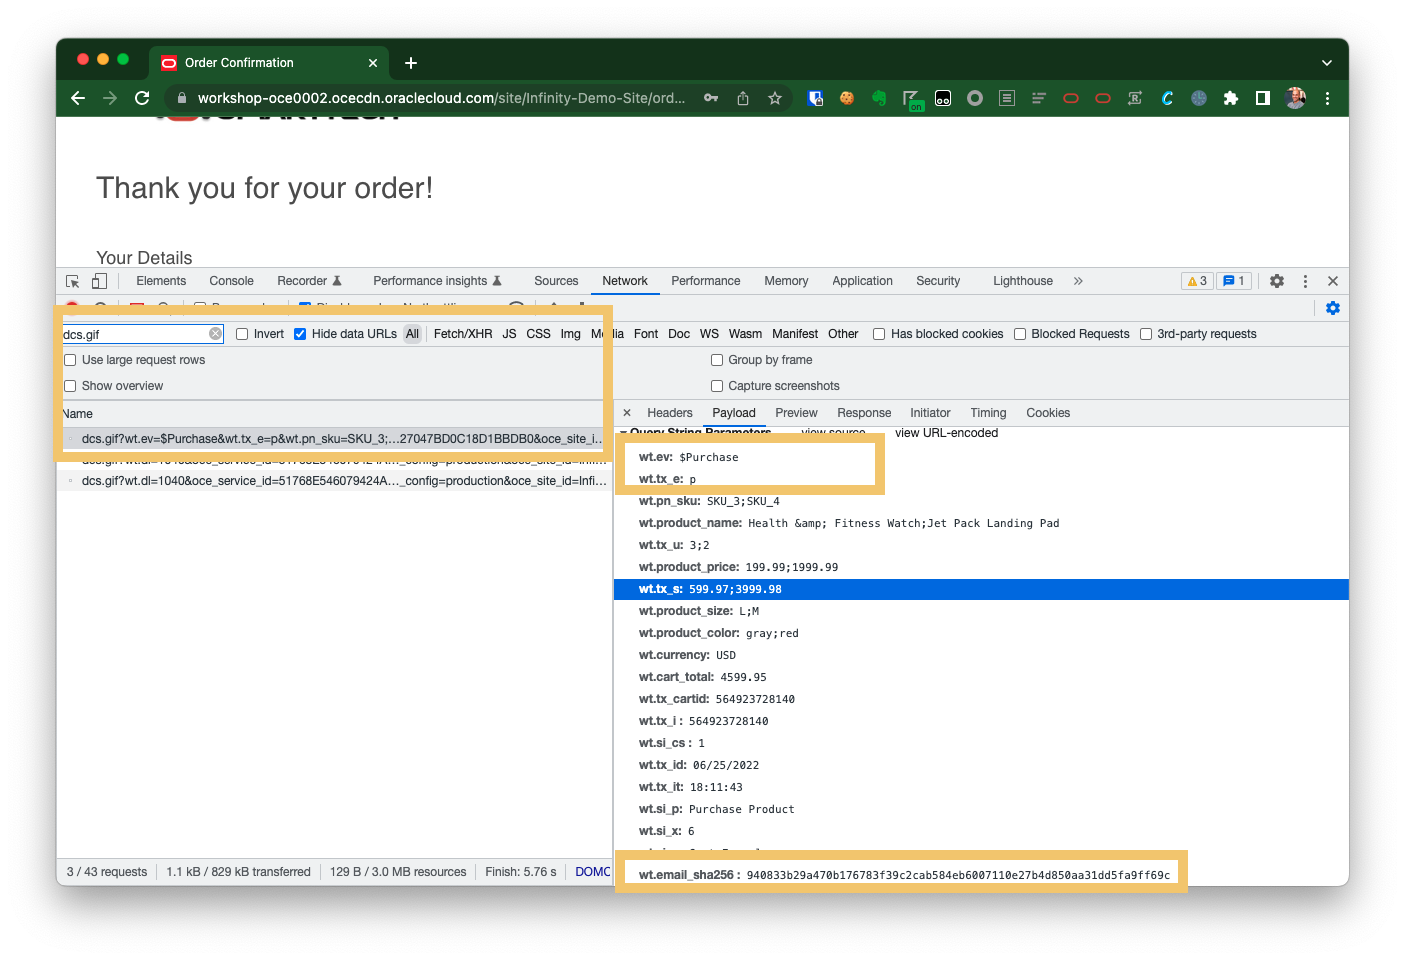
When you reach the Order Summary page (
confirmation.php), filter fordc.orac- you should see at adcs.gifrequest with at least the following parameters declared:dcs.gif - purchase product
3.4 Validate User Identifier Tracking
The test website tracks users by identifier once they declare their email address during the checkout process (you will see wt.email_sha256 on all Infinity requests once this has happened).
You can validate this as follows:
-
Visit the test website.
-
Add any product to your cart.
-
Visit the View Cart page.
-
Proceed to the Checkout by clicking on Checkout.
-
Enter your details and then click Continue to Payment.
-
Open the developer tools (DevTools in Google Chrome) and open the Network.
-
Refresh the page.
-
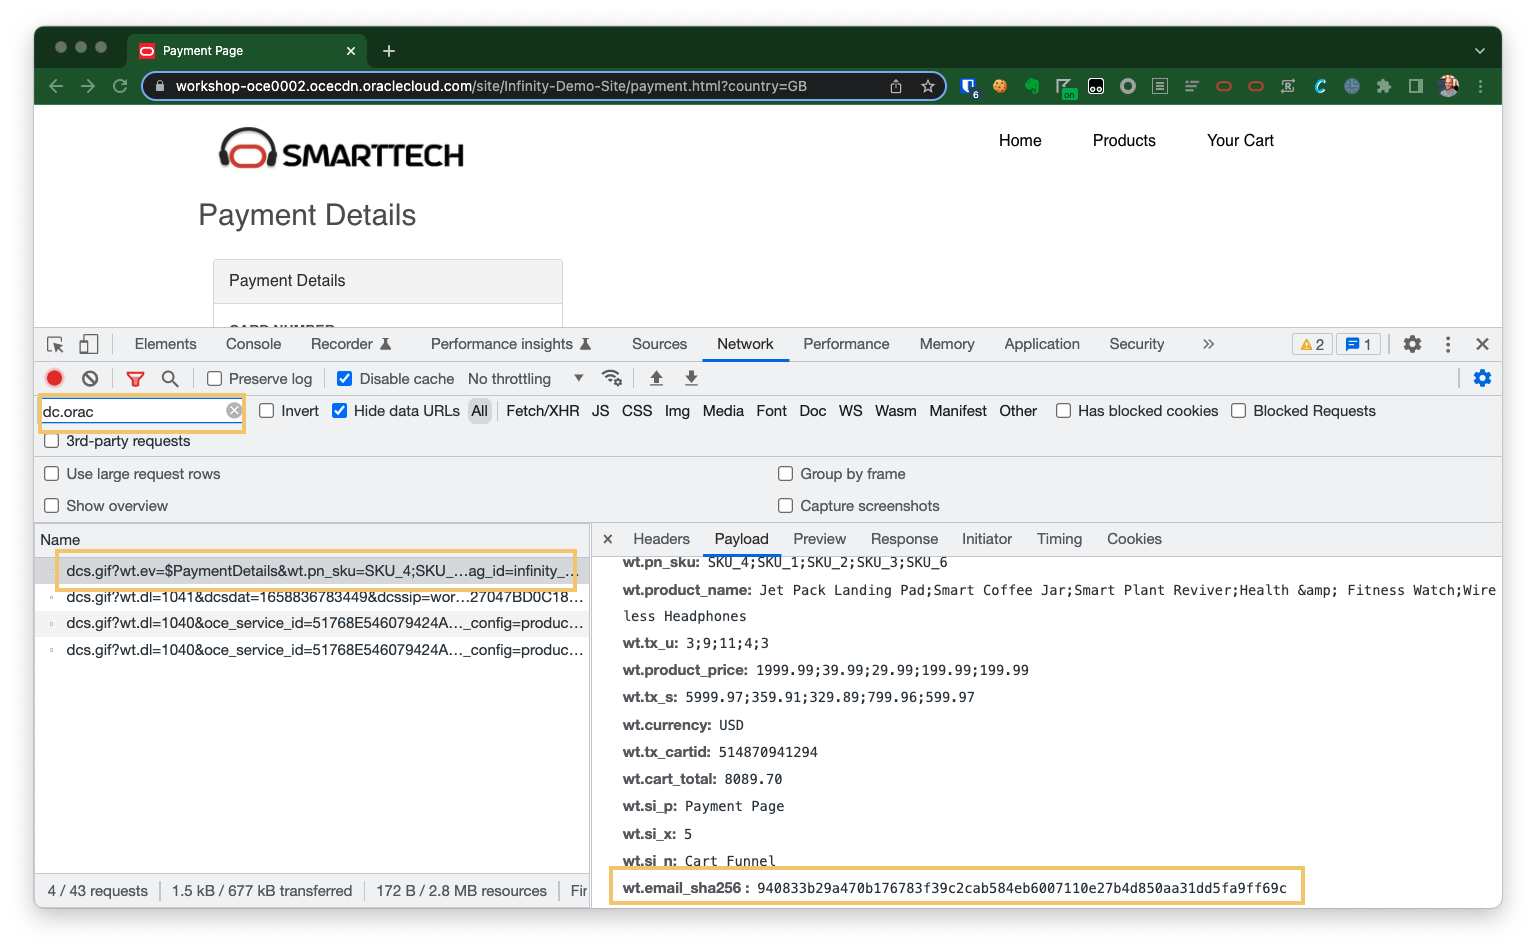
Filter for
dc.oracand you should see adcs.gifrequest withwt.email_sha256populated:dcs.gif - User Identifier Tracking
-
Write down the value you see for
wt.email_sha256as we will need this for later in the tutorial for creating a record in Responsys.
Important! Once logged in, you can see your
wt.email_sha256value on any Infinity calls so if you lose this - you can check anydcs.gifrequest (be sure you’re in the same browser you completed the above steps in though!).
Step 4: Configure Oracle Responsys
Now that we know our website visitors are being tracked by Oracle Infinity, we can configure Responsys to send cart abandon emails to any customers who have abandoned.
Firstly, log into your Responsys account then complete the following steps:
4.1 Create a new Folder
We are going to create a new Folder for all of our tutorial assets to live in:
- Create a new Folder named
Tutorial Abandon Cart.
4.2 Create a new Profile List for our Customers
Tip! Ordinarily, you would use your existing Profile List which create and update your customer records for (using a Responsys Connect job). For this tutorial, we’re creating a separate list to keep this tutorial activity completely separate from your real Responsys activity.
We will be creating a distinct Profile List (sometimes known as a Contacts List) to ensure we can keep the data we need for this tutorial distinct (and not accidentally affect any campaigns you may have running in Responsys):
- Create a new Profile List named
Tutorial Abandon Cart - Profile Listand assign it theTutorial Abandon Cartfolder (you can give it a description if you like).
4.3 Create a new Supplemental Table of our Products
We will be creating a Supplemental Table to store all of the products we will be supporting on our website. This will be used to populate our emails with the correct product details and images:
-
Create a Supplemental Table with a Delimited-Text File by uploading the Sample Supplemental Table.
-
Use a field separator of
Comma(leave all other fields as default). -
Set the fields types as follows:
PRODUCT_SKU:Short Text Field (up to 25 chars).PRODUCT_NAME:Medium Text Field (up to 100 chars).PRODUCT_PRICE:Number Field.PRODUCT_URL:Long Text Field (up to 500 chars).PRODUCT_IMAGE_URL:Long Text Field (up to 500 chars).PRODUCT_DESCRIPTION:Long Text Field (up to 500 chars).
-
Set
PRODUCT_SKUas a Primary Key Field.Note: The
PRODUCT_SKUwill match the SKUs we are declaring aswt.pn_skuin the Add Product to Cart Infinity Tracking we setup earlier. -
Set the Data Extraction Fields as
PRODUCT_SKU. -
Name the table
Tutorial Abandon Cart - Products. -
Assign it to the
Tutorial Abandon CartFolder. -
Set to
Never Expires.
4.4 Create a Custom Event to trigger Abandon Cart Emails
We now need an Custom Event in Responsys which will be triggered when someone abandons their cart by our Infinity Action later in the tutorial:
-
Create a Custom Event with the following details:
- Name :
tutorial_abandon_cart_event. - Custom Event Type :
Standard. - Description :
Abandon Cart event for Oracle Infinity.
- Name :
4.5 Create Campaign Categories
We will create a Marketing Strategy and Marketing Program for our tutorial which we will use in our Email Campaign in the next step:
- Create a Marketing Strategy of
Tutorial - Abandonment. - Create a Marketing Program of
Tutorial.
4.6 Create a Test Record in your Profile List
Note: If you do not complete this step, your email preview will fail in later in this tutorial.
For our tutorial, we need are going to need to manually create a record in our Profile List so that Responsys will know who to target.
Tip! Normally, you would have a Responsys Connect job set up to automatically create and update customer records in your main Profile List as users register on your website. For our tutorial, we will just create the records we want to test ourselves in Responsys.
Create your record as follows:
-
Find your SHA 256 Hashed Email Address (you previously captured this by checking the
wt.email_sha256value in your Infinity calls). -
Find the email address you signed up to the website with (from when you signed up earlier).
-
Create a new record in your
Tutorial Abandon Cart - Profile ListProfile List with the following details:- EMAIL_ADDRESS :
EMAIL ADDRESSS YOU SIGNED UP WITH. - EMAIL_FORMAT :
HTML. - EMAIL_PERMISSION_STATUS :
Opt In. - Leave all other fields as default.
- EMAIL_ADDRESS :
4.7 Create your Email Campaign
You will first create an Create an Email Campaign which is effectively the email which will be sent to your end users (and will be triggered by your Program as per the later step of Create a Program).
Create a Campaign
Create an Email Campaign with the following settings:
- Type: Select
Email. - Name: Set the name as
Tutorial Abandon Cart - Campaign). - Description: Set the description as
Targeting users who abandon their cart via Oracle Infinity). - Purpose: Select
Transactional. - Marketing Strategy: Select
Tutorial - Abandonment(as per our previous settings). - Marketing Program: Select
Tutorial(as per our previous settings). - Folder: Set to the
Tutorial Abandon Cartfolder we created earlier. - List: Select the
Tutorial Abandon Cart - Profile ListProfile List we created earlier.
Add Your Data Sources
You will need to ensure that your campaign is linked through to the Product Supplemental Table we created earlier and the PRODUCT_SKUS Dynamic Variable (this is what Oracle Infinity will pass through the abandoned product SKUs as) so that it can generate the email content correctly:
-
Open the Data Sources.
-
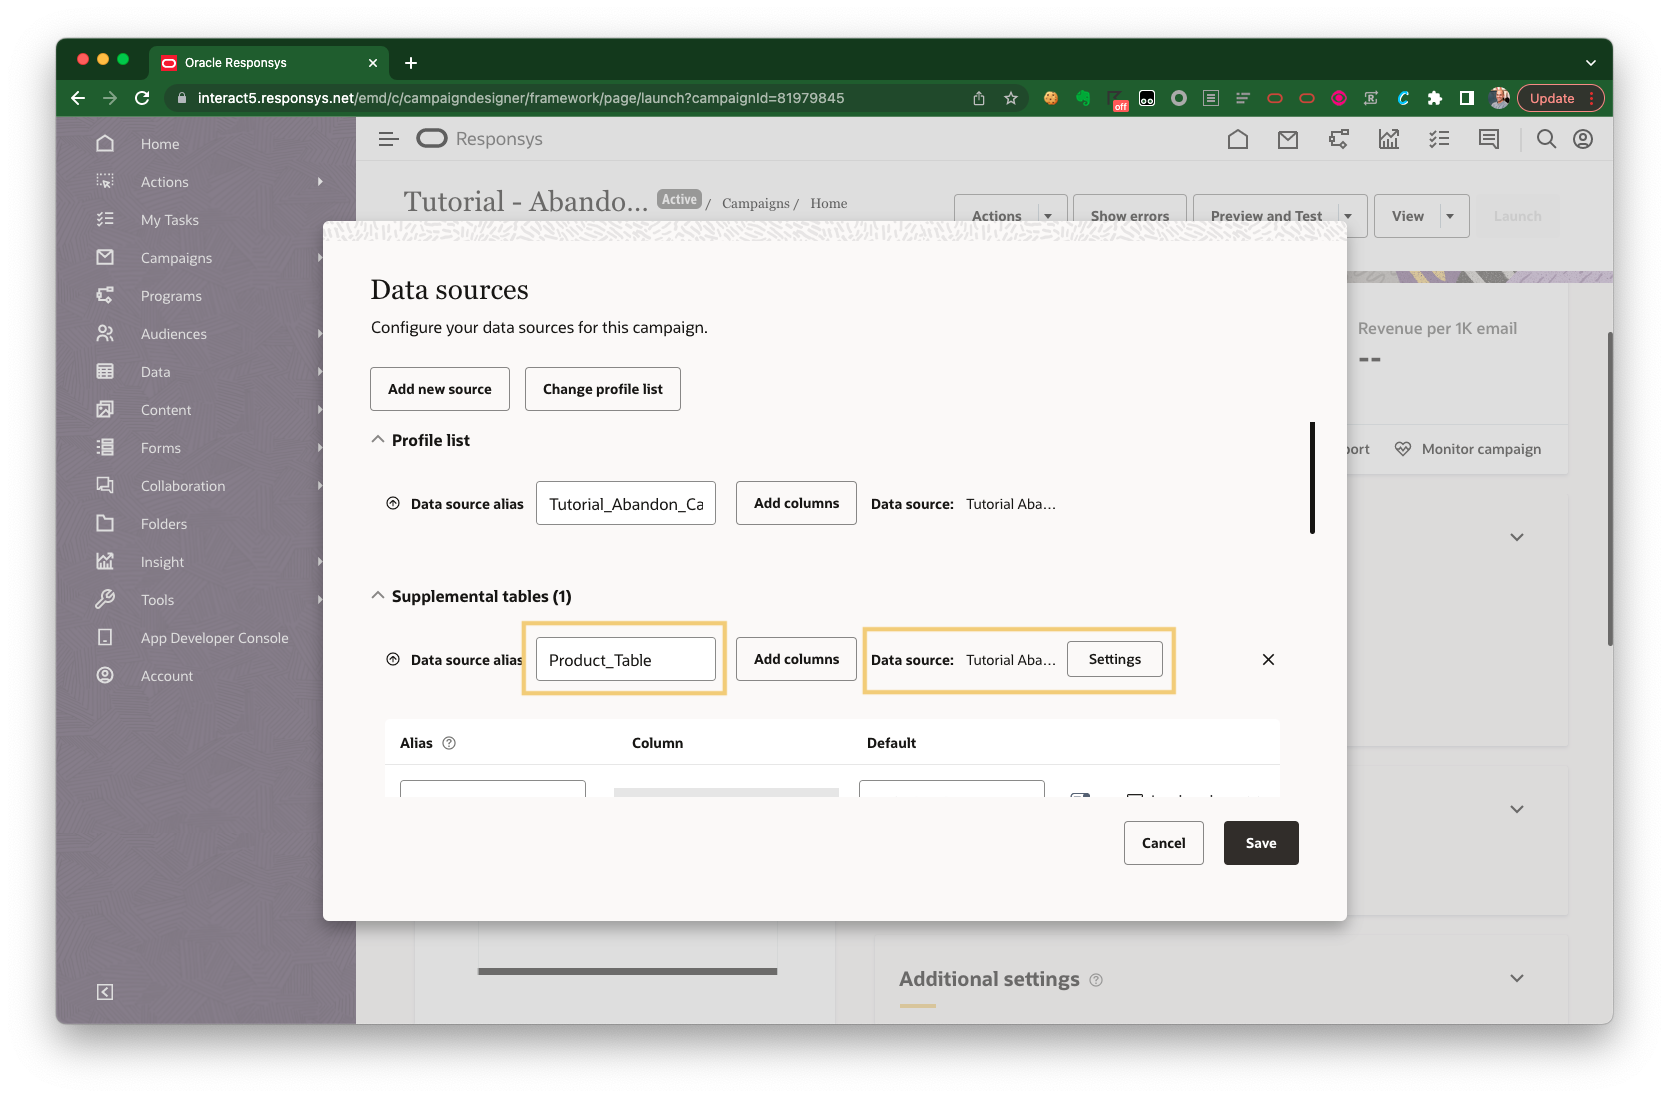
Add the
Tutorial Abandon Cart - ProductsSupplemental Table we created earlier as aSupplemental TableData Source.- Change the Data Source Alias to
Product_Table.
Data Sources - Aliases
-
Ensure your columns have the following aliases:
PRODUCT_DESCRIPTION: Visible description of your product.PRODUCT_IMAGE_URL: URL of image which will be displayed to your users.PRODUCT_NAME: Visible name of product.PRODUCT_PRICE: Visible price of your product (without currency).PRODUCT_SKU: Visible SKU of your product (also used to look up the other fields per product).PRODUCT_URL: Clickthrough URL for the product.
-
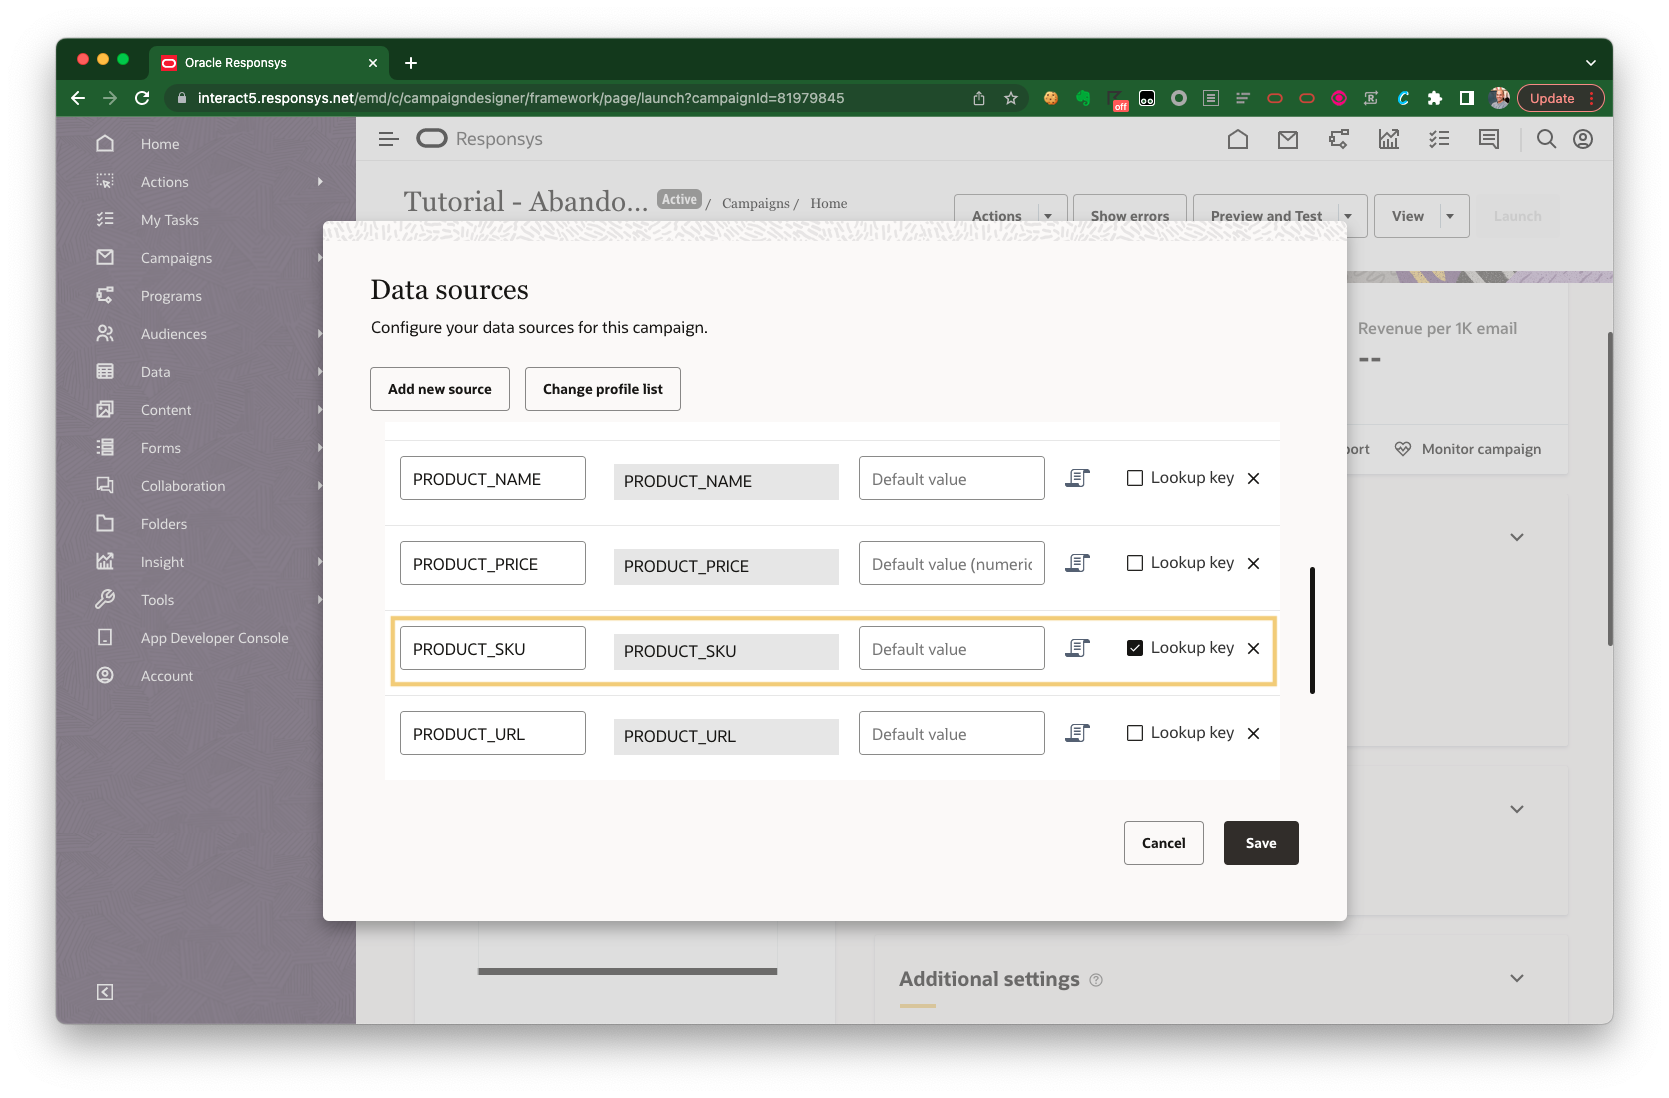
Ensure you set
PRODUCT_SKUas a Lookup key.
Data Sources - Key
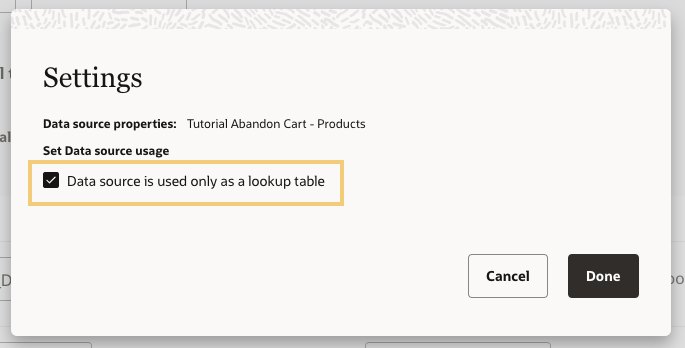
- Ensure you set the Supplemental Table as
Data source is used only as a lookup table(see Data Sources for more information).
Click ‘Settings’

Check ‘Data source is used only as a lookup table’
- Change the Data Source Alias to
-
Add a Dynamic Variable with an alias of
PRODUCT_SKUS.Setting your Default: Ensure you add a default of a
'14;15. This will populate our email preview with products14and15.Adding a Dynamic Variable

Create a Message
Tip! Normally, you will create your own messages but we are supplying a template you can use for this tutorial.
You will need to create a message which will be displayed to the user within your email:
- Create a message from a file.
- Browse for a file and use the following email template.
- Add a Subject of
Did you forget something?(this will display as the subject line in your email). - Remove Link Tracking (in this tutorial, we will not be using Link Tracking to simplify the workflow but you can add this in yourself at a later stage if you wish).
How does the Email Template populate the Cart contents? See the template explanation if you’d like to understand how Oracle Responsys Personalization Language (RPL) is used to insert the user’s cart contents into the email.
Preview Your Email Campaign
We will now preview your email campaign in isolation without using Oracle Infinity (to ensure the email renders correctly):
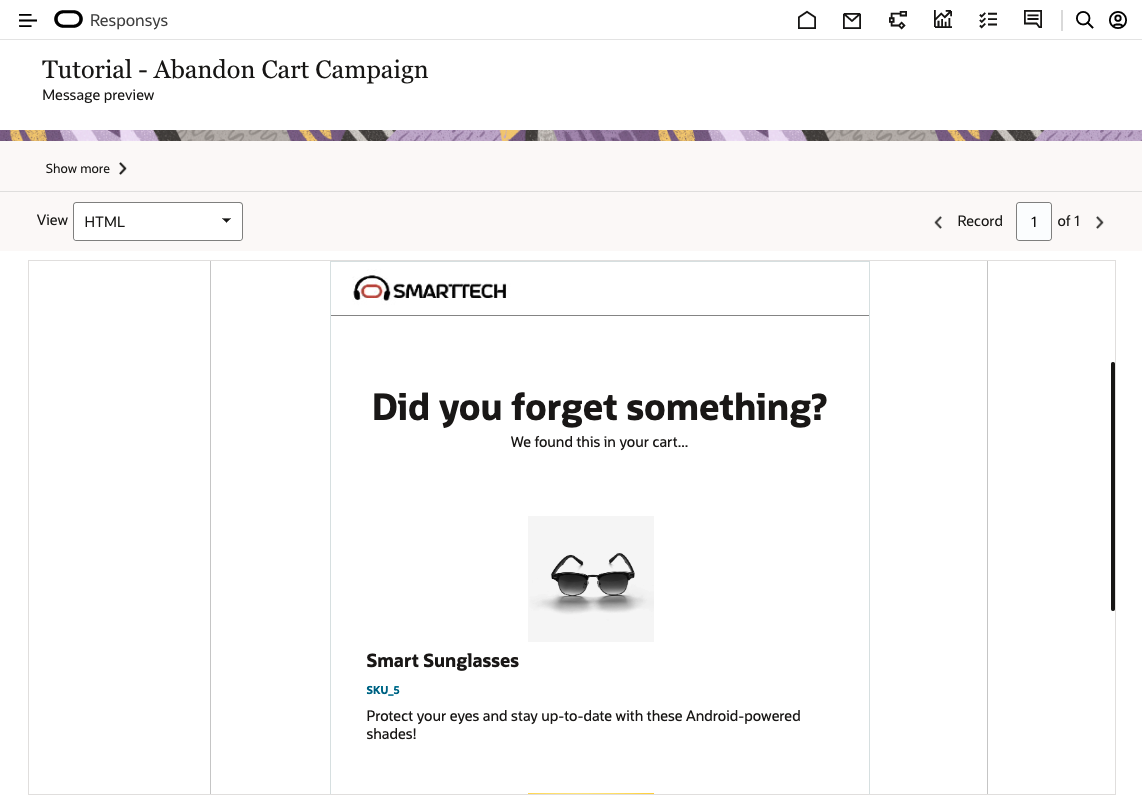
-
You should now see a sample email populated with the default products you set within the
PRODUCT_SKUSDynamic Variable within your Campaign Data Sources:Previewing your email
You can now go on to create your Program in the next step.
Ignore any Targeting errors: You may see errors in the user interface within the Targeting section. Please ignore these as this section does not need to be completed if running within a Program (as is being done within this tutorial).
4.7 Create a Program
Now that the Email Campaign has been set up correctly and tested, you will need to Create a Program which will receive the data from Oracle Infinity and trigger the Campaign in order to send emails to your customers.
-
Create a Program with the following details:
- Name:
Tutorial Abandon Cart - Program. - Folder: Set to the
Tutorial Abandon Cartfolder you created earlier. - List: Set to the
Tutorial Abandon Cart - Profile ListProfile List you created earlier. - Description: Set to
Targeting users who abandon their cart via Oracle Infinity).
- Name:
-
Add and connect the following elements to your Program Canvas:
(a) Custom Event
Add a Custom Event and configure as follows:
- Listen for custom event type :
tutorial_abandon_cart_event(you created this earlier). - Audience Label : Toggle this on and set to
Abandon Cart Tutorial(or any value you like - this is optionally used for analysis). - Create new Audience for each incoming segment : Uncheck this.
- Match entry on : Leave as
-optional-*. - Do not create a new entry in the program and leave the existing entry where it is : Toggle this on*
*These settings ensure customers cannot enter the program more than once at a time - important if you want to build in a longer campaign with reminder emails after the initial email so you can avoid emailing customers too much.
(b) Send Email Campaign
Add Send Email Campaign and configure as follows:
- Set Campaign to
Tutorial Abandon Cart - Campaignand leave all other options as default.
(c) End
Add End and leave with default settings.
- Listen for custom event type :
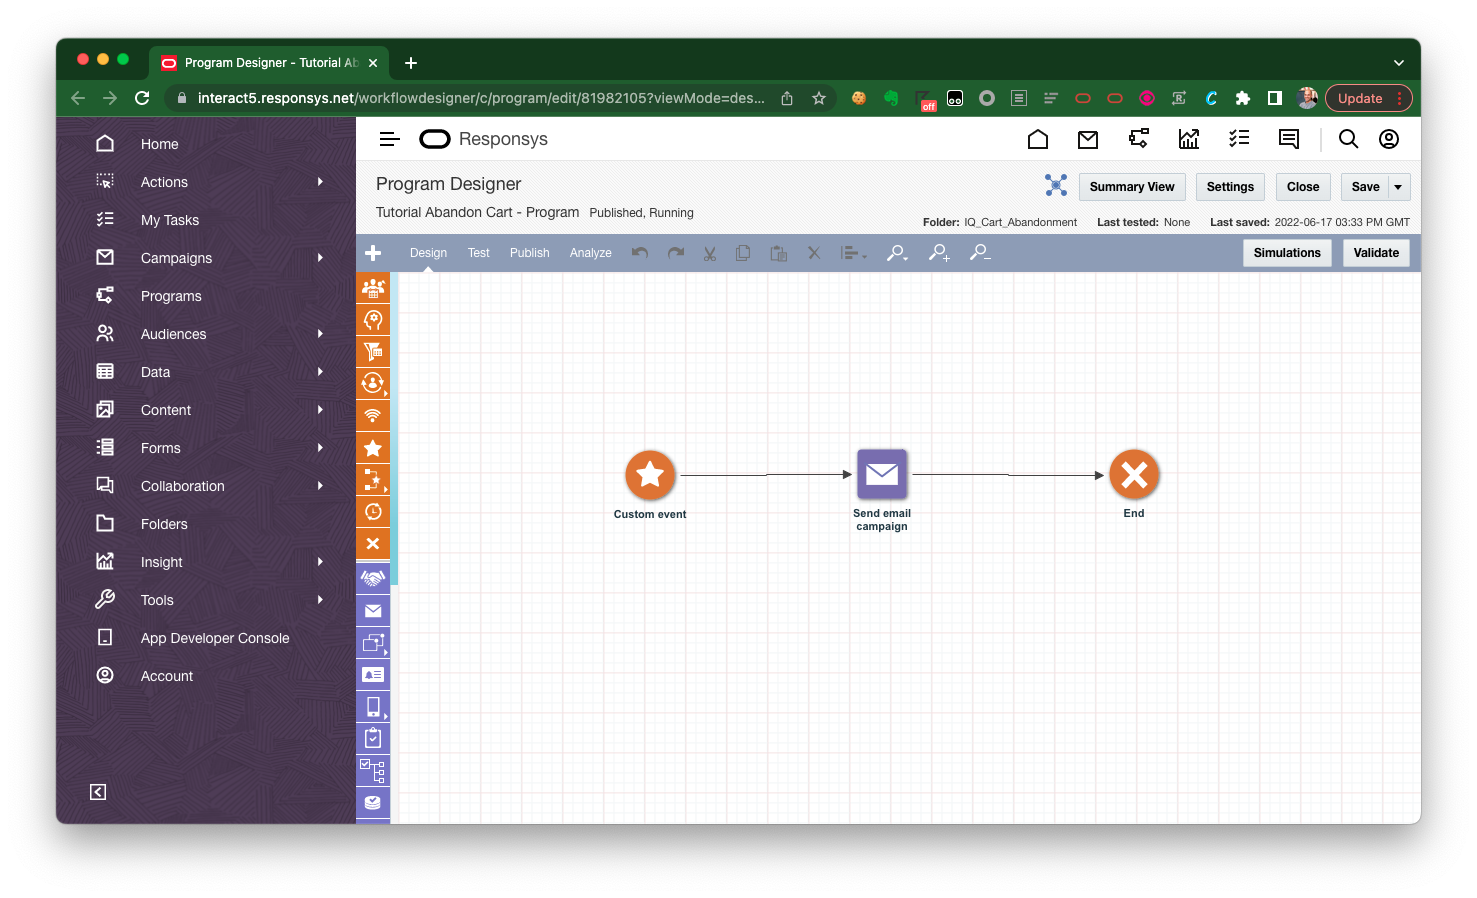
-
Ensure your elements are connected as per below:
Cart Abandonment Program
-
Within the Design tab, go to Settings > Options:
- Set Auto unpublish this program based on the following settings as
Unpublish manually. - Enter your email address under Enter email addresses to receive notifications about this program.
- Under Tracking and Variables, click + and add “PRODUCT_SKUS” with a type of “Text”.
- Set Auto unpublish this program based on the following settings as
-
Publish your Program using default settings.
Step 5: Configure Oracle Infinity
5.1 Set up Oracle Responsys Connection
You will need to set up a connection to your Oracle Responsys account within Oracle Infinity. Please see Configuring an Oracle Responsys connection to set up your connection.
Connection not working?
- Did you enter the ‘username’ for the connection (not the email address)?
- Did you create a user with the correct privileges?
You will need to set up a Custom Event destination with the following details from the previous Configure Oracle Responsys for Cart Abandonment step:
- Log in to the Infinity user interface.
- Configure your Oracle Responsys connection as per the documentation.
- Custom Event - Please select the
tutorial_abandon_cart_eventCustom Event you previously created within Oracle Responsys. - Folder - Please enter
Tutorial Abandon CartFolder as the folder (where ourTutorial Abandon Cart - Profile ListProfile List lives). - List - Please enter
Tutorial Abandon Cart - Profile Listas our Profile List.
5.2 Create the Email SHA256 Hash Parameter
We need to create a parameter for our SHA 256 Hashed Email Address to use in our Action in the next step. To do this:
-
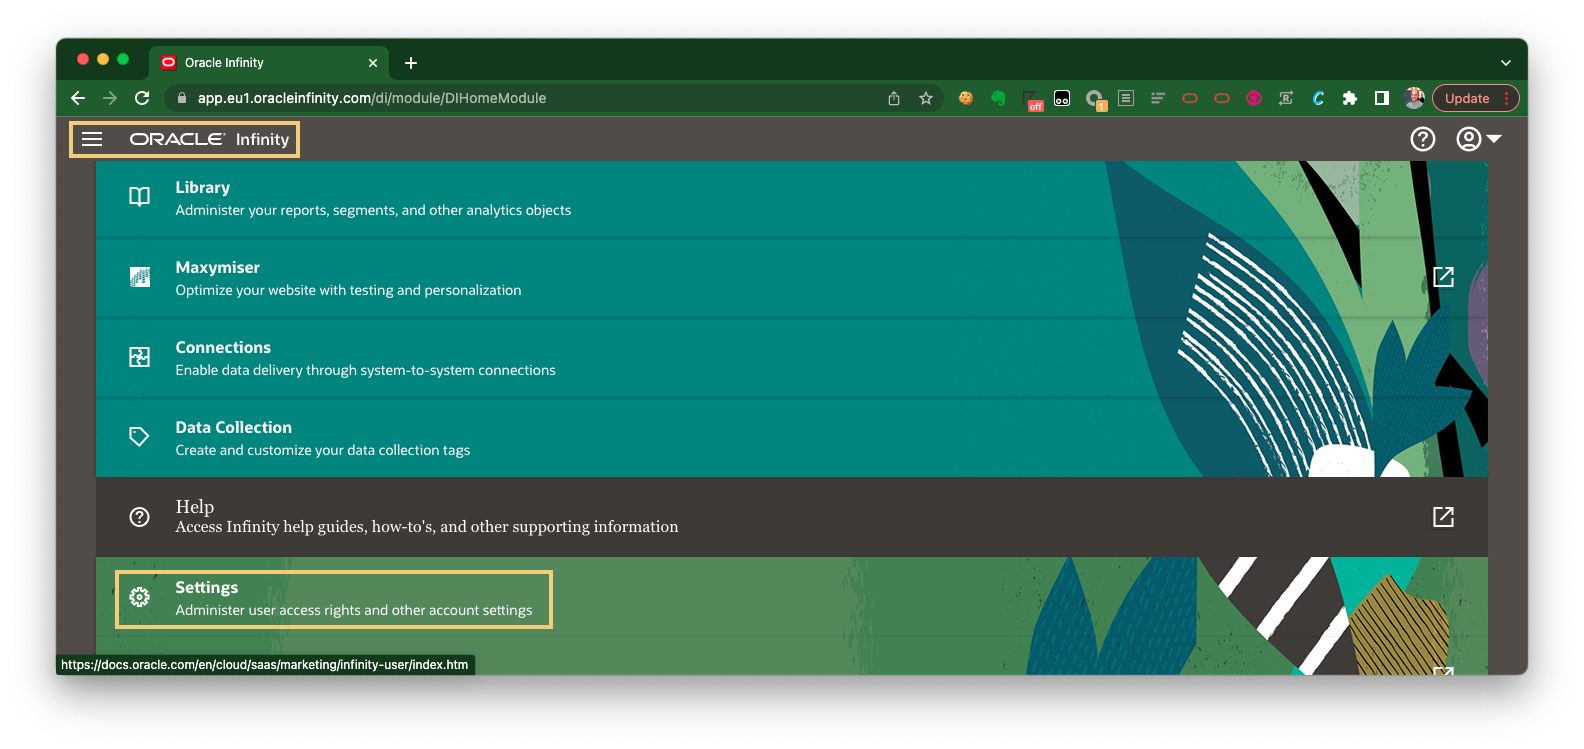
In the Infinity user interface, open the Settings menu from the top-left navigation menu:
Editing Parameters
-
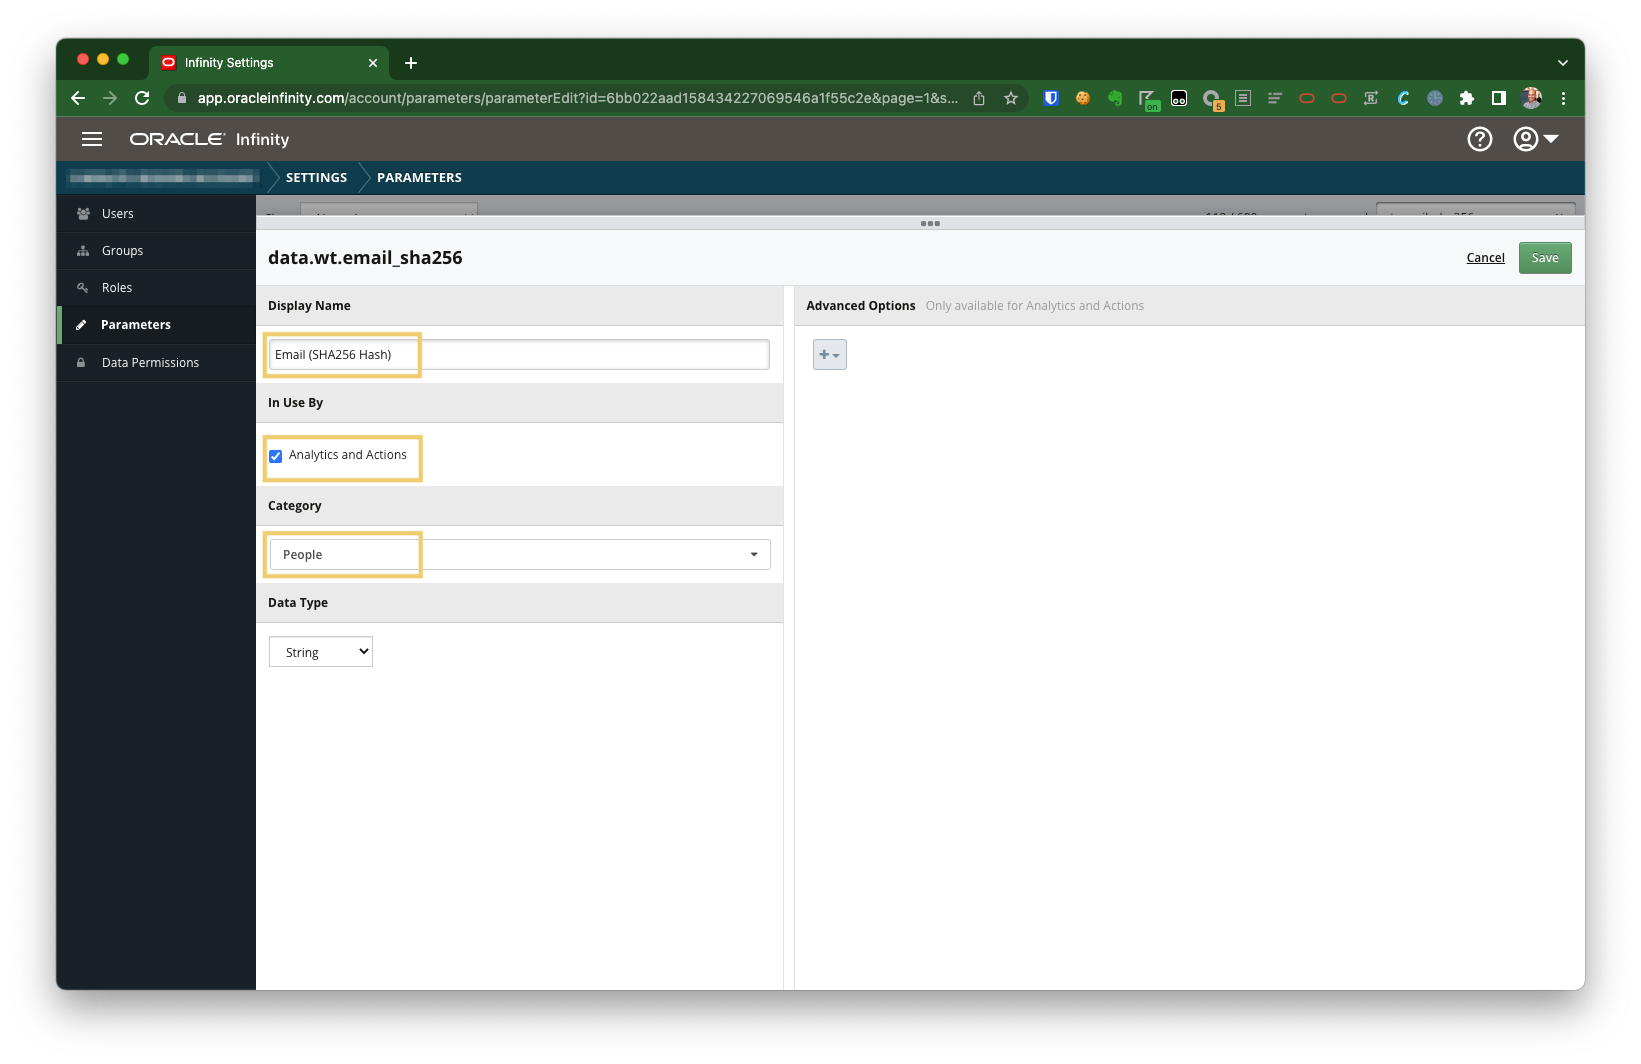
Select the Parameters item in the left-hand menu.
-
Search for
wt.email_sha256in the top-right menu (ensuring change Showing to All Parameters. -
Click on the pencil icon on the right-hand side to edit this parameter.
-
Set the Display Name to
Email (SHA256 Hash). -
Check the Analytics & Actions box.
-
Set the Category to People.
-
Click Save.
Email SHA256 Hash Parameter
5.3 Create Your Action
Create your Action within Oracle Infinity as follows:
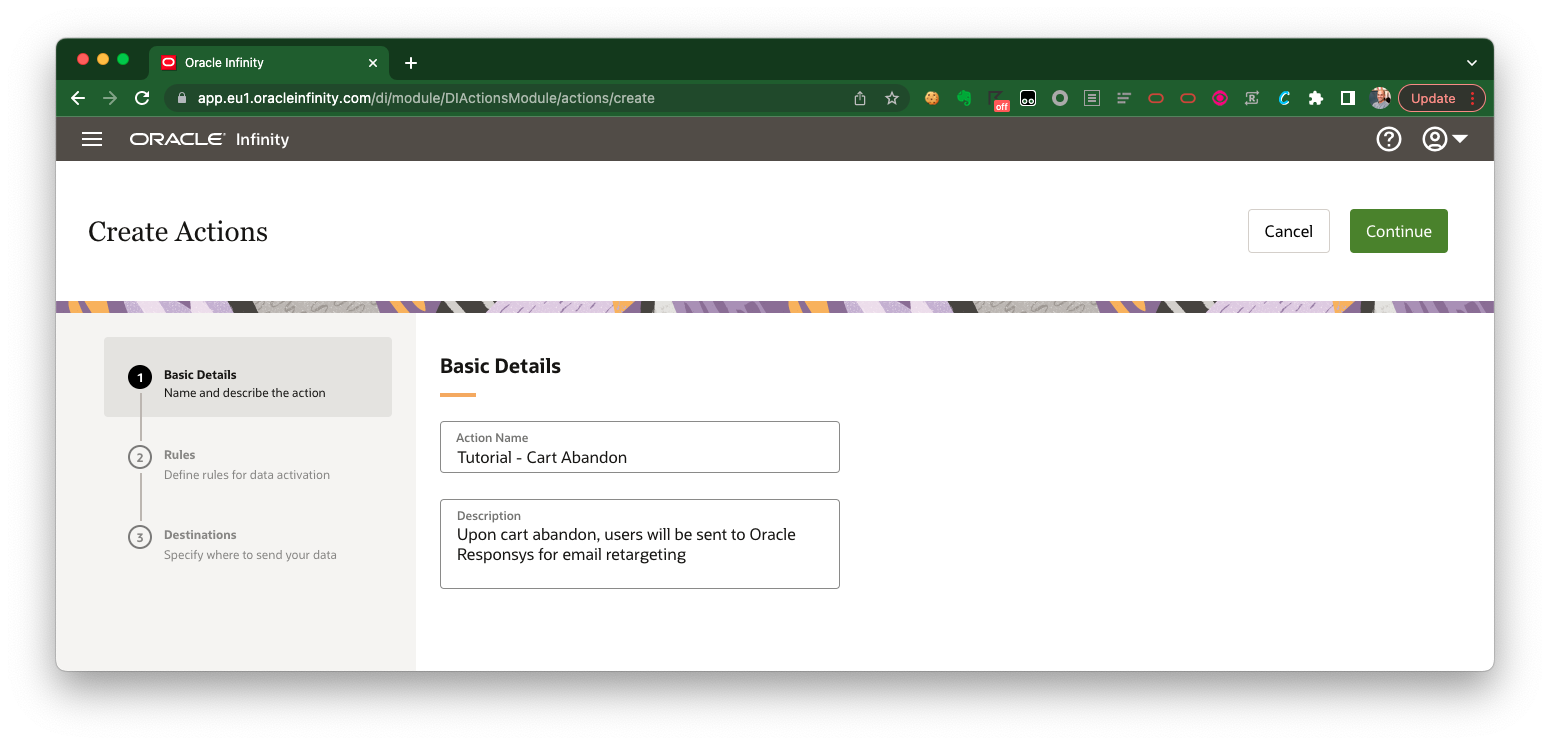
Basic Details
Please complete as follows:
-
Action Name: Name this
Tutorial - Cart Abandon. -
Action Description: Describe this as
Upon cart abandon, users will be sent to Oracle Responsys for email retargeting.Basic Details
Rules
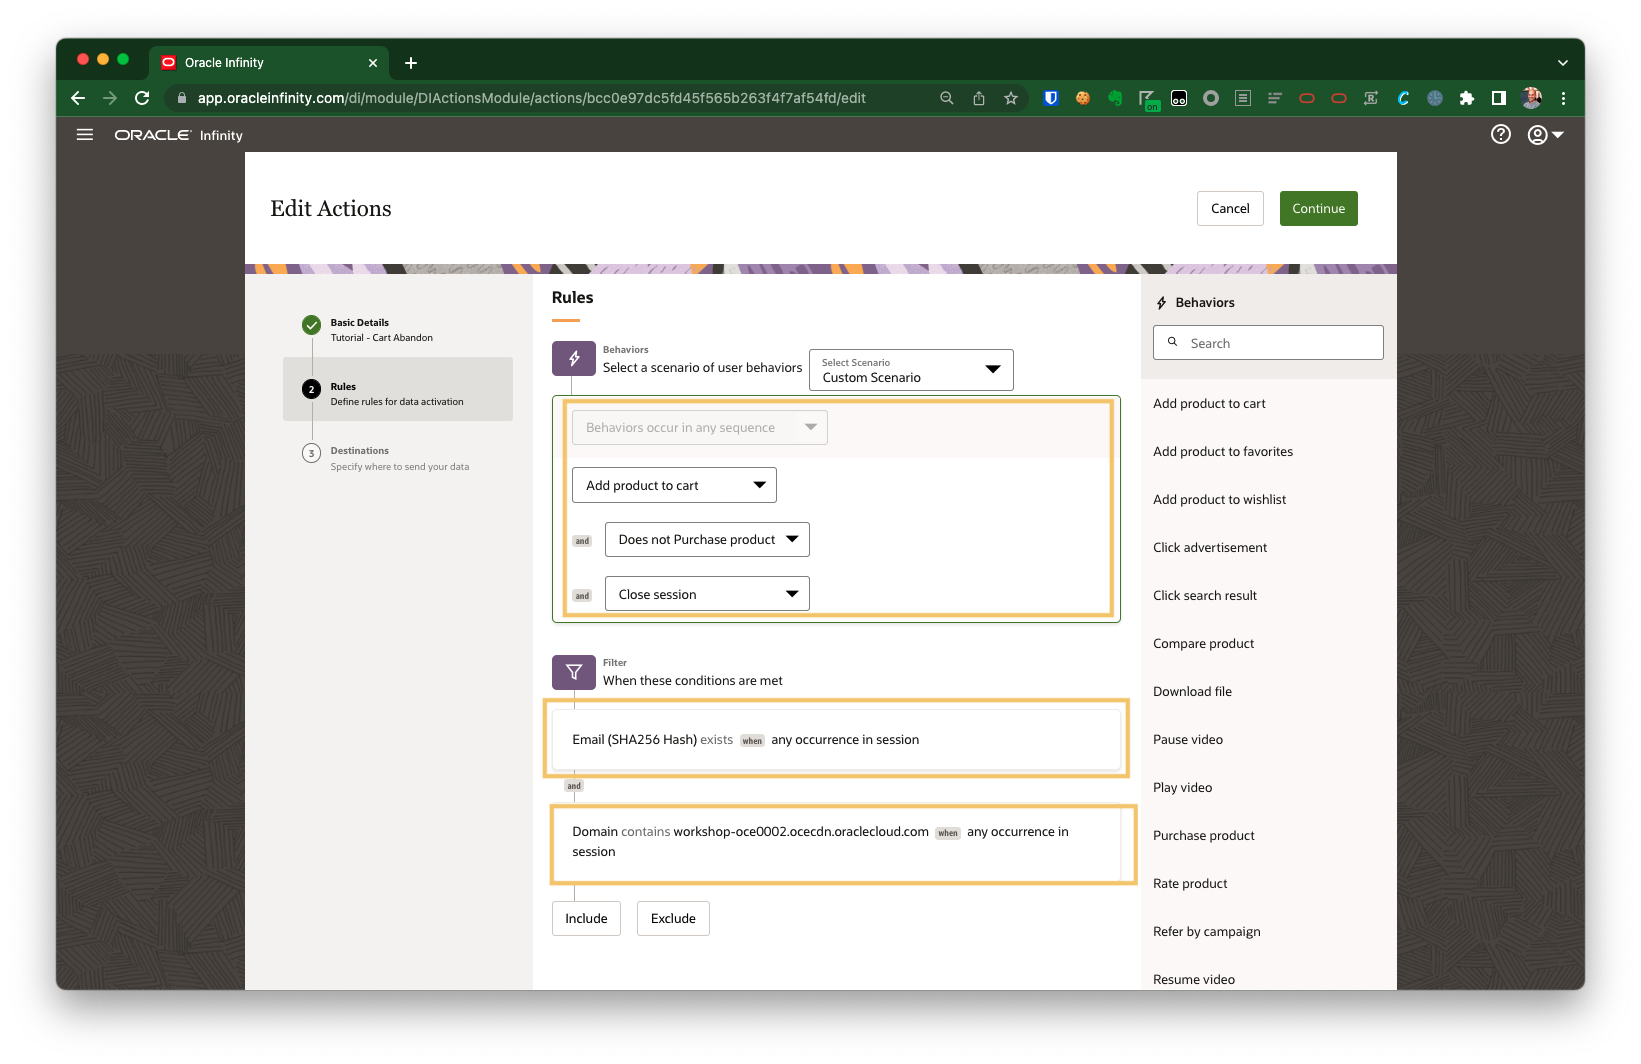
-
Please select the Product Add Abandonment Scenario.
-
Remove
View Productfrom the Scenario. -
Click Include to add the following filter:
Email SHA256 HashExists on Any occurrence in session.
-
Click Include to add another filter (so that you have an
ANDclause):DomainContains on
-
Click Continue.
Rules
Tip! We are adding a domain filter for
workshop-oce0002.ocecdn.oraclecloud.comto ensure that you real customers on your website do not accidentally qualify for this action and enter you Responsys Program.
Destinations
As per the Connection you created earlier in Set up Oracle Responsys Connection within Infinity:
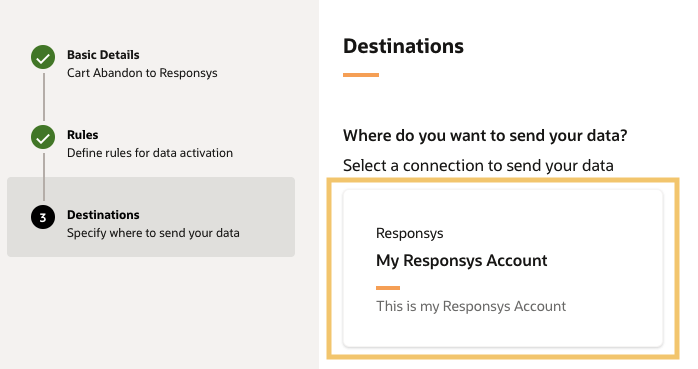
-
Select the Oracle Responsys Connection you previously created:
Select your Oracle Responsys Account
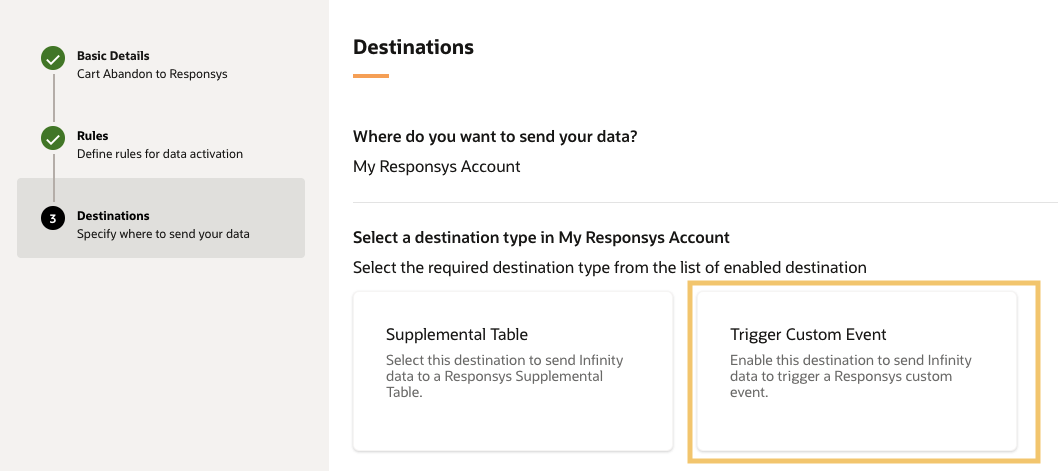
-
Select Trigger Custom Event:
Trigger Custom Event
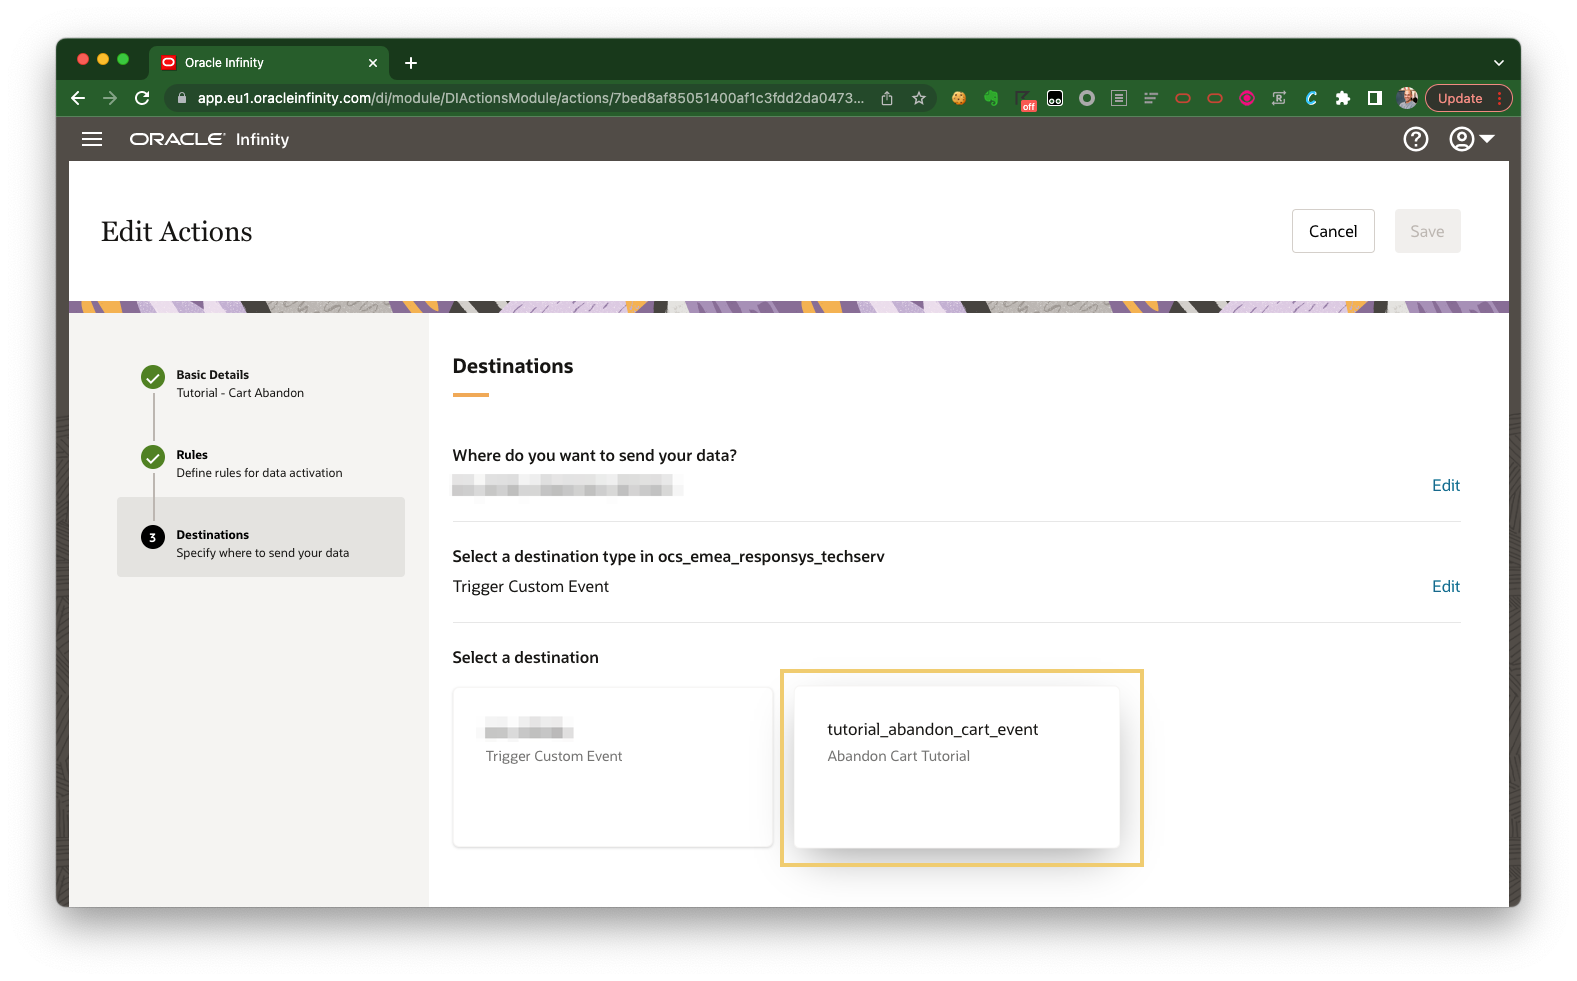
-
Select the Destination you previously created for cart abandonment:
Select your Destination
Field Mapping
You will now map to required parameters which will be sent to Oracle Responsys for cart abandoners:
Match Key
We will now map the Email SHA256 Hash we collect in Oracle Infinity (wt.email_sha256) to dedicated Responsys field for Email SHA256 Hash (EMAIL_SHA256_HASH_).
- Within the Infinity Data column, select the Email SHA256 Hash parameter.
- Select Last occurrence in session.
- Within the Oracle Responsys Fields column, type
customerIdto map this to the Email SHA256 Hash field
Product SKU
Map the Product SKU parameter to your dynamic variable within Oracle Responsys used to denote the Product SKU(s) within the user’s cart.
-
Click the + icon on the right-hand side to add a new mapping.
-
Within the Infinity Data column, select Behaviors > Add product to cart > Product SKU.
-
Within the Oracle Responsys Fields column, enter the dynamic variable you chose within the Configure Oracle Responsys for Cart Abandonment step - we used
PRODUCT_SKUS.Mapping your Parameters

-
Click Save to save your Action.
5.3 Push your Action Live
You can now enable your action by clicking it within the user interface then clicking Enable.
5.4 Testing
Notes:
Please note that this tutorial will only work for users you have manually added in Responsys. If other users wish to test this, simply create a record in the Responsys Profile List with the correct
EMAIL_SHA256_HASH_for their login (captured aswt.email_sha256as per earlier).When deployed on your real website, you would have a process which automatically creates records in your real Profile List in Responsys so you do not need to implement this step.
To test your Action, please follow these steps:
- Open an Incognito/private window to ensure that you have cleared your cookies (we to ensure we start with a new Infinity profile so we remove any previous behavior on the website which may interfere with our testing).
Note:If you already have an incognito window open, you will need to close all of them to ensure you clear the cookies in incognito mode.
-
Visit your test site ensuring that you update the URL with your
ACCOUNTGUIDandTAGID(as per above). -
Log in with your credentials from earlier.
Note: You must ensure that you use the same credentials you used earlier so that the test record you created in Responsys is used for our test.
-
Add at least one item to your cart.
-
Wait 30-40 minutes* for your session to close**.
-
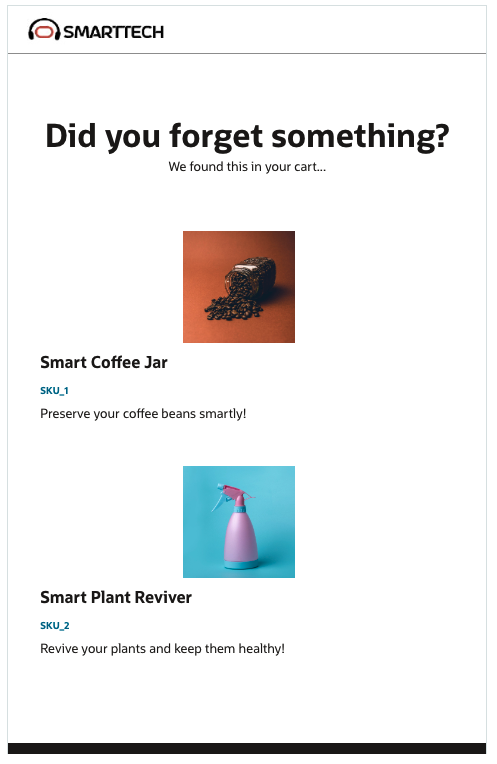
You should receive an email with the products you added to your cart within the session. For example:
Example Email
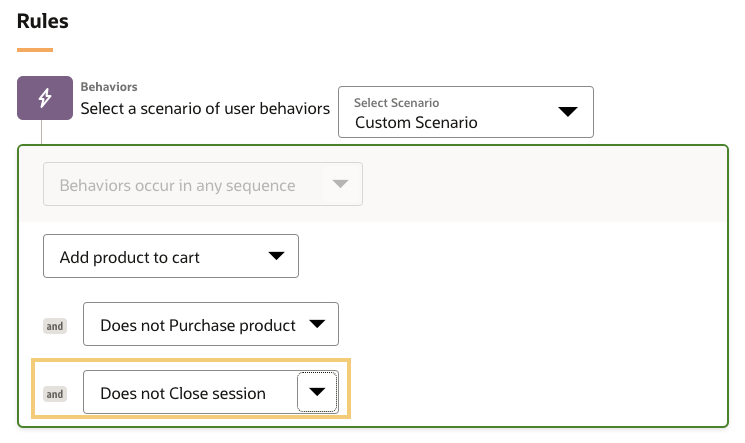
*Don’t want to wait 30 minutes?: For testing, you may wish to temporarily update your Action to trigger on
Does not close session. This will trigger emails immediately upon cart add so that you can validate your emails are being sent more quickly (be aware that this should not be used for real customers - it will email them as soon as they add a product to their cart):Changing to ‘Does not close session’
**What happens upon session close?
At the end of your session:
- Your Action will evaluate its required conditions.
- As you qualify, a message will be sent to Oracle Responsys with your chosen match key (for example,
Email SHA256 Hash) with the Product SKUs which should be displayed in your abandon cart email.- Oracle Responsys will look up your record in your selected Profile List.
- Oracle Responsys will find your email address and send you an email (provided there are no conditions which should stop this, for example - you are opted out of emails).
Troubleshooting: Please see Troubleshooting for common issues and solutions.
Congratulations! You are have now completed the tutorial and you are triggering emails upon cart abandon on the test website!
Next Steps
Now that you have successfully delivered an abandon cart use case on the test website, you now have everything you need to begin an implementation on your own website.
Frequently Asked Questions
How do I log in to the Infinity User Interface?
You will have received your login URL in your original welcome email (for example, app.oracleinfinity.com or app.eu1.oracleinfinity.com.
Troubleshooting
I don’t receive an Email after abandoning my Cart
Please see the following suggestions:
| Suggestion | Description |
|---|---|
| Did you wait 30 minutes for your Infinity session to close? | You must not perform any actions on the website for 30 minutes to that Infinity can close your session to ensure you haven’t purchased anything and have truly abandoned |
If you are waiting for the session to close, try amending your Action to trigger on Does not close session (see Testing). |
This will trigger the action immediately (potentially many times through your web session) as soon as the Action criteria is met so it is only recommended for testing. |
| Have you added a test record for yourself in Responsys? | Without a record existing in the Profile List you are using - your email will not fire. |
Related Links
- Oracle Infinity - Oracle Responsys Connection - Oracle Infinity Help Center article on enabling Oracle Responsys Connections.
- Oracle Infinity - Actions - Oracle Infinity Help center article on Actions.
- Oracle Infinity - User Help Center - User Help Center for Oracle Infinity.
- Oracle Infinity - Developer Help Center - Developer Help Center for Oracle Infinity.
- Oracle Responsys - User Help Center - User Help Center for Oracle Responsys.
More Learning Resources
Explore other labs on docs.oracle.com/learn or access more free learning content on the Oracle Learning YouTube channel. Additionally, visit education.oracle.com/learning-explorer to become an Oracle Learning Explorer.
For product documentation, visit Oracle Help Center.
Quick Start : Triggering Abandon Cart Emails with Infinity and Responsys
F44881-07
September 2022
Copyright © 2022, Oracle and/or its affiliates.
