| Skip Navigation Links | |
| Exit Print View | |

|
Sun Blade 6000 Ethernet Switched NEM 24p 10GbE User’s Guide |
Understanding the Switched NEM
Switched NEM Features Overview
Installing or Replacing the Switched NEM
Verifying the Switched NEM Installation
Verify Installation With the CMM ILOM Web Interface
Verify Installation With the CMM ILOM CLI
Finish the Switched NEM Installation
Install the Fabric Expansion Module in the Server Blade
Installing or Removing SFP+ or QSFP Optical Transceiver Modules
Install an SFP+ or QSFP Optical Transceiver Module
Remove an SFP+ or QFSP Optical Transceiver Module
Managing the NEM Remotely (ILOM)
Configuring an Externally Accessible IP Address on the NEM
Connecting to the NEM ILOM Through the CMM ILOM
Configure SEFOS User Privileges
Special Considerations for RADIUS Users
Configure User Privileges for RADIUS Users
Backing Up and Restoring the ILOM and SEFOS Configuration
This procedure is for installing a Switched NEM into an empty slot. If you are replacing a Switched NEM, see Replace a Switched NEM.
Note - Refer to the Sun Blade 6000 Ethernet Switched NEM 24p 10GbE Product Notes for any system limitations before installing the Sun Blade 6000 Ethernet Switched NEM 24p 10GbE.
Refer to the Sun Blade 6000 Ethernet Switched NEM 24p 10GbE Product Notes for the latest firmware and patch information.
You can insert either one or two Switched NEMs in the Sun Blade 6000 chassis. If you insert only one Switched NEM, place it in the lower slot (NEM 0). Before installing your Switched NEM, remove the NEM filler panel in the slot you plan to use.
See Switched NEM External Ports for the pinouts of the serial management port.
If you do not need the dongle to connect to the serial management port, go to Step 4.
If you need the dongle to connect to the serial management port, follow these steps:
See Switched NEM External Ports for the location of the serial management port on the Switched NEM.
See Switched NEM External Ports for the location of the serial management port on the Switched NEM.
Ensure that:
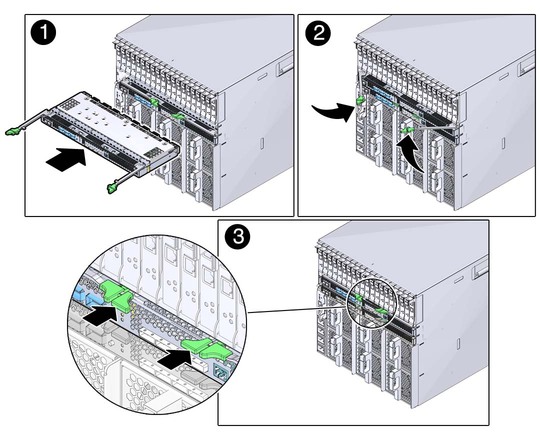
Support the weight of the Switched NEM with one hand at the bottom of the NEM.
This figure shows how to install the Switched NEM. The green Power OK LED will light on the NEM when it is properly installed. See Switched NEM LEDs for the location of that LED.
