In Certificate Management System, the characters allowed in a DN are based on the components (attributes) as defined in the X.509 standard.
Table A.2 lists the attributes supported by default and their character sets. Explanation of the character sets are in Table A.3. The set of attributes is extensible.
Extending Attribute Support
By default, Certificate Management System supports attribute identified in Table A.2. You can extend the list of attributes supported by server. The syntax for adding additional X.500Name attributes (or components) is as follows:
X500Name.<NEW_ATTRNAME>.oid=<n.n.n.n>
X500Name.<NEW_ATTRNAME>.class=<string_to_DER_value_converter_
class>
Note the following:
The string-to-value converter class can be one of these:
For example:
X500Name.MY_ATTR.oid=1.2.3.4.5.6
X500Name.MY_ATTR.class=netscape.security.x509.DirStrConverter
Adding New or Proprietary Attributes
To add a new or proprietary attribute that's not supported by Certificate Management System by default:
Stop the Certificate Manager.
Go to this directory: <server_root>/cert-<instance_id>/config
Open the configuration file, CMS.cfg, in a text editor.
Add the new attributes to the configuration file.
For example, if you want to add three proprietary attributes, MYATTR1 that is
a directoryString, MYATTR2 that is a IA5String, and MYATTR3 that is
PrintableStrings, you would add the following lines at the end of the
configuration file:
X500Name.attr.MYATTR1.oid=1.2.3.4.5.6
X500Name.attr.MYATTR1.class=netscape.security.x509.DirStrCon
verter
X500Name.attr.MYATTR2.oid=11.22.33.44.55.66
X500Name.attr.MYATTR2.class=netscape.security.x509.IA5String
Converter
X500Name.attr.MYATTR3.oid=111.222.333.444.555.666
X500Name.attr.MYATTR3.class=netscape.security.x509.Printable
Converter
Save your changes and close the file.
Next, add each new attribute or component (for example, MYATTR1, MYATTR2 and MYATTR3) to the enrollment form. For instructions, see "Adding Attributes to an Enrollment Form".
Restart the Certificate Manager.
Reload the enrollment page and verify your changes; the new attributes that you added should now show up in the form.
To verify that the new attributes are in effect, request a certificate using the manual enrollment form.
Be sure to enter values for the new attributes (so that you can verify
whether they appear in certificate subject names). For example, you can
enter the following values for the new attributes and look for them in the
subject name:
MYATTR1: a_value
MYATTR2: a.Value
MYATTR3: aValue
CN: John Doe
O: Siroe Corp
Go to the agent interface and approve your request.
When you receive the certificate, check the subject name. The certificate should show the new attribute values in the subject name.
Adding Attributes to an Enrollment Form
The steps below explain how to add an attribute (or component) to the Manual enrollment form:
Go to this directory: <server_root>/cert-<instance_id>/web/ee
Open the ManUserEnroll.html file in a text editor.
Find the line with the component name that the new component will follow and copy the table row, using the new component name. For the purposes of this instruction, assume that the new component you want to add is DC and that it follows component OU. Here's how you would add a table row for DC (the lines you need to add are shown in bold):
<tr>
<td valign="TOP">
<div align="RIGHT">
         <font face="PrimaSans BT, Verdana, Arial, Helvetica,

           sans-serif" size="-1">Organization unit: </font>
</div>
</td>
<td valign="TOP">
         <input type="TEXT" name="OU" size="30"

           onchange="formulateDN(this.form, this.form.subject)">
</td>
</tr>
<tr>
<td valign="TOP">
<div align="RIGHT">
         <font face="PrimaSans BT, Verdana, Arial, Helvetica,

           sans-serif" size="-1">Domain component: </font>
</div>
</td>
<td valign="TOP">
         <input type="TEXT" name="DC" size="30"

           onchange="formulateDN(this.form, this.form.subject)">
</td>
</tr>
Save your changes and close the file.
Go to this directory: <server_root>/cert-<instance_id>/web/ee
Open the cms-funcs.js file in a text editor.
Find the line with form.OU != null (or the component that the new component will follow) and add the if block. For example, if the new component is DC and comes after OU, you need to add the lines shown in bold:
if (form.OU != null) {
if (OU.value != '') {
if (doubleQuotes(OU.value) == true) {
                alert('Double quotes are not allowed in Org Unit

                      field');
OU.value = '';
OU.focus();
return;
}
           if (distinguishedName.value != '')

               distinguishedName.value += ', ';
               distinguishedName.value += 'OU=' +

               escapeDNComponent(OU.value);
}
}
if (form.DC != null) {
if (DC.value != '') {
if (doubleQuotes(DC.value) == true) {
                alert('Double quotes are not allowed in DC

                       field');
DC.value = '';
DC.focus();
return;
}
           if (distinguishedName.value != '')

               distinguishedName.value += ', ';
               distinguishedName.value += 'DC=' +

               escapeDNComponent(DC.value);
}
}
Save your changes and close the file.
Reload the Manual enrollment form in the browser and verify your changes.
To verify that the Enroll for a certificate using the new attribute value.
Changing the DER Encoding Order
You can also change the DER-encoding order of a DirectoryString. (The reason for allowing this to be configurable is that different clients support different encodings for historical reasons.)
The syntax for changing the DER-encoding order of a DirectoryString is as follows:
X500Name.dirStringEncodingOrder=<list_of_encodings_separated_by_commas>
Possible encoding values are as follows:
For example, X500Name.dirEncodingOrder=Printable,BMPString.
To change the DirectoryString encoding:
Stop the Certificate Manager.
Go to this directory: <server_root>/cert-<instance_id>/config
Open the configuration file, CMS.cfg, in a text editor.
Add the encoding order to the configuration file.
For example, if you want to specify two encoding values,
PrintableString and UniversalString, and the encoding order is
PrintableString first and UniversalString next, you would add the
following line at the end of the configuration file:
X500Name.directoryStringEncodingOrder=PrintableString,Univer
salString
Save your changes and close the file.
To verify that the encoding order are in effect, enroll for a certificate using the manual enrollment form. Use "John_Doe" for CN.
Go to the agent interface and approve your request.
When you receive the certificate, use the dumpasn1 tool to examine the encoding of the certificate; for details on the dumpasn1 tool, see Appendix C, "Command-Line Utilities."
The CN component of the subject name should be encoded as a
UniversalString.
Repeat Steps 6 through 8 above, but use "John Smith for CN this time.
The CN component of the subject name should be encoded as a
PrintableString.
Role of Distinguished Names in Certificates
In certificates issued by Certificate Management System, DNs are used to identify the entity that owns the certificate. In all cases, if you are using Certificate Management System with a directory, the format of the DNs in your certificates should match the format of the DNs in your directory. It is not necessary that the names match exactly; certificate mapping allows the subject DN in a certificate to be different from the one in the directory. For more information, see "Mapper Modules".
DNs in End-Entity Certificates
In end-entity certificates issued by Certificate Management System, DNs are used to identify the end entity that owns the certified key pair. The end entity is one of the following:
- The individual who owns the certified key pair (for personal or client certificates--to form this type of DN, use the CN component to specify the user's full name:
CN=<user's_full_name>, OU=<user's_division_name>,
O=<company_name>, C=<country_name>
For example:
CN=Jane Doe, OU=Human Resources, O=Siroe Corporation, C=US
- The server that owns the certified key pair (for SSL server certificates)--to form this type of DN, use the CN component to specify the server's fully qualified host name in the form <machine_name>.<your_domain>.<domain>:
CN=<host_name>, OU=<division_name>, O=<company_name>,
C=<country_name>
For example:
CN=corpDirectory.siroe.com, OU=Human Resources, O=Siroe
Corporation, C=US
When clients such as Netscape Navigator receive a server certificate, they
expect the CN component of the certificate's subject to match the host name
in the URL. If the name in the certificate and the host name of the server do
not match, Navigator notifies the user and gives the user the choice of not
connecting to the server.
For example, if Navigator goes to the URL https://
corpDirectory.siroe.com and receives a certificate from the server, it
expects the CN component of the certificate's subject to be
corpDirectory.siroe.com. If the CN component has a different value (for
example, corpDir.siroe.com), Navigator notifies the user that the
certificate's subject name does not match the host name in the URL.
DNs in CA Certificates
In CA certificates issued by Certificate Management System (for both root and subordinate CAs), DNs are used to identify the authority who owns the certified key pair.
To form this type of distinguished name, use the CN component to specify the name of your CA:
CN=<CA_name>, O=<company_name>, C=<country_name>
For example:
CN=Siroe Certificate Authority, O=Siroe Corporation, C=US
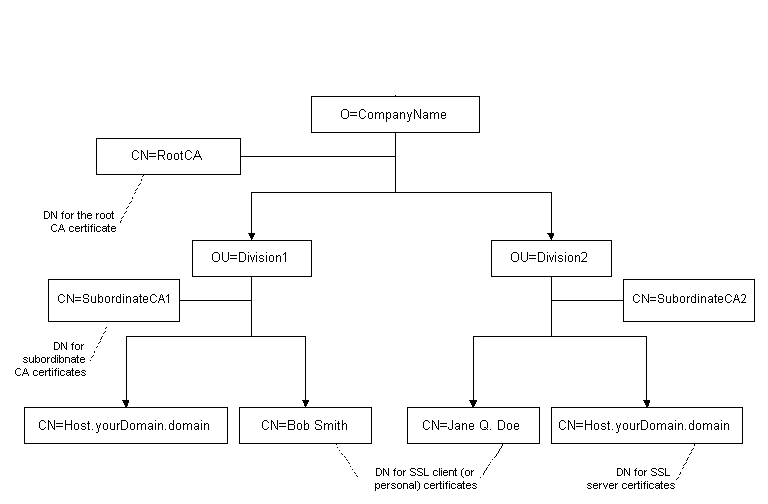
Selecting DNs for Certificates
Figure 28.4 illustrates the structure of distinguished names you might select for CA certificates, server certificates, and personal certificates.
Figure 28.4 Sample directory hierarchy
DN Patterns and Certificate Subject Names
You can configure Certificate Management System to issue certificates with subject names that are formulated from the directory attributes and entry DN. The dnpattern configuration variable of the automated-enrollment modules, such as UidPwdDirAuth and UidPwdPinDirAuth, described in "Overview of Authentication Modules" enable you to configure the server to issue certificates with required subject names. Note that dnpattern is a string representing a subject name pattern to formulate from the directory attributes and entry DN. If empty or not set, Certificate Management System uses the LDAP entry DN as the certificate subject name.
The dnpattern configuration variable supports escaped commas and multiple attribute variable assertions (AVAs) in a RDN. Below is the syntax for the DN pattern followed by examples.
Syntax
Example 1
If the configured DN pattern is
E=$attr.mail.1, CN=$attr.cn, OU=$dn.ou.2, O=$dn.o, C=US
The subject name formulated will be as follows:
E=jdoe@siroe.org, CN=Jane Doe, OU=people, O=siroe.org, C=US
Example 2
If the configured DN pattern is
E=$attr.mail.1, CN=$attr.cn, OU=$dn.ou.2, O=$dn.o, C=US
The subject name formulated will be as follows:
E=jdoe@siroe.org, CN=Jane Doe, OU=people, O=siroe.org, C=US
Example 3
If the configured DN pattern is
CN=$attr.cn, $rdn.2, O=$dn.o, C=US
The subject name formulated will be as follows:
CN=Jane Doe, OU=IS+OU=people, O=siroe.org, C=US
Example 4
If the configured DN pattern is
CN=$attr.cn, OU=$dn.ou.2+OU=$dn.ou.1, O=$dn.o, C=US
The subject name formulated will be as follows:
CN=Jane Doe, OU=people+OU=IS, O="siroe \, org", C=US
If an attribute or subject DN component does not exist, the attribute is skipped.
