|
Chapter 10
Authentication Modules for End-
Entity Enrollment
Certificate Management System provides a set of authentication modules that enable you to configure the server to authenticate end entities, based on specified criteria, when they enroll for a certificate. This chapter explains the authentication modules that are installed with the server--it lists and briefly describes the modules and then explains each one in detail. Before reading this chapter, you should have read the chapter "Introduction to Authentication".
The chapter has the following sections:
|
 Overview of Authentication Modules Overview of Authentication Modules |
|
Certificate Management System supports both manual and automated certificate issuance.
In the manual method of certificate issuance, end entities supply most of the information required by the server to formulate certificate requests and issue certificates. Manual issuance is also dependent on human agents; it requires that all end-entity certificate requests be approved by agents before the server can process the requests. To understand the role of an agent in your PKI, see "Agents".
For details on the manual method of certificate issuance, see "Manual Authentication". For the automated method of certificate issuance, Certificate Management System provides a set of plug-in modules. Plug-in modules are implemented as Java classes and are registered in the CMS authentication framework. The Authentication Plugin Registration tab of the CMS window (see Figure 10.1) lists all the modules and the corresponding classes that are currently registered with a CMS instance.
Figure 10.1 Default authentication modules for end-user enrollment 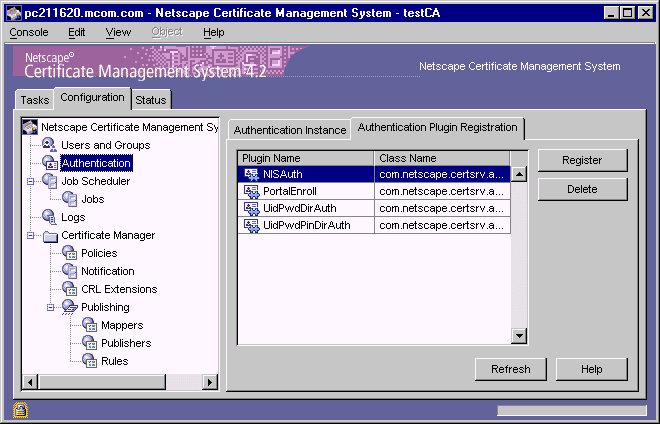
Table 10.1 lists the authentication modules provided for the Certificate Manager and Registration Manager; no authentication modules are provided for the Data Recovery Manager as it does not function as an enrollment authority in a PKI. You can use these modules to configure a Certificate Manager and Registration Manager to employ a specific authentication method during certificate enrollments.
Because large corporations typically store corporatewide user, group, and network-resource data in LDAP-compliant directories, the default authentication modules provided for automated certificate enrollment use an LDAP directory for authenticating users or for formulating certificate subject names, or for both. If you already have an LDAP-compliant directory, such as Netscape Directory Server, with end-user data, you can use that directory for any of the purposes mentioned above. For example, if you have an NIS server and LDAP directory installations, you can use the NIS server for authenticating end users and the directory for formulating certificate subject names; end users will be required to provide only their NIS user IDs and passwords during enrollment.
If you don't have a directory deployed, you may use the Netscape Directory Server instance created at the time of CMS installation; in the documentation, this instance is identified as the Configuration Directory. For a demonstration on how to use this directory for issuing certificates to end users, see Chapter 2: "Default Demo Installation" of the Netscape Certificate Management System Installation and Deployment Guide.
If you determine that the default authentication modules do not meet your requirements, you can develop a custom authentication module using the CMS SDK, which is available in the form of Java Docs at this location:
<server_root>/cms_sdk/sdkdocs
For general guidelines on developing custom authentication modules and adding them to the CMS authentication framework, see "Developing Custom Authentication Modules". Be sure to take a look at the authentication-specific samples available at this location:
<server_root>/cms_sdk/samples/authentication
For instructions on how to configure a Certificate Manager and a Registration Manager to use one or more of the authentication methods, see "Setting Up Authentication for End-User Enrollment".
Keep in mind that in an automated certificate management setup, the Certificate Manager and Registration Manager use the configured authentication methods only during certificate enrollment. During certificate renewal, the servers rely on end users SSL client certificate for automated renewal. For automated revocation, the users can use their SSL-client certificate or a challenge password. For more information, see sections "Authentication of End Users During Certificate Renewal" and "Authentication of End Users During Certificate Revocation".)
Certificate Management System also provides HTML forms-based interfaces for all the authentication methods it supports. Your end entities can use these forms for certificate enrollment. Explanation of each enrollment form, along with the corresponding authentication module, is covered in "Enrollment Forms". Certificate renewal and revocation forms are covered as a part of those processes. For details on individual form elements in the enrollment, renewal, and revocation forms, see the online help available by clicking the Help buttons on the HTML forms. You can also customize these forms to suit to your organization's requirements. For customization information, see "Agent and End-Entity Interfaces".
|
 Manual Authentication Manual Authentication |
|
Manual authentication refers to operations which must be approved by a CMS agent, where no automated operation is possible. That is, a real person must log in to approve or reject request. By default, Certificate Management System provides manual-enrollment forms that enable you to request many types of certificates from the server. For details, see "Enrollment Forms".
Note that the manual authentication method is hardcoded; you cannot configure it in any other way. This ensures that when the server receives requests that lack authentication credentials, it sends those requests to the request queue for agent approval. It also means that if you don't configure a Certificate Manager or Registration Manager for any other authentication method, the server automatically sends all certificate-related requests to a queue where they await agent approval.
Figure 10.2 illustrates how the manual authentication method works during certificate enrollment.
Figure 10.2 Manual authentication of end entities during certificate enrollment 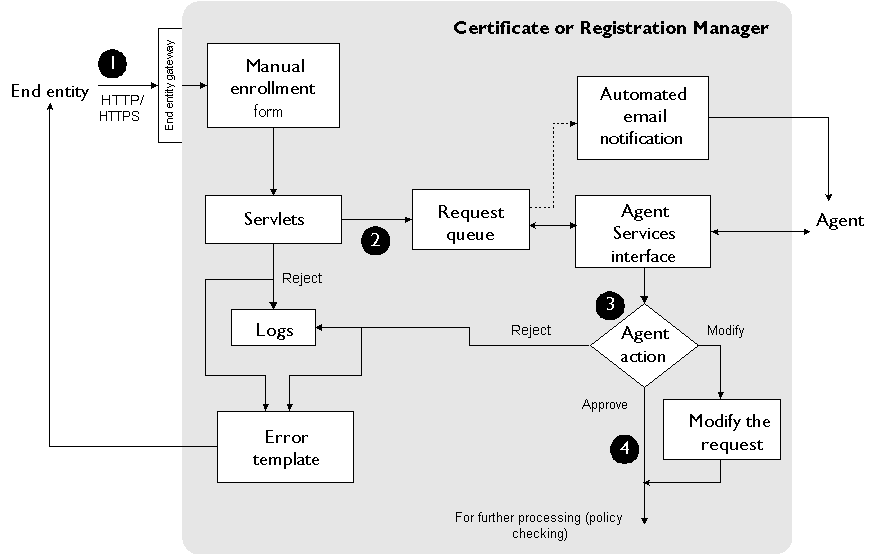
These are the steps shown in Figure 10.2:
In the manual enrollment form, the end entity enters the information needed to request a certificate and submits the request to the server.
When the server receives the request, it automatically lists the request in a certificate request queue for an agent to process.
An agent verifies the authenticity of the request.
When the server receives the agent-approved request, it subjects it to policy processing; for details, see "Policies".
The certificate is delivered to the email address specified in the certificate
request.
|
 Directory-Based Authentication Directory-Based Authentication |
|
The UidPwdDirAuth plug-in module implements the directory-based authentication method. You can use this module for authenticating end users during certificate enrollment. You can use this module for authenticating unprivileged users in the global LDAP domain.
As part of configuring a Certificate Manager and a Registration Manager, or both, for authentication, you specify an LDAP directory that the server must use to authenticate end users. End users enroll for a certificate by entering their user IDs and passwords for this authentication directory in an HTML form that is served by a Certificate Manager or Registration Manager (see "Enrollment Forms". Once the server successfully authenticates an end user, it retrieves the rest of the information required to formulate the certificate from the directory.
Figure 10.3 illustrates how authentication based on a user ID and password works during certificate enrollment.
Figure 10.3 User ID- and password-based authentication of an end user 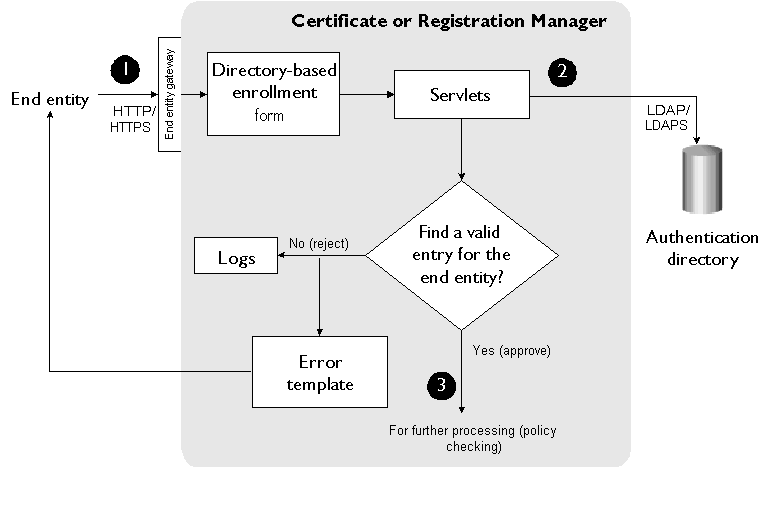
These are the steps shown in Figure 10.3:
In the directory-based certificate enrollment form, the end user enters a user ID and password for the directory and submits the request to a Certificate Manager or Registration Manager.
When the server receives the request, it looks up the directory that is configured for authenticating end users. The server verifies the authenticity of the user by checking the directory entries.
If, for some reason, the directory to which the server binds for
authenticating the user ID and password is unavailable, the server returns
an LDAP error code and writes it to the log. When troubleshooting any
authentication failures, if you see a log entry with an LDAP error code, look
up the corresponding error code at this URL:
http://help.netscape.com/kb/server/970303-9.html
A sample log entry with an LDAP error code is shown below:
28/Jun/1999:18:40:25 -0700] conn=0 op=7 RESULT err=32 tag=101 nentries=0 etime=0]
Next, the server subjects the certificate request to policy processing; for details, see "Policies".
UidPwdDirAuth Module
The Java class that implements the directory-based authentication method is identified as follows:
com.netscape.certsrv.authentication.UidPwdDirAuthentication
Figure 10.4 shows how configurable parameters of the UidPwdDirAuth module are displayed in the CMS window.
Figure 10.4 Parameters defined in the UidPwdDirAuth module 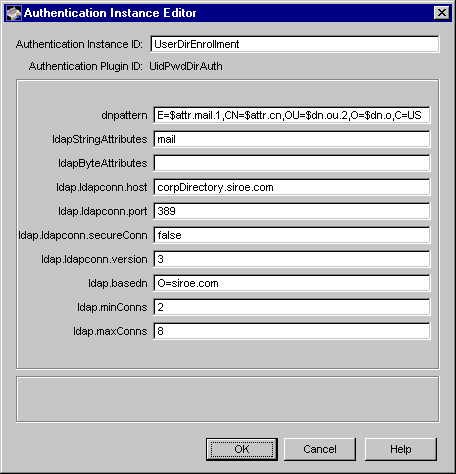
Table 10.2 gives details about each of these parameters and their values.
|
 Directory- and PIN-Based Authentication Directory- and PIN-Based Authentication |
|
The UidPwdPinDirAuth plug-in module implements the directory- and PIN-based authentication method. You can use this module for authenticating users in the global LDAP domain during certificate enrollment. This authentication method is functionally very similar to the directory-based authentication explained in "Directory-Based Authentication", except that for stronger authentication you combine a PIN or one-time password with the end users' user IDs and passwords.
As a part of setting up a Certificate Manager or a Registration Manager, or both for end-user authentication, you specify the LDAP directory that the server must use to authenticate end users. End users enroll for a certificate by entering their user IDs, passwords, and PINs in an HTML form that is served by the Certificate Manager or Registration Manager (see "Enrollment Forms". Once the server successfully authenticates an end user, it retrieves the rest of the information required to formulate the certificate from the directory. You can also configure the server to either retain or remove the PIN from the directory following successful authentication.
Normally, user entries in directories do not contain PINs. In order to use the UidPwdPinDirAuth module, you must first populate the directory that you intend to use for authentication with unique PINs for users; each user to whom you intend to issue a certificate must know his or her PIN at the time of certificate enrollment, as he or she will be required to enter it in the enrollment form. To aid you in the process of generating unique PINs for users and adding them to the directory, Certificate Management System provides a command-line tool called the PIN Generator. The section "Using the PIN Generator Tool" explains how to use this tool in detail.
UidPwdPinDirAuth Module
The Java class that implements the directory- and PIN-based authentication method is identified as follows:
com.netscape.certsrv.authentication.UidPwdPinDirAuthentication
Figure 10.5 shows how configurable parameters of the UidPwdPinDirAuth module are displayed in the CMS window.
Figure 10.5 Parameters defined in the UidPwdPinDirAuth module 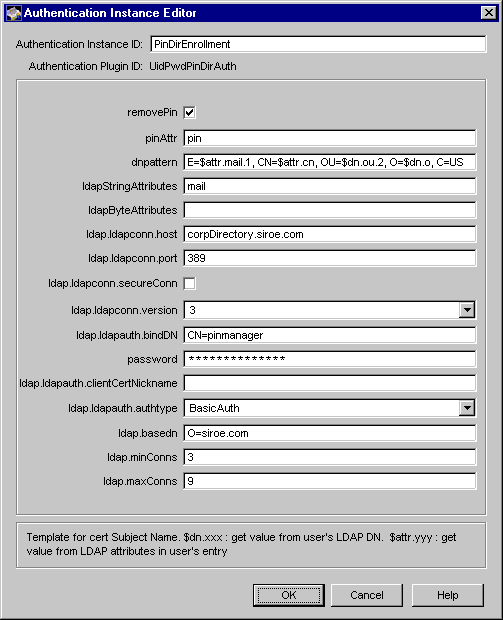
Table 10.3 gives details about each of these parameters.
|
 NIS Server-Based Authentication NIS Server-Based Authentication |
|
The NISAuth module implements the NIS server-based authentication. You can use the module for authenticating unprivileged users in the NIS domain during certificate enrollment. The module enables you to deploy Public Key Infrastructure (PKI) leveraging an existing NIS server installation--it enables you to configure a Certificate Manager or Registration Manager to authenticate end users, based on their user IDs and passwords stored in an existing NIS server, and to issue certificates.
Optionally, you can configure the authentication module to do an LDAP correlation--that is, use the NIS directory to authenticate users based on the user ID and password they enter in the enrollment form, but compose certificate subject names from an LDAP-compliant directory, such as Netscape Directory Server. When using an LDAP directory to compose subject names, you can configure the module to search for and retrieve specific LDAP attribute values from the directory. The ability of the module to use an LDAP directory to form certificate subject names is useful in cases where the NIS server only stores user IDs and passwords and you don't want to formulate subject names using just common names and user IDs.
In the absence of an LDAP directory, subject names of all certificates issued by the server will be of the form CN=<FirstName LastName>,UID=<UserID>, where First Name and Last Name is a user's first and last names as specified in the NIS directory, and UserID is the user's NIS ID. To accommodate scenarios where the default subject-name form isn't adequate, the module supports a parameter named extendedDN. This parameter enables you to specify a suffix that the server should use for extending the default subject DN pattern.
Figure 10.6 illustrates how the NIS authentication module works during certificate enrollment.
Figure 10.6 NIS server-based authentication of an end user 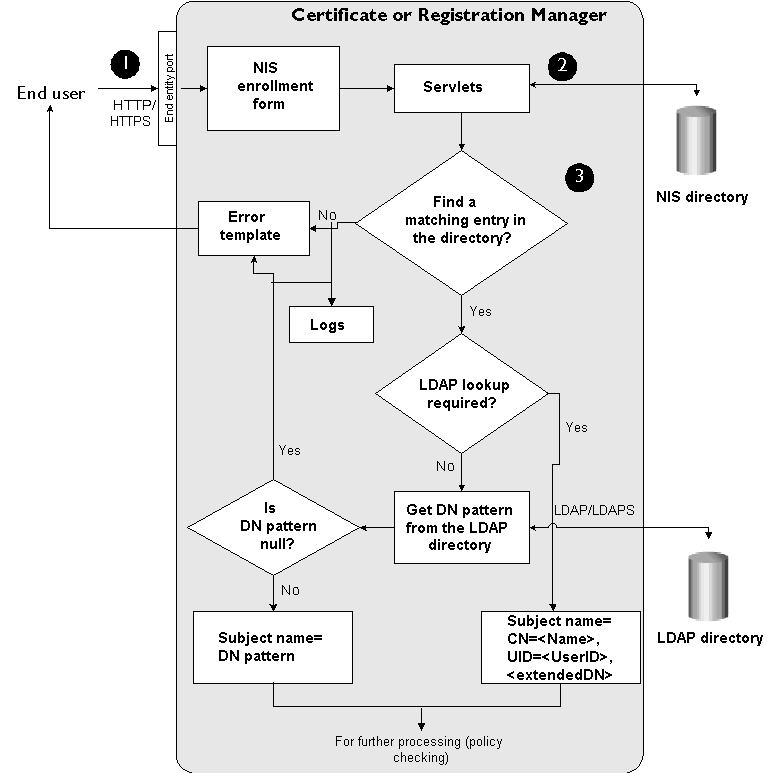
These are the steps shown in Figure 10.6:
In the NIS server-based certificate enrollment form, the end user enters his or her user ID and password for the NIS server and submits the request to a Certificate Manager or Registration Manager.
When the server receives the request, it looks up the NIS server that is configured for authenticating end users. The server verifies the authenticity of the end user by checking the entries.
- If the end user does not have a valid entry in the NIS server, the Certificate Manager or Registration Manager rejects the request, logs an error message, and sends a rejection notification to the user.
- If the end user has a valid entry in the NIS server, the Certificate Manager or Registration Manager checks to see if any LDAP directory has been configured for retrieving attributes for constructing the certificate subject name. If a directory is specified, the server checks it for the user's entry, retrieves all the information required to construct the subject name, and adds the subject name to the certificate request. If a directory is unspecified, the server uses the NIS user's name, user ID, and extended DN (if specified) for the subject name.
If, for some reason, the directory to which the server binds for retrieving
user attributes is unavailable, the server writes the appropriate LDAP error
code to the log. When checking the log for troubleshooting any
authentication failures, if you see a log entry with an LDAP error code, look
up the corresponding error code at this URL:
http://help.netscape.com/kb/server/970303-9.html
A sample log entry with an LDAP error code is shown below:
30/Dec/1999:18:40:25 -0700] conn=0 op=7 RESULT err=32 tag=101 nentries=0 etime=0]
Next, the server subjects the certificate request to policy processing; for details, see "Policies".
NISAuth Module
The Java class that implements the NIS server-based authentication module is identified as follows:
com.netscape.certsrv.authentication.NISAuth
Figure 10.7 shows how configurable parameters of the NISAuth module are displayed in the CMS window.
Figure 10.7 Parameters defined in the NISAuth module 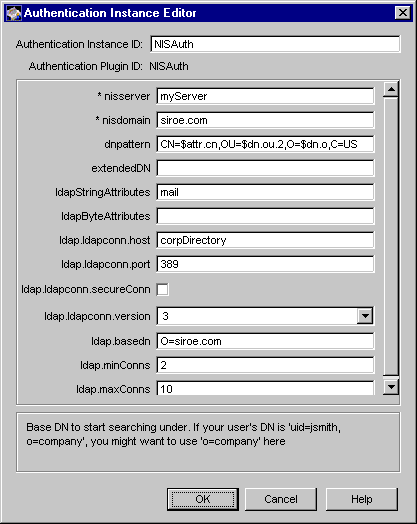
Table 10.4 gives details about each of these parameters and their values.
|
 Portal Enrollment Portal Enrollment |
|
The PortalEnroll module implements portal enrollment. This module enables you to issue certificates and create directory entries for users who do not yet have an entry in the directory. For example, if your company runs a portal service, such as Netscape NetcenterTM, you can use the PortalEnroll module to issue certificates to new users when they register for the online service. You can also use the module to authenticate and issue certificates to your extranet users. For example, if you have deployed extranets for partners and vendors, you can use the module to authenticate and issue certificates to these users when they register for the service.
The PortalEnroll module does following:
There are many advantages in issuing certificates to your user community:
Functionally, the portal authentication module is very similar to the directory-based authentication module (see "Directory-Based Authentication") except that instead of binding to the directory as the enrolling user, Certificate Management System binds as some directory account with permission to create and update user entries. The server then queries the directory for the user name specified by the user and if it doesn't find a match, it adds the entry with all the standard LDAP field names that match the directory attributes.
For example, if the HTTP form input contains data such as surname, common name, and phone number, the corresponding LDAP attributes would be set in the directory; for details, see "Enrollment Forms". The server also uses a combination of these attributes (which you can specify using the dnpattern parameter defined in the module) to construct subject names for certificates.
Note that the portal authentication module by default uses the standard LDAP object class named inetOrgPerson to create and update user entries. The input fields defined in the default portal enrollment form correspond to the attributes defined in this object class as defined in Netscape Directory Server 4.x. The module is capable of reading and writing these attributes only. However, you can customize the module to accommodate all the fields supported by popular portals by extending the directory schema to include a new object class; you'll also be required to update the enrollment form to include attributes corresponding to the new object class. For guidelines on how to customize the module, check the sample located here:
<server_root>/cms_sdk/samples/authentication
Figure 10.8 illustrates how the portal authentication module works during certificate enrollment.
Figure 10.8 Portal authentication of an end user 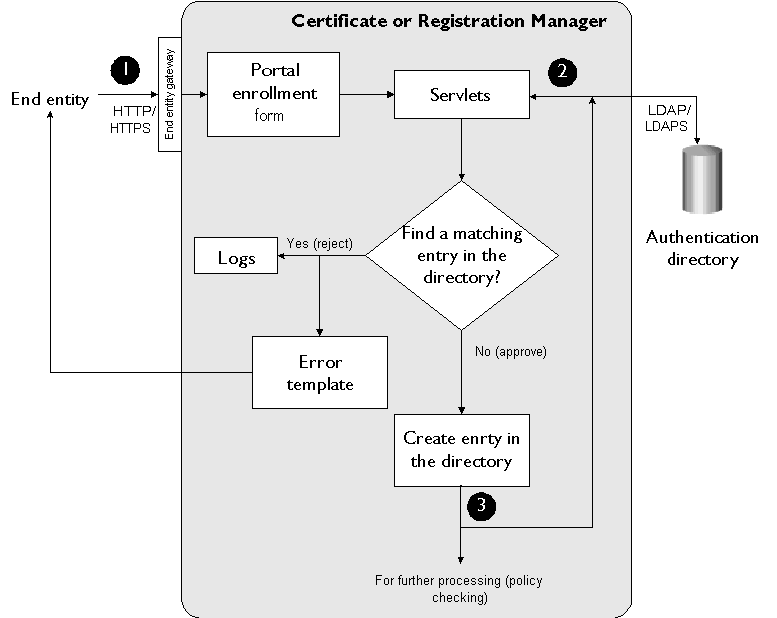
These are the steps shown in Figure 10.8:
In the portal enrollment form, the end user enters registration information, such as a user name or ID, password, first name, last name, and mailing address, and submits the request to the server.
When the server receives the request, it verifies that the required fields contain appropriate information, for example, the values entered in the Password and Confirm Password fields match. Next, the server looks up the directory that is configured for authenticating portal service users for a matching user name.
If, for some reason, the directory to which the server binds for
authenticating the user ID and password is unavailable, the server returns
an LDAP error code and writes it to the log. When troubleshooting any
authentication failures, if you see a log entry with an LDAP error code, look
up the corresponding error code at this URL:
http://help.netscape.com/kb/server/970303-9.html
A sample log entry with an LDAP error code is shown below:
28/Jun/1999:18:40:25 -0700] conn=0 op=7 RESULT err=32 tag=101 nentries=0 etime=0]
Next, the server subjects the certificate request to policy processing; for details, see "Policies".
PortalEnroll Module
The Java class that implements the portal authentication plug-in module is identified as follows:
com.netscape.certsrv.authentication.PortalEnroll
Figure 10.9 shows how configurable parameters for the PortalEnroll module are displayed in the CMS window.
Figure 10.9 Parameters defined in the PortalEnroll module 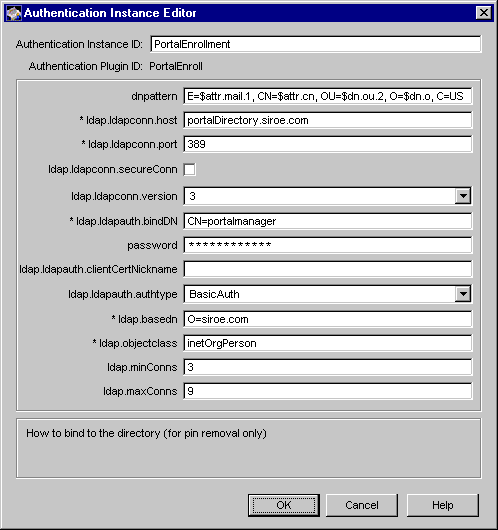
Table 10.5 gives details about each of these parameters and their values.
|
 Certificate-Based Enrollment Certificate-Based Enrollment |
Certificate Management System supports certificate-based enrollment for browser certificates. End users can use preissued certificates to authenticate to the server in order to enroll for certificates. Below are two deployment scenarios that explain the usefulness of certificate-based enrollment.
- You have deployed a client that can generate dual key pairs and you want to issue dual certificates (one for signing and another for encrypting data) to your users. You also want to make sure that users put their key materials only on hardware tokens.
One way to achieve this would be to initialize hardware tokens in bulk and
preload them with dual certificates issued by Certificate Management
System for dual key pairs. You generate these certificates with some
generic-looking common names, for example, hardwaretoken1234. This
way, there's no one-to-one relation between users and the hardware tokens
initially. Once the tokens are ready, you make them available to users by
some means, for example, from a vending-machine-like box in the break
room. Basically, a user can get and use any pre-initialized and certificate-
loaded hardware token.
Next, each user uses the randomly-picked token to enroll (strictly speaking,
renew) for a pair of certificates that have a subject name derived from their
LDAP attribute values; the certificates will be issued for the existing key
pairs preloaded into the token, but now the key pairs will be associated
with the user's identity.
- You want users use the signing certificate already in their possession to get an encryption certificate.
For example, assume you have deployed Certificate Management System
and have issued single certificates (for single key pairs) to users. Recently,
you deployed a client application (such as Netscape Personal Security
Manager) that is capable of generating dual key pairs. Your CMS installation
includes the Data Recovery Manager, but you weren't using it until now
because you didn't have clients that were capable of generating dual-key
pairs. Now, you want your users to use their signing certificates as
authentication tokens to request another certificate that they'll use for
encrypting data.
To enable you to configure Certificate Management System for certificate-based enrollment, the following three enrollment forms are provided:
Note that all three enrollment forms by default work with the directory-based authentication module, named UidPwdDirAuth, explained in "Directory-Based Authentication". You can use the certificate-based enrollment forms with any of the authentication modules, for example, directory- and PIN-based or NIS-server based authentication modules. However, this would require you to add the necessary hidden fields or variables to enrollment form that's provided for the corresponding authentication module; check Table 10.6 to figure out which enrollment form works with which module.
In general, the following three hidden variables distinguish certificate-based enrollment forms from other enrollment forms:
Before modifying a form, be sure to take a look at the default certificate-based enrollment forms. Also check the customization-related information for enrollment forms in "Customizing End-Entity and Agent Interfaces".
In addition to the enrollment forms, a policy plug-in named IssuerConstraints is also provided; see "Issuer Constraints Policy". This plug-in allows you to configure the server to recognize the CA that issues the certificates that your users will use for authentication purposes; you need this policy to ensure that the CA issues certificates only to those users who present a valid certificate during enrollment. Note that in the current implementation, the CA that issues the new certificates must be the same as the one that issues the certificates users will use for authentication. That is, the issuer DN in the authentication certificate must match the issuer DN specified in the policy configuration.
Here are a few things to keep in mind:
General guidelines to set up certificate-based enrollment (for dual certificates) are as follows:
On the server side you need do the following:
On the client side, you need to do the following:
|
 Enrollment Forms Enrollment Forms |
|
The end-entity interface of the Certificate Manager and the Registration Manager include default HTML forms for all the authentication methods--manual and automated--supported by the server.
Enrollment forms can be categorized into two types, depending on the authentication method they support.
All enrollment forms are accessible from the Enrollment tab of the End Entity Services interface. Note that by default the Enrollment tab lists only those forms that are associated with the manual enrollment method (it does not list the forms provided for the automated-enrollment methods). However, when you create an instance of any of the authentication modules provided for automated end-user enrollment--for example, directory-based or NIS-server based authentication--a link to the corresponding form is automatically created under the Browser section of the Enrollment tab. Instructions for enabling automated end-user enrollments is covered in "Setting Up Authentication for End-User Enrollment".
Before asking users to use any of the enrollment forms, you should review the form and make the appropriate changes to the form content. For example, some of the forms include instructions for administrators and you should delete those lines. Files for all enrollment forms are located here:
<server_root>/cert-<instance_id>/web/ee
For basic instructions to customize any of the enrollment forms, see "Step 5. Set Up the Enrollment Interface". For advanced information on customizing the HTML forms, including how to make changes to the embedded Javascript functions, see "Agent and End-Entity Interfaces".
Figure 10.10 shows the End Entity Services interface of a Certificate Manager with the manual enrollment form for end users selected.
Figure 10.10 End Entity Services interface of a Certificate Manager 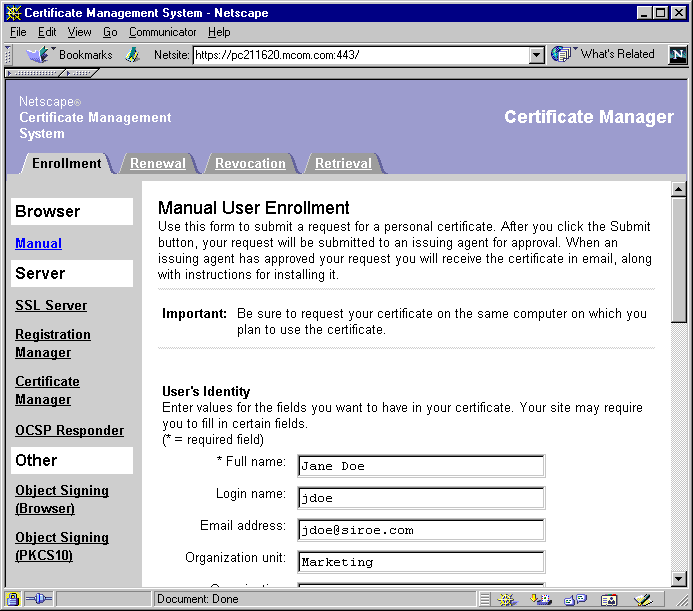
Table 10.6 lists the forms that correspond to the menu options in the Enrollment tab of the End Entity Services interface of the Certificate Manager and Registration Manager.
Generating Files Required By Third-Party Object Signing Tools
When issuing an object-signing certificate to Microsoft IE, Certificate Management System can generate a certificate (.CER) and a private key (.PVK) files for use by Microsoft signcode tool or any third-party sign tools that rely on these files. For the server to generate these files, you must edit the default form provided for requesting an object-signing certificate for browsers.
To generate the private-key file:
Go to this directory: <server_root>/cert-<instance_id>/web/ee
Locate the file named ManObjSignEnroll.html.
Open it in an editor.
Search for this line:
Enroll.GenKeyFlags = 1 ' key exportable
Type the following line below it:
Enroll.PVKFilename = "<pvk_file_path>"
Your changes should look like this:
...
Enroll.GenKeyFlags = 1 ' key exportable
Enroll.PVKFilename = "<pvk_file_path>"
szCertReq = Enroll.createPKCS10(szName, "1.3.6.1.5.5.7.3.2")
...
Replace <pvk_file_path> with the absolute path, including the filename, to the directory in which you want the private key file created; for example, "C:\myKey.PVK". Be sure to use the .PVK extension and to enclose the path in double quotes.
Optionally, you may further edit the form to include a text field for entering the file path.
Save your changes.
Now use the form to issue an object-signing certificate.
If your users need to generate Software Publishing File (SPC) files for their object-signing certificates, you should ask them to use the Microsoft tool named cert2spc. The SPC file enables them to execute commands such as this:
signcode -spc myCert.spc -v myKey.pvk file.exe
Here's how a user can create a SPC file for an object-signing certificate:
Open a web browser window.
Go to the End Entity Services interface.
Locate the object-signing certificate for which you want to create the SPC file.
Scroll down the page (that shows the certificate information in detail) to find the certificate in base-64 encoded format. It looks like this:
-----BEGIN CERTIFICATE-----
MIICJzCCAZCgAwIBAgIBAzANBgkqhkiG9w0BAQQFADBCMSAwHgYDVQQKExdOZXRzY2FwZSBDb21td
W5pY2F0aW9uczngjhnMVQ2VydGlmaWNhdGUgQXV0aG9yaXR5MB4XDTk4MDgyNzE5MDAwMFoXDTk5M
DIyMzE5MDAwMnbjdgngYoxIDAeBgNVBAoTF05ldHNjYXBlIENvbW11bmljYXRpb25zMQ8wDQYDVQQ
LEwZQZW9wbGUxFzAVBgoJkiaJkIsZAEBEwdzdXByaXlhMRcwFQYDVQQDEw5TdXByaXlhIFNoZXR0e
TEjMCEGCSqGSIb3DbndgJARYUc3Vwcml5YUBuZXRzY2FwZS5jb20wXDANBgkqhkiG9w0BAQEFAANL
ADBIAkEAoYiYgthgtbbnjfngjnjgnagwJjAOBgNVHQ8BAf8EBAMCBLAwFAYJYIZIAYb4QgEBAQHBA
QDAgCAMA0GC2pWZWUm7waHEtdbo9vSpbJkXTM/2GhWbsO5vLdeOxrPGxihkHgV/yyggiufr4s3az
-----END CERTIFICATE-----
Create an ASCII file named cert.b64.
Copy and paste the base-64 encoded certificate blob, including the marker lines -----BEGIN CERTIFICATE----- and -----END CERTIFICATE----- to the file.
Convert the text-based certificate to its DER-encoded format using the ASCII to Binary tool, explained in Appendix C, "Command-Line Utilities."
For example, the command
<server_root>/bin/cert/tools/AtoB cert.b64 cert.der
converts the base-64 encoded certificate in the cert.b64 file to its DER-
encoded format and writes the DER-encoded certificate to a file named
cert.der.
Next, use the Microsoft tool named cert2spc to convert the DER-encoded certificate to SPC format. For example, the command
cert2spc cert.der cert.spc converts the DER-encoded certificate in the cert.der file to its SPC format and writes the certificate to a file named cert.spc.
For additional information, check these links:
|
|
|

|