This section explains how to use the CMS window to do the following:
For information on adding or changing authentication-specific information in the configuration file, see "Authentication Parameters in the Configuration File".
Setting Up Authentication for End-User Enrollment
To set up a Certificate Manager and Registration Manager to authenticate end users based on a specific criteria, follow these steps:
Note
If you do not configure a Certificate Manager or Registration Manager to use
any of the registered authentication plug-in modules, the server uses manual
authentication for end-user enrollment. This means that all end-user enrollment
requests are queued for agent approval. For more information, see "Manual
Authentication".
Step 1: Find the Required Information
Before setting up a Certificate Manager or Registration Manager to use a specific authentication method:
- Determine the authentication module you want to use. To find out about the modules that are installed with the server, see "Overview of Authentication Modules". If you want to develop and use a custom plug-in module, be sure to read "Developing Custom Authentication Modules".
- If you decided to use the directory-based authentication module, note the authentication directory credentials, such as the host name, port number, base DN, the user entry to bind as and the corresponding password, the DN pattern to retrieve from the directory to construct certificate subject names, LDAP version number, and minimum and maximum number of connections permitted. Check Table 10.2 to get the complete list of parameters for which you'll be asked to provide values for.
- If you decided to use the directory- and PIN-based authentication module, note the authentication directory credentials, such as the host name, port number, based DN, the user entry to bind as and the corresponding password, LDAP version number, and minimum and maximum number of connections permitted. Check Table 10.3 to get the complete list of parameters for which you'll be asked to provide values for.
Next, read "Using the PIN Generator Tool", determine the options you want to use to generate PINs, and construct the command for generating the PINs. Note that the optfile option enables you to put all the arguments in a file (instead of typing the arguments at the command prompt) and then point the tool to read arguments from the file.
- If you decided to use the NIS server-based authentication module, note the NIS server host name and domain name. If you have an LDAP directory deployed and want to use that for formulating the certificate subject names, note the directory-specific information. Check Table 10.4 to get the complete list of parameters for which you'll be asked to provide values for.
- If you decided to use the portal authentication module, note the LDAP directory-specific information. Check Table 10.5 to get the complete list of parameters for which you'll be asked to provide values for.
- Determine the enrollment form you want your users to use. For guidance, check "Enrollment Forms".
The next step depends on the authentication module you chose:
Step 2. Set Up the Directory for PIN-Based Enrollment
Go through this step only if you want to configure the server to use the directory- and PIN-based authentication method (with or without PIN removal).
To set up a directory for PIN-based authentication method:
Step A. Check the Directory for User Entries
Before you run the PIN Generator tool, make sure that the directory you intend to use for generating PINs has been populated with end-user entries that require PINs. It is also a good idea to confirm with that directory's administrator that all pending directory requests have been processed before the PIN Generator starts its operation.
Step B. Update the Directory
By default, the PIN Generator modifies the pin attribute in a directory's user entry (see "Arguments"). Because this attribute is not part of the standard organizationalPerson, you need to add it--that is, create a new object class (named pinPerson) in your authentication directory's schema.
In general, you need to update the slapd.user_at.conf file to include the pin attribute and the slapd.user_oc.conf file to include the object-class definition. The modified schema should look similar to this:
attribute pin bin
objectclass pinPerson
In addition, if you want to make use of the PIN-removal feature--that is, remove a user's PIN from the directory after Certificate Management System successfully authenticates that user and thus prevent the user from enrolling for another certificate--ACIs must be set up on the directory to prevent end users from creating new PINs for themselves. To do this, you need to create an entry for a PIN manager user with read-write permission to the pin attribute.
The PIN Generator tool comes with a configuration file, named setpin.conf, which enables you to automate the process of updating the authentication directory with changes required for setting up PIN-based authentication. The configuration file is located in this directory:
<server_root>/bin/cert/tools
To make the required schema changes and add an entry for the PIN manager user:
Go to this directory: <server_root>/bin/cert/tools
Open the setpin.conf file in a text editor.
Follow the instructions outlined in the file and make the appropriate changes.
Typically, you will need to update the Directory Server's host name,
Directory Manager's bind password, and PIN manager's password.
Run the setpin command with its optfile option pointing to the setpin.conf file (setpin optfile=setpin.conf).
The tool modifies the schema with a new attribute (by default, pin) and a
new object class (by default, pinPerson), creates a pinmanager user, and
sets the ACI to allow only the pinmanager user to modify the pin attribute.
If the tool is able to update the directory with all the changes, you should
see a status-update message, similar to the sample shown below:
Adding attribute: ( pin-oid NAME 'pin' DESC 'User Defined Attribute'
SYNTAX '1.3.6.1.4.1.1466.115.121.1.5' SINGLE-VALUE )
.. successful
Adding objectclass: ( pinPerson-oid NAME 'pinPerson' DESC 'User
Defined ObjectClass' SUP 'top' MUST ( objectclass ) MAY ( aci $ pin )
.. successful
Adding user: cn=pinmanager,o=siroe.com
.. successful
modifying ACI for: ou=people,o=siroe.com
.. successful
Step C. Prepare the Input File
This step is optional.
If you want to generate PINs for specific user entries or want to provide your own PINs, use an input file (to provide the tool with such information). For information on constructing an input file, see "Input File".
Step D. Run the Command Without the Write Option
Run the setpin command without the write option. Be sure to include the output option and bind to the directory as the PIN manager user. For details, see "The setpin Command".
The tool will write PINs to the specified output file; no changes are made to the directory yet. This will give you the opportunity to check the PINs (by looking at the output file) before updating the directory.
To run the command:
Open a terminal window.
Go to this directory: <server_root>/bin/cert/tools
Run the setpin command with the appropriate arguments; be sure to point the optfile option to the file you've created (and not to the setpin.conf file).
Step E. Check the Output File
Check the output file to be sure it contains PINs for your users; the output should look similar to the one specified in "Output File".
Next, verify that the tool has assigned PINs to the correct users and that the PINs conform to the length and character-set restrictions you specified. If the output isn't what you want, run the command again with appropriate arguments. Repeat the process until the output file shows the results you want.
Step F. Run the Command Again with the Write Option
When you are sure about the results, run the command again (with exactly the same arguments) with the write option and the output option. The tool stores the hashed PINs in the directory. For information on how PINs are stored in the directory, see "How PINs Are Stored in the Directory".
Use the output file for delivering PINs to users after you complete setting up the required authentication method; see "Step 9. Deliver PINs to End Users".
Step 3. Enable the PIN Present Policy
This step is required for PIN-based enrollment with PIN removal only.
To deploy PIN-based enrollment with PIN removal effectively, the PIN present policy must be enabled and configured properly. This policy, if enabled, checks the authentication directory for a user's PIN when an end user requests a certificate and issues the certificate only if the PIN exits in the directory--thus preventing users from getting a certificate in the absence of a PIN. If you are not familiar with the role this policy plays in PIN-based enrollment, see "PIN Present Policy".
Unlike some of the other policy rules, Certificate Management System does not create an instance of the PIN present policy rule during installation. If you created this rule after installation, you can configure the server to use that rule. The instructions below explain how to create a new rule:
Log in to the CMS window for the Certificate Manager (see "Logging In to the CMS Window").
Select the Configuration tab.
In the navigation tree, select Certificate Manager, and then select Policies.
The Policy Rules Management tab appears. It lists currently configured
policy rules.
Click Add
The Policy Plugin Implementation window appears.
Select PinPresentConstraints and click Next.
The Policy Rule Editor window appears. It lists the configuration
information required for this policy rule. 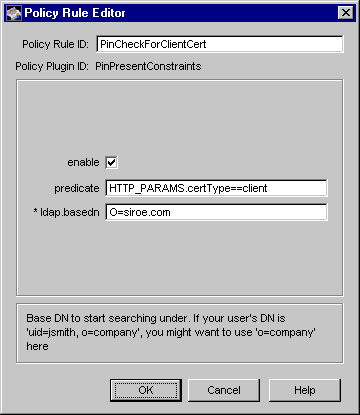
Enter the appropriate information.
Policy Rule ID.
Type a unique name that will help you identify the rule. Be sure to formulate the name using any combination of letters (aA to zZ), digits (0 to 9), an underscore (_), and a hyphen (-). For example, you can type My_Policy_Rule or MyPolicyRule as the instance name, but not My Policy Rule.
enable.
Check the box to enable the rule.
predicate.
Type the predicate expression for this rule. If you want this rule to be applied to all certificate requests, leave the field blank. Because the enrollment method is applicable for end user enrollments only, the typical predicate expression would be HTTP_PARAMS.certType==client. To form the correct predicate expression, see "Using Predicates in Policy Rules".
Click OK.
You are returned to the Policy Rules Management tab. If required, click the
Reorder button and order the rules as appropriate. For details, see "Step 5.
Reorder Policy Rules".
Step 4: Add an Authentication Instance
Adding an authentication instance to the CMS configuration involves creating a new instance of an already registered plug-in module, assigning a unique name or ID to the instance, and entering appropriate values for the parameters that define the plug-in you want to create an instance of.
When naming an authentication instance (or rule), be sure to formulate the name using any combination of letters (aA to zZ), digits (0 to 9), an underscore (_), and a hyphen (-); other characters and spaces are not allowed. For example, you can type My_Auth_Rule or MyAuthRule as the instance name, but not My Auth Rule.
Also note that when you add an authentication instance, the CMS configuration is updated with authentication-specific information only. The server does not associate the authentication instance you added with any of the end-user enrollment forms--that is, the end-user servlets that should use this authentication instance are not configured yet. You make this association by manually embedding the authentication instance name in the enrollment forms.
By default, the enrollment forms include authentication instance names listed in Table 12.1. Note that the authentication instances are not created by default; only the instance names are embedded in the forms for your convenience. If you create authentication instances with the default names, you can skip the step ("Step A. Associate the Authentication Instance With the Enrollment Form") that explains how to update an enrollment form to associate it with the name of an authentication instance.
Figure 12.2 shows the default directory-based enrollment form configured to use an authentication instance named UserDirEnrollment.
Figure 12.2 Authentication information in the default directory-based enrollment form
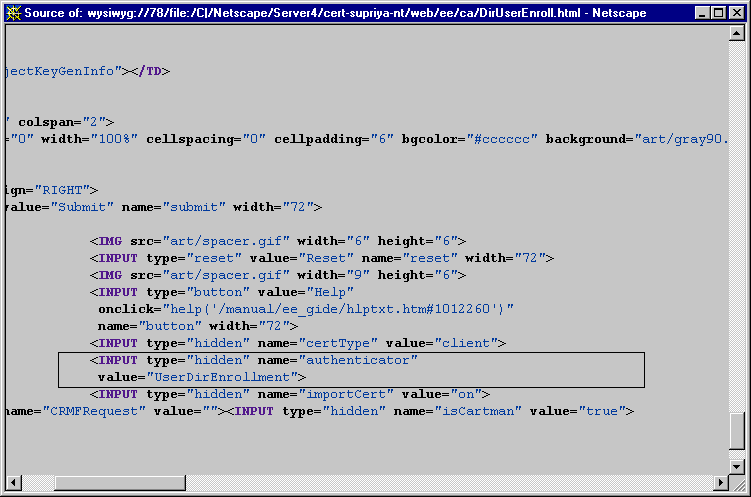
For information on locating and customizing the default end-entity forms, see "End-Entity Forms and Templates".
To add an authentication instance to the CMS configuration:
In the CMS window, select the Configuration tab.
In the navigation tree, select Authentication.
The right pane shows the Authentication Instance tab, which lists any
currently configured authentication instances. 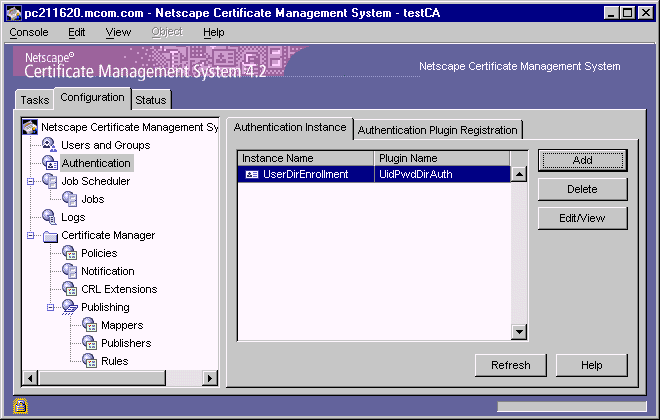
Click Add.
The Select Authentication Plugin Implementation window appears. It lists
the currently registered authentication plug-in modules. 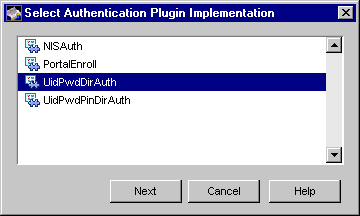
Select a plug-in module.
The following choices are the ones provided by default with Certificate
Management System (they are described in "Overview of Authentication
Modules"). If you have registered any custom authentication plug-in
modules, they too will be available for selection.
UidPwdDirAuth.
Select this if you want to use the directory-based authentication module; see "Directory-Based Authentication".
UidPwdPinDirAuth.
Select this if you want to use the directory- and PIN-based authentication module (with or without PIN removal); see "Directory- and PIN-Based Authentication".
To configure Certificate Management System for PIN-based enrollment
method, you must have completed "Step 2. Set Up the Directory for PIN-
Based Enrollment".
NISAuth.
Select this if you want to use the NIS server-based authentication module; see "NIS Server-Based Authentication".
PortalEnroll.
Select this if you want to use the portal authentication module; see "Portal Enrollment".
For the purposes of this instruction, assume that you selected
UidPwdPinDirAuth.
Click Next.
The Authentication Instance Editor window appears. The Authentication
Instance ID field shows the default instance name embedded in the
associated enrollment form (see Table 12.1). The Authentication Plugin ID
field shows the module you've chosen. The remaining fields list the
configuration information required for this authentication instance.
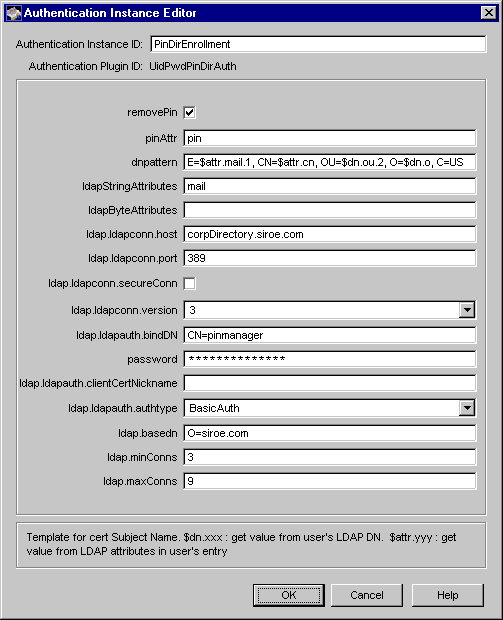
If you don't want to use the default instance name, in the Authentication Instance ID field, type a unique name for this instance that will help you identify it.
For the name, be sure to use an alphanumeric string with no spaces. If you
chose to use a different name, be sure to edit the default name in the
enrollment form in the next step, "Step 5. Set Up the Enrollment Interface".
Fill in values for the remaining parameters.
Click OK.
The CMS configuration is modified. If the changes you made require you to
restart the server, you will be prompted accordingly. Don't restart the server
yet; you can do this after you've made all the required changes.
Step 5. Set Up the Enrollment Interface
This step explains how to customize the end-entity interface for the enrollment method you've chosen for your users.
Step A. Associate the Authentication Instance With the Enrollment Form
You can skip this step if, in the previous step, you chose the default instance name suggested in Table 12.1. Otherwise, you must edit the enrollment form to associate the instance you added because Certificate Management System relies on the authentication instance name embedded in the enrollment form to determine the authentication method.
For the new authentication instance to work with end-entity enrollment forms, you must update the appropriate forms, as follows:
In the CMS host system, go to this directory:
<server_root>/cert-<instance_id>/web/ee
Locate the file that corresponds to the authentication module you chose in "Step 4: Add an Authentication Instance"; use Table 12.1 for guidance.
Open the file in a text editor.
Locate the attribute that associates the authentication instance with the enrollment form.
<INPUT TYPE="HIDDEN" NAME="authenticator" VALUE="myAuthMgr">
<INPUT TYPE="HIDDEN" NAME="authenticator" VALUE="myAuthMgr">
Check the value assigned to authenticator attribute (the VALUE= field). Make sure that it is same as the name or ID you assigned to the authentication instance you created in Step 5. If it is different, replace it with the name of the authentication instance. For example, if you used test_auth as the instance name, the edited line should look like this:
<INPUT TYPE="HIDDEN" NAME="authenticator" VALUE="test_auth">
Save your changes and close the file.
Step B. Customize the Form
You can make any other changes to meet your organization's requirements.
Step C. Hook Up the Certificate-Based Enrollment Form
This step is required if you want to use any of the certificate-based enrollment forms.
As explained in "Enrollment Forms", Certificate Management System provides three forms for certificate-based enrollment:
By default, the form named CertBasedDualEnroll.html is hooked up to the Enrollment tab of the end-entity interface. You can replace this form with either of the other two forms, CertBasedEncryptionEnroll.html and CertBasedSingleEnroll.html; you can do this by uncommenting the script relevant to either of the forms in the index file and by commenting out the script for CertBasedDualEnroll.html--thus, effectively unhook the old one and hook the new one.
To enable any of the certificate-based enrollment forms, follow these steps:
In the CMS host system, go to this directory:
<server_root>/cert-<instance_id>/web/ee
Locate the index.html file.
Open the file in a text editor.
Follow instructions as appropriate:
If you want to enable the CertBasedDualEnroll.html form, search for
CertBasedDualEnroll. You should find a block of script like the
following:
count++;
}
if (http != 'true') {
// this one is directory based cert-based
if ( isAuthMgrEnabled("UidPwdDirAuth") ) {
item = 'certBasedDualEnroll';
menuItems[count] = top.EnrollMenu[count] =
new menuItem(item, 'CertBasedDualEnroll.html',
'Certificate');
If you want to enable the CertBasedEncryptionEnroll.html form,
search for CertBasedEncryption. You should find a block of script like
the following:
count++;
}
// item = 'certBasedEncEnroll';
// menuItems[count] = top.EnrollMenu[count] =
		//			new menuItem(item,

		//				'CertBasedEncryptionEnroll.html', 'Certificate');
Uncomment the lines and then add lines for using the automated
enrollment module you configured the server with. Your edited lines should
look similar to this:
count++;
}
if (http != 'true') {
// this one is directory based cert-based
if ( isAuthMgrEnabled("UidPwdDirAuth") ) {
item = 'certBasedEncEnroll';
menuItems[count] = top.EnrollMenu[count] =
				new menuItem(item, 'CertBasedEncryptionEnroll.html',

					'Certificate');
If you want to enable the CertBasedSingleEnroll.html form, search for
CertBasedSingle. You should find a block of script similar to this:
count++;
}
// item = 'certBasedSingleEnroll';
// menuItems[count] = top.EnrollMenu[count] =
		//			new menuItem(item, 'CertBasedSingleEnroll.html',

	 //					'Certificate');
Uncomment the lines and then add lines for using the automated
enrollment module you configured the server with. Your edited lines should
look like these:
count++;
}
if (http != 'true') {
// this one is directory based cert-based
if ( isAuthMgrEnabled("UidPwdDirAuth") ) {
item = 'certBasedSingleEnroll';
menuItems[count] = top.EnrollMenu[count] =
				new menuItem(item, 'CertBasedSingleEnroll.html',

					'Certificate');
Make sure to comment out lines for any unused options.
If you're using any of the default modules, except for the one provided for the directory-based enrollment (UidPwdDirAuth), edit the following line to replace UidPwdDirAuth with the name of the module you're using.
if ( isAuthMgrEnabled("UidPwdDirAuth") ) {
By default, a link named Certificate will be created under the Browser section. If you want to rename the link, replace Certificate in the following line with the new name:
new menuItem(item, 'CertBasedDualEnroll.html',
'Certificate');
Save your changes and close the file.
Step D. Remove Unwanted Enrollment Options
This step is optional.
By default, the Enrollment tab of the end-entity interface shows just one link, named Manual, under the Browser section. The Manual link opens a form that enables end users to request certificates manually. When you enable automated enrollment, that is, when you create an instance of any of the automated enrollment modules, a link for the corresponding form is automatically created under the Browser section. For example, if you create an instance of the directory-based authentication module, you will notice a new link named Directory under the Browser section.
If you don't want your end users to see the manual enrollment option, you can remove it from the Enrollment tab altogether. The steps below explain how to remove the Manual link from the Browser section of the Enrollment tab:
In the CMS host system, go to this directory:
<server_root>/cert-<instance_id>/web/ee
Locate the index.html file.
Open the file in a text editor.
Locate the initEnrollMenu function (the function initEnrollMenu() line).
Remove or comment out lines that correspond to the Manual enrollment form.
count++;
item = 'manuser';
menuItems[count] = top.EnrollMenu[count] =
new menuItem(item, 'ManUserEnroll.html', 'Manual');
Save your changes and close the file.
Open a browser window.
Go to the end-entity interface and verify your changes.
Step 6. Enable End-Entity Interaction
You can configure end-entity interaction with a Certificate Manager or a Registration Manager, or with both. End entities cannot interact with a Data Recovery Manager directly; they must interact through a Certificate Manager or Registration Manager. By default, the Certificate Manager is configured for end-entity interaction; the Registration Manager is not configured for end-entity interaction.
Depending on the subsystem you're configuring, follow the instructions in "Enabling End-Entity Interaction with a Certificate Manager" or in "Enabling End-Entity Interaction with a Registration Manager".
Enabling End-Entity Interaction with a Certificate Manager
To enable end-entity interaction with a Certificate Manager:
In the CMS window, select the Configuration tab.
In the navigation tree, select Certificate Manager.
The General Setting tab appears. 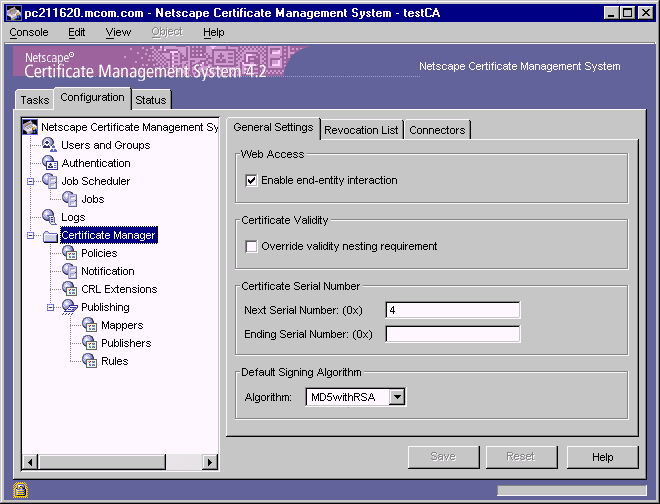
In the Web Access section, check the "Enable end-entity interaction" option if you want end entities to be able to interact with the selected Certificate Manager via the HTTPS port; leave it unchecked to disable end-entity interaction with the server.
Note that if you disable end-entity interaction, the Network tab still shows
the HTTPS port and allows you to configure it (see "Configuring Port
Numbers"). However, you should know that the server ignores this port.
In the Certificate Validity section, check the "Override validity nesting requirement" option, if you want the Certificate Manager to issue certificates with validity periods beyond that of its CA signing certificate; see "CA Signing Key Pair and Certificate").
If you leave the box unchecked and if the Certificate Manager (CA) finds a
request with validity period extending beyond that of its CA signing
certificate, it automatically truncates the validity period to end on the day
the CA signing certificate expires. For example, if the CA signing certificate
expires on June 10, 2004, any enrollment or renewal request with validity
period beyond June 10, 2004 will have validity period truncated to end on
June 10, 2004.
Validity periods of certificates during enrollment is determined by the policy
explained in "Validity Constraints Policy". Similarly, validity periods of
certificates during renewal is determined by the policy explained in
"Renewal Validity Constraints Policy".
In the Certificate Serial Number section, specify the serial number range for certificates issued by this Certificate Manager. The server assigns the serial number you enter in the "Next serial number" to the next certificate it issues and the number you enter in the "Last serial number" to the last certificate it issues.
The serial number range enables you to deploy multiple CAs, balancing the
number of certificates each CA issues. Note that the combination of an
issuer name and a serial number uniquely identifies a certificate. To ensure
that two distinct certificates issued by the same authority doesn't contain the
same serial number, make sure the serial number range does not overlap
among cloned CAs. (For information on cloning CAs, see Netscape
Certificate Management System Installation and Deployment Guide.
In the Default Signing Algorithm section, select the signing algorithm the Certificate Manager should use for signing certificates. The choices are "MD2 with RSA," "MD5 with RSA," and "SHA1 with RSA," if the CA's signing key type is RSA and "SHA1 with DSA," if the CA's signing key type is DSA.
Note that the signing algorithm specified in the Certificate Manager's policy
configuration overrides the algorithm you select here. For information on a
Certificate Manager's policy configuration, see "Signing Algorithm
Constraints Policy".
To save your changes, click Save.
The CMS configuration is modified. If the changes you made require you to
restart the server, you will be prompted accordingly. In that case, restart the
server.
Enabling End-Entity Interaction with a Registration Manager
To enable end-entity interaction with a Registration Manager:
In the CMS window, select the Configuration tab.
In the navigation tree, select Registration Manager.
The General Setting tab appears. 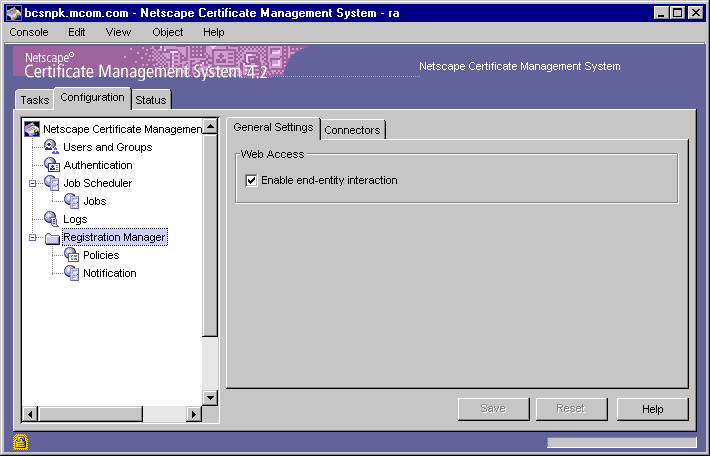
In the Web Access section, check the "Enable end-entity interaction" option if you want end entities to be able to interact with the selected Registration Manager via the HTTPS port; leave it unchecked to disable end-entity interaction with the server.
Note that if you disable end-entity interaction, the Network tab still shows
the HTTPS port and allows you to configure it (see "Configuring Port
Numbers"). However, you should know that the server ignores this port.
To save your changes, click Save.
The CMS configuration is modified. If the changes you made require you to
restart the server, you will be prompted accordingly. In that case, restart the
server.
Step 7. Turn on Automated Notification
Both the Certificate Manager and the Registration Manager can send certificate-issuance notification to end users. For details on turning this feature on, see "Configuring a Subsystem to Send Notifications to End Entities".
Step 8. Test Your Authentication Setup
To test whether your end users can successfully enroll for a certificate using the authentication method you've set up:
Open a web browser window.
Go to the end-entity interface for the enrollment authority you configured. The default URL is as follows:
https://<host_name>:<end_entity_HTTPS_port> or
http://<host_name>:<end_entity_HTTP_port>
In the Enrollment tab, open the enrollment form you customized.
Fill in all the values and submit the request.
The client prompts you to enter the password for your key database.
When you enter the correct password, the client generates the key pair.
Do not interrupt the key-generation process. Upon completion of the key
generation, the request is submitted to the server for certificate issuance.
The server subjects the request to the currently configured policy rules and
issues the certificate only if the request passes all the policy rules.
Upon receipt of a notification about the certificate issuance, install the
certificate in your browser.
Verify that the certificate is installed in the browser's certificate database; for example, in Communicator you can open the Security Info window and verify that the certificate is listed in there.
If you've set up the directory- and PIN-based authentication with PIN removal, reenroll for another certificate using the same PIN. Your request should get rejected.
If you've set up the portal enrollment, verify that an entry for the user is created in the directory. For example, you can point your browser to the portal directory and find out if an entry for the user for whom you requested the certificate exists.
In the URL field, type
ldap://<host_name>:<port>/<base_dn>??sub?(uid=<user_id>),
substituting <host_name> with the fully qualified host name of the
Directory Server, <port_number> with the port number at which the
Directory Server is listening to authentication requests from the Certificate
Manager <base_dn> with the DN to start searching for the user's entry, and
<user_id> with the ID of the user for whom you requested the certificate.
For example, if the directory host name is corpDirectory, port number is
389, base DN is O=siroe.com, and user's ID is jdoe, the URL would look
like this:
ldap://corpDirectory:389/O=siroe.com??sub?(uid=jdoe)
In the resulting page, look for the user's credentials and verify that they
match what you specified in the enrollment form. If you've configured
Certificate Management System to publish certificates to the same directory
("Publishing Certificates and CRLs to a Directory"), you will be able to see
the certificate-related information; it typically includes information such as
the owner of the certificate, the CA that has issued the certificate, the serial
number, the validity period, and the certificate fingerprint.
Step 9. Deliver PINs to End Users
This step is applicable for directory- and PIN-based authentication with or without PIN removal.
After you have confirmed that the PIN-based enrollment works (as it should), deliver the PINs to users so they can use them during enrollment. To protect the privacy of PINs, be sure to use a secure, out-of-band method for delivery. Here are a few suggested delivery methods:
Deleting an Authentication Instance
You can delete an authentication instance that you no longer need from the CMS configuration. If you delete an authentication instance, end users will fail to enroll for certificates using the associated enrollment form. If you want the form to work with another authentication instance, you must make the appropriate changes to the form; see "Step 5. Set Up the Enrollment Interface".
To delete an authentication instance from the CMS configuration:
Log in to the CMS window (see "Logging In to the CMS Window").
Select the Configuration tab.
In the navigation tree, click Authentication.
The right pane shows the Authentication Instance tab, which lists currently
configured authentication instances.
In the Instance Name list, select the instance you want to delete and click Delete.
When prompted, confirm the delete action.
The CMS configuration is modified. If the changes you made require you to
restart the server, you will be prompted accordingly. In that case, restart the
server.
Modifying an Authentication Instance
You can modify an authentication instance by editing its configuration parameter values; you cannot edit the name of an instance. To change the name of an instance, you need to create a new instance exactly like the instance you want to rename, except with a new name, and delete the old instance. For details, see "Step 4: Add an Authentication Instance".
When you modify an authentication instance, the CMS configuration is updated to include the modifications. Because you are not changing the name of the authentication instance, you do not have to make any changes to the end-user servlet configuration.
To modify an authentication instance in the CMS configuration:
Log in to the CMS window (see "Logging In to the CMS Window").
Select the Configuration tab.
In the navigation tree, click Authentication.
The right pane shows the Authentication Instance tab, which lists
configured authentication instances. 
In the Instance Name list, select the instance you want to modify and click Edit.
The Configure Authentication Instance Parameters window appears,
showing the current configuration of this instance.
For the purposes of completing these instructions, assume you selected
UserDirEnrollment. 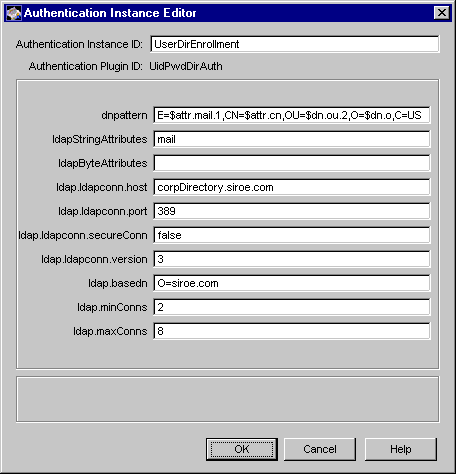
Make changes as appropriate. If you need description for any of the parameters, click the Help button or check these:
Click OK.
The CMS configuration is modified. If the changes you made require you to
restart the server, you will be prompted accordingly. In that case, restart the
server.