You can configure the Certificate Manager and Registration Manager to run automated jobs, that is execute specific jobs at specified times. This section explains how to configure a subsystem to evaluate end-entity requests based on a set of policy rules. The steps are as follows:
This section explains how to use the CMS window to perform the following operations:
For information on adding or changing job-specific information in the configuration file, see "Job Scheduler Parameters in the Configuration File".
Step 1. Plan
Before configuring a Certificate Manager or Registration Manager to run jobs, be sure to do the following:
Step 2. Modify Existing Jobs
Modifying a job involves changing the configuration parameter values of the job instance; you cannot change the name of a job. To change the name of a job, create a new job using the same job plug-in module (that you used to create the job you want to rename) with the same parameter values, and delete the old one.
As a part of modifying a job, you can change its status from enabled to disabled or vice versa by checking or unchecking the enable parameter. A subsystem executes only those jobs that are enabled.
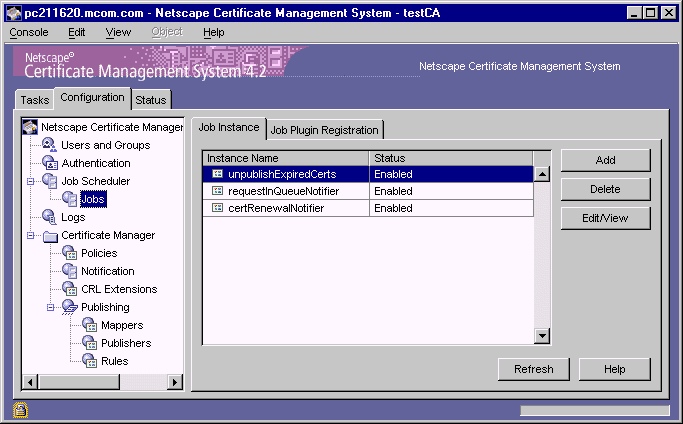
During installation, the Certificate Manager and Registration Manager automatically create a set of jobs (that you would most likely want to use) using the job plug-in modules registered by default. Figure 15.2 shows the jobs created for a Certificate Manager. The Registration Manager also has a similar list. Table 15.1 summarizes the default jobs created for both Certificate Manager and Registration Manager.
After installation, you must verify whether you want to use these jobs, check how these jobs are configured, and make the appropriate configuration changes. If you don't want to use a job, delete it from the configuration following the instructions in "Step 3. Delete Unwanted Jobs"; alternatively, you may keep it in the disabled state. If you want to create a new job, follow the instructions in "Step 4. Add New Jobs".
Figure 15.2 Default jobs created for a Certificate Manager
To modify a configured job in the CMS configuration:
Log in to the CMS window (see "Logging In to the CMS Window").
Select the Configuration tab.
In the navigation tree, select Job Scheduler, then select Jobs.
The Job Instance tab appears (Figure 15.2). The default jobs are listed in
Table 15.1.
In the Instance Name list, select a job that you want to modify.
For the purposes of this instruction, assume that you selected the job named
unpublishExpiredCerts.
Click Edit/View.
The Job Instance Editor window appears, showing how this job is currently
configured. An example is shown below. 
Make the necessary changes and click OK.
Repeat steps 4 through 6 for the remaining jobs.
Click Refresh.
Step 3. Delete Unwanted Jobs
You can delete unwanted jobs from the CMS configuration, by using the CMS window. If you think you might need a job in the future, instead of deleting it from the configuration you should disable it by setting the enable parameter value to false. In this way, you can avoid re-creating the job in the future. Because Certificate Management System executes only those jobs that are currently enabled, keeping unwanted jobs in a disabled state in the configuration does not affect the server's functioning.
To delete a job from the CMS configuration:
In the Job Instance tab, select the job you want to delete and click Delete.
When prompted, confirm the delete action.
The CMS configuration is modified. If the changes you made require you to
restart the server, you will be prompted accordingly. Don't restart the server
yet; you can do so after you've made all the required changes.
Step 4. Add New Jobs
Adding a job to the CMS configuration involves creating a new instance of an already registered plug-in module, assigning a unique name (an alphanumeric string with no spaces) for the instance, and entering appropriate values for the parameters that define the plug-in module you want to create an instance of. When you add a job, the CMS configuration is updated with the appropriate information.
When naming a job, be sure to formulate the name using any combination of letters (aA to zZ), digits (0 to 9), an underscore (_), and a hyphen (-); other characters and spaces are not allowed. For example, you can type My_Job or MyJob as the instance name, but not My Job.
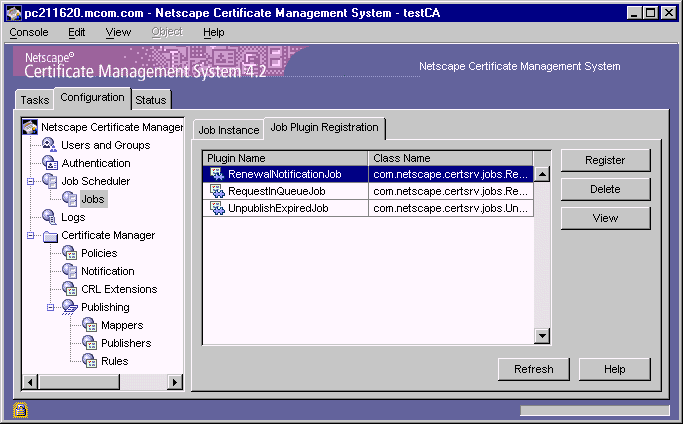
Figure 15.3 shows the job modules registered with a Certificate Manager. The Registration Manager also has a similar list. Table 15.2 summarizes the default modules registered with both Certificate Manager and Registration Manager. If you have registered any custom job modules (see "Registering a Job Module"), they too will be available for selection.
Figure 15.3 Default job modules registered with a Certificate Manager
To add a job to the CMS configuration:
In the Job Instance tab, click Add.
The Select Job Plugin Implementation window appears. It lists the currently
registered job modules. The default modules are listed in Table 15.2.
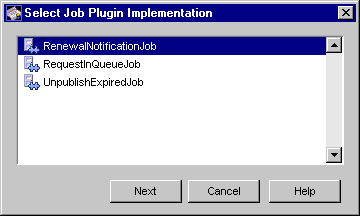
Select a module.
For the purposes of this instruction, assume that you selected the
RenewalNotificationJob module.
Click Next.
The Configure Job Instance Parameters window appears. It lists the
configuration information required for this job. 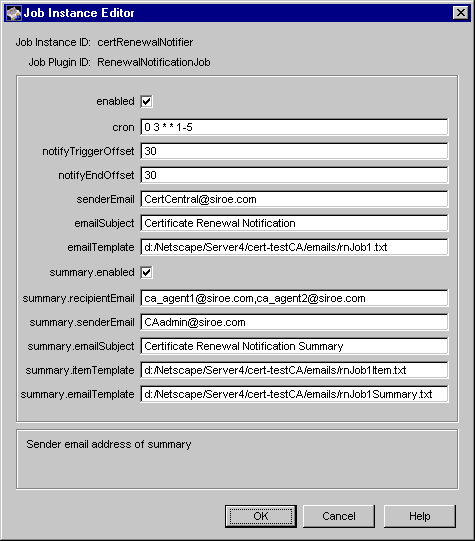
Enter the appropriate information.
Job Instance ID.
Type a unique name that will help you identify the job. Be sure to formulate the name using any combination of letters (aA to zZ), digits (0 to 9), an underscore (_), and a hyphen (-). For example, you can type My_Job or MyJob as the instance name, but not My Job.
enabled.
To enable the job, type true; to disable the job, type false.
cron.
Specifies the cron specification for when this job should be run. In other words, it specifies the time at which the Job Scheduler daemon thread should check the certificates for sending renewal notifications. For example, 03**1-5. Be sure to follow the convention specified in "Schedule for Executing Jobs"
notifyTriggerOffset.
Type the number of days before certificate expiration the first notification should be sent. For example, if you want the server to send renewal notifications to users 30 days before their certificates expire, type 30.
notifyEndOffset.
Type the number of days after the certificate expire notifications will continue to be sent, if the certificate is not renewed. For example, if you want the server to continue sending renewal notifications to users (if they don't renew their certificates) 30 days after their certificates expire, type 30.
senderEmail.
Type the complete email address to which the server should send notifications regarding any delivery problems. For example, CertCentral@siroe.com.
emailSubject.
Type the subject line of the notification message; the subject line must be an alphanumeric string of up to 255 characters. For example, Certificate Renewal Notification.
emailTemplate.
Type the path, including the filename, to the directory that contains the template to be used for formulating the message content. For example: C:/Netscape/Server4/cert-testCA/emails/renewJob.txt.
summary.enabled.
Type true if you want the server to compile a summary report of renewal notifications and send. Type false if you don't want the server to compile a summary report of renewal notifications.
summary.recipientEmail.
Type the email addresses of recipients of the summary report; when specifying multiple recipients, separate addresses by commas. These can be, for example, agents who need to know the status of user certificates. For example, ca_agent1@siroe.com, ca_agent2@siroe.com.
summary.senderEmail.
Type the full email address of the sender (of the summary message); in case of a delivery problem, the server will send a notification to this address. For example, CAadmin@siroe.com.
summary.emailSubject.
Type the subject line of the summary message; the subject line must be an alphanumeric string of up to 255 characters. For example, Certificate Renewal Notification Summary.
summary.itemTemplate.
Type the path, including the filename, to the directory that contains the template to be used for formulating the content and format of each item to be collected for the summary report (see the summary.emailTemplate parameter below). For example, C:/Netscape/Server4/cert-testCA/emails/renewJobItem.txt. For more information, see For details, see "Customizing Notification Messages".
summary.emailTemplate.
Type the path, including the filename, to the directory that contains the template to be used for formulating the summary report. For example, C:/Netscape/Server4/cert-testCA/emails/renewJobSummary.txt. For more information, see "Customizing Notification Messages".
Click OK.
You are returned to the Policy Rules Management tab.
Repeat steps 1 through 5 and create additional rules, if required.
Step 5. Schedule the Frequency
The Certificate Manager and Registration Manager can execute a job only if the Job Scheduler is turned on (or enabled). As a part of turning the Job Scheduler on, you also specify the frequency at which the Job Scheduler daemon should check if any of the configured jobs need to be executed.
To schedule the interval for executing the job:
In the navigation tree, click Job Scheduler.
The General Settings tab appears. It shows whether the Job Scheduler
component is currently enabled or disabled. 
Enter information as appropriate:
Enable Job Scheduler.
Check this option to enable the Job Scheduler. To disable the Job Scheduler uncheck the option; disabling turns off all the jobs.
Check Frequency.
Type the frequency at which the Job Scheduler daemon thread should wake up and call the configured jobs that meet the cron specification (see "Schedule for Executing Jobs"). By default, it is set to one minute.
To save your changes, click Save.
The CMS configuration is modified. If the changes you made require you to
restart the server, you will be prompted accordingly. In that case, restart the
server.
Step 6. Customize Message Templates
Each job uses templates for formulating the notification-message and summary-message contents. Make sure to customize the appropriate templates to suit your organization's requirements. For details on default templates, see "Customizing Notification Messages".
Step 7. Verify Mail Server Settings
The Certificate Manager and Registration Manager use the mail server specified in the SMTP tab (of the CMS window) for routing or sending email notifications automatically. Verify that the host name and port number of the mail server are accurate; see "SMTP Settings".

