Remove the Motherboard
This is a cold-service procedure that must be performed by qualified service personnel. Power down the server completely before performing this procedure.
 | Caution - Ensure that all power is removed from the server before removing or installing the motherboard assembly. You must disconnect the power cables from the server before performing these procedures. |
 | Caution - This procedure requires that you handle components that are sensitive to ESD which can cause server components to fail. |
When replacing the motherboard, remove the SPM and SCC PROM from the old motherboard and install these components on the new motherboard. The SPM contains the Oracle ILOM system configuration data, and the SCC PROM contains the system host ID and MAC address. Transferring these components preserves the system-specific information stored on these modules. Whenever you replace the motherboard or the SPM, you must update the firmware so the portions of firmware in the SPM and on the motherboard are consistent.
- Prepare for servicing.
- Remove all PCIe cards.
- If installed, remove any NVMe cables that are connected to the drive backplane.
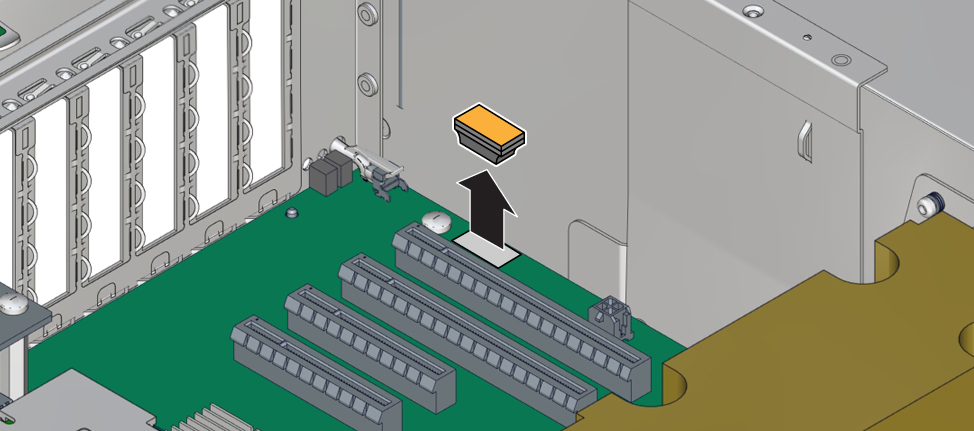
- Remove the SCC PROM from the motherboard.
You will reinstall it on the new motherboard.

-
Remove the SPM.
You will reinstall the SPM on the new motherboard. See Remove the SPM.
-
Remove the eUSB drive.
You will reinstall the eUSB drive on the new motherboard. See Remove the eUSB Drive.
- Remove all memory risers.
See Remove a DIMM.
- Remove the System Remind button assembly (air divider) by lifting it up and away from the power supplies.
- Disconnect all cables connected
to the motherboard.
- Disconnect two longer
cables that connect the motherboard to the drive backplane.
Push down a metal tab on each connector and pull up.
- Disconnect two shorter cables
from the motherboard.
One cable goes to the drive backplane. The other is a ribbon cable to the power supply.
- Disconnect the fan board power
cable and the ribbon cable from the motherboard.

Caution - When removing the ribbon cable from the motherboard, grasp the cable connector on either side and pull straight up to disconnect the cable. Do not rock the cable side to side. Doing so could damage the connector.
-
If necessary, disconnect the four NVMe drive cables from the drive
backplane.
Note the order in which the cables are connected, you must reinstall them into the same connectors.
- Disconnect two longer
cables that connect the motherboard to the drive backplane.
- Remove the power supply cover.
You must guide two slots on the PS backplane cover around two pins on the inside of the power supply cage.
- Lift the cover up a little to clear the first part of the slots.
- Pull the cover a little towards the front of the chassis.
- Push the tooth at the bottom of the cover to clear the edge of the power supply cage.
- Lift the cover out of the chassis.
The two cables are now exposed. Be prepared to move those cables out of the way when you lift the motherboard.
- Remove the four bus bar screws that secure the motherboard to the PS backplane.
- Position the drive end of the cables off to the side using the tab on the top of the plastic power supply cover.
- Remove the motherboard.

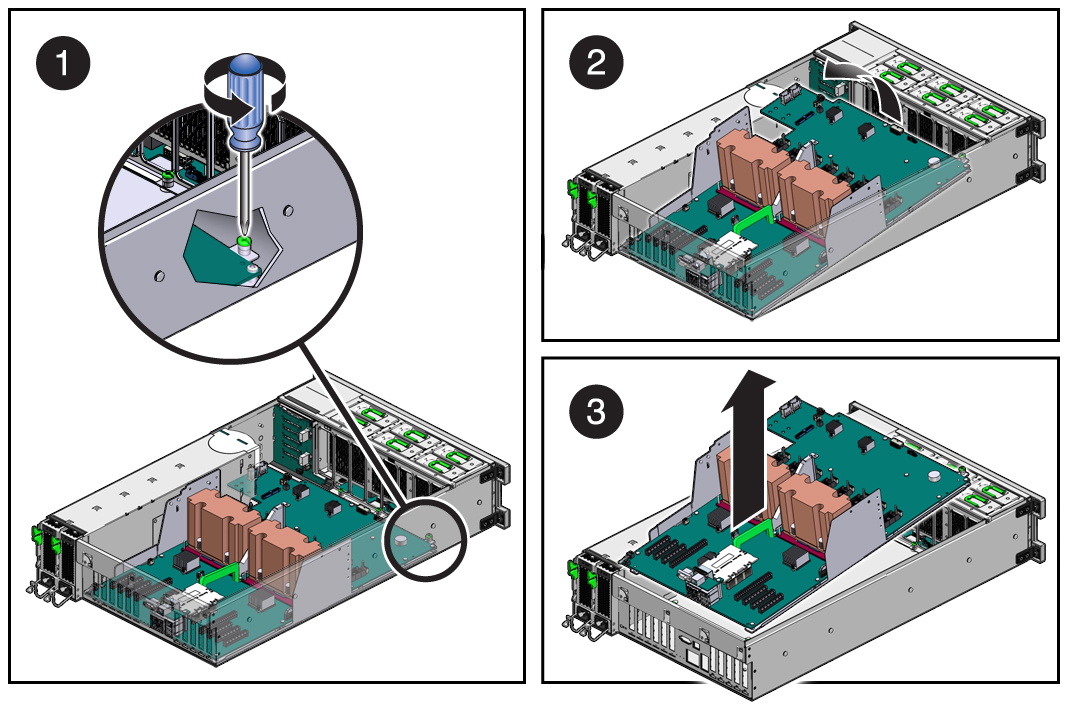
- Loosen the captive screw (in the corner near the fans) that secures the motherboard to the chassis (panel 1).
- Grasp the handle on the motherboard and slide it toward the front of the chassis (panel
2).
Tilt up the end of the motherboard that is near the front of the chassis.
- Lift the motherboard out of the chassis (panel 3).
Ensure that the remaining cables do not get caught on edges of the motherboard.
- Install a new motherboard.