
Oracle VM VirtualBox can import and export virtual machines in the following formats:
Open Virtualization Format (OVF). This is the industry-standard format. See Section 1.14.1, “About the OVF Format”.
Cloud service formats. Exporting to and importing from cloud services such as Oracle Cloud Infrastructure is supported. See Section 1.14.4, “Exporting an Appliance to Oracle Cloud Infrastructure”.
OVF is a cross-platform standard supported by many virtualization products which enables the creation of ready-made virtual machines that can then be imported into a hypervisor such as Oracle VM VirtualBox. Oracle VM VirtualBox makes OVF import and export easy to do, using the VirtualBox Manager window or the command-line interface.
Using OVF enables packaging of virtual appliances. These are disk images, together with configuration settings that can be distributed easily. This way one can offer complete ready-to-use software packages, including OSes with applications, that need no configuration or installation except for importing into Oracle VM VirtualBox.
The OVF standard is complex, and support in Oracle VM VirtualBox is an ongoing process. In particular, no guarantee is made that Oracle VM VirtualBox supports all appliances created by other virtualization software. For a list of known limitations, see Known Limitations.
Appliances in OVF format can appear in the following variants:
They can come in several files, as one or several disk images, typically in the widely-used VMDK format. See Section 5.2, “Disk Image Files (VDI, VMDK, VHD, HDD)”. They also include a textual description file in an XML dialect with an
.ovfextension. These files must then reside in the same directory for Oracle VM VirtualBox to be able to import them.Alternatively, the above files can be packed together into a single archive file, typically with an
.ovaextension. Such archive files use a variant of the TAR archive format and can therefore be unpacked outside of Oracle VM VirtualBox with any utility that can unpack standard TAR files.
OVF cannot describe snapshots that were taken for a virtual machine. As a result, when you export a virtual machine that has snapshots, only the current state of the machine will be exported. The disk images in the export will have a flattened state identical to the current state of the virtual machine.
The following steps show how to import an appliance in OVF format.
Double-click on the OVF or OVA file.
Oracle VM VirtualBox creates file type associations automatically for any OVF and OVA files on your host OS.
Select File, Import Appliance from the VirtualBox Manager window.
From the file dialog, go to the file with either the
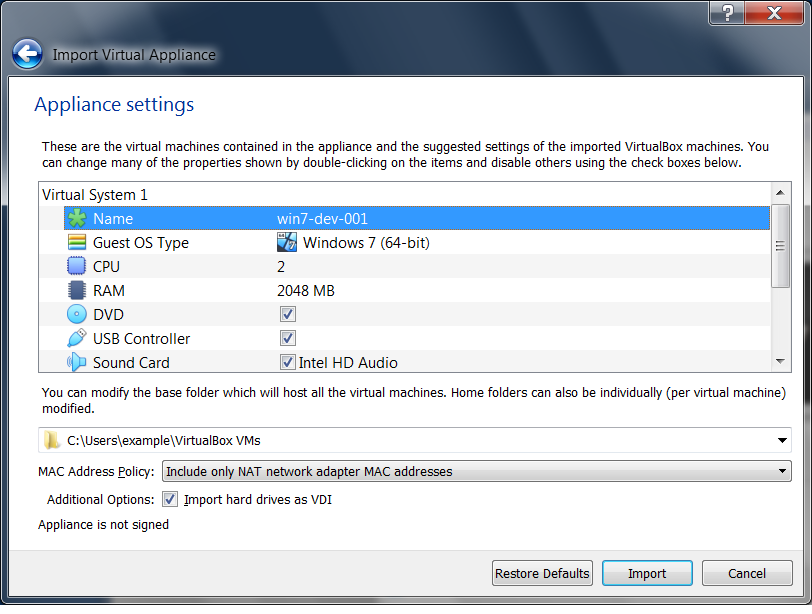
.ovfor the.ovafile extension.Click Import to open the Appliance Settings screen.
This screen shows the VMs described in the OVF or OVA file and enables you to change the VM settings.
By default, membership of VM groups is preserved on import for VMs that were initially exported from Oracle VM VirtualBox. You can change this behavior by using the Primary Group setting for the VM.
The following global settings apply to all of the VMs that you import:
Base Folder: Specifies the directory on the host in which to store the imported VMs.
If an appliance has multiple VMs, you can specify a different directory for each VM by editing the Base Folder setting for the VM.
MAC Address Policy: Reinitializes the MAC addresses of network cards in your VMs prior to import, by default. You can override the default behavior and preserve the MAC addresses on import.
Import Hard Drives as VDI: Imports hard drives in the VDI format rather than in the default VMDK format.
Click Import to import the appliance.
Oracle VM VirtualBox copies the disk images and creates local VMs with the settings described on the Appliance Settings screen. The imported VMs are shown in the list of VMs in VirtualBox Manager.
Because disk images are large, the VMDK images that are included with virtual appliances are shipped in a compressed format that cannot be used directly by VMs. So, the images are first unpacked and copied, which might take several minutes.
You can use the VBoxManage import command to import an appliance. See Section 7.10, “VBoxManage import”.
The following steps show how to export an appliance in OVF format.
Select File, Export Appliance to open the Export Virtual Appliance wizard.
From the initial window, you can combine several VMs into an OVF appliance.
Select one or more VMs to export, and click Next.
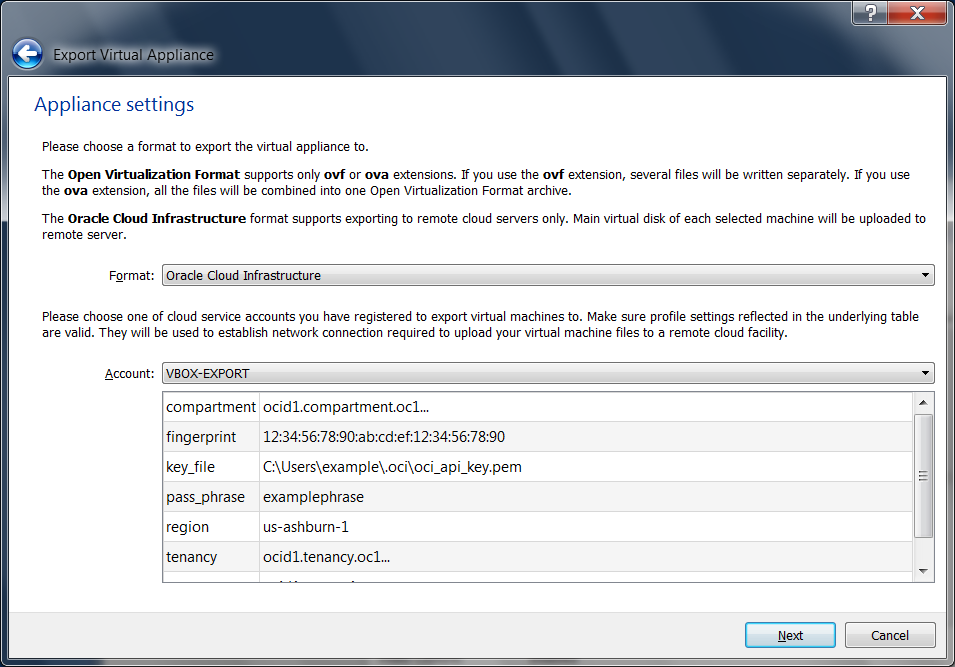
The Appliance Settings screen enables you to select the following settings:
Format: Selects the Open Virtualization Format value for the output files.
The Oracle Cloud Infrastructure value exports the appliance to Oracle Cloud Infrastructure. See Section 1.14.4, “Exporting an Appliance to Oracle Cloud Infrastructure”.
File: Selects the location in which to store the exported files.
MAC Address Policy: Specifies whether to retain or reassign network card MAC addresses on export.
Write Manifest File: Enables you to include a manifest file in the exported archive file.
Include ISO Image Files: Enables you to include ISO image files in the exported archive file.
Click Next to show the Virtual System Settings screen.
You can edit settings for the virtual appliance. For example, you can change the name of the virtual appliance or add product information, such as vendor details or license text.
Double-click the appropriate field to change its value.
Click Export to begin the export process. Note that this operation might take several minutes.
You can use the VBoxManage export command to export an appliance. See Section 7.11, “VBoxManage export”.
Oracle VM VirtualBox supports the export of VMs to an Oracle Cloud Infrastructure service.
Before you can export a VM to Oracle Cloud Infrastructure, ensure that you perform the following configuration steps:
For a custom Linux image, prepare the VM as described here:
https://docs.cloud.oracle.com/iaas/Content/Compute/Tasks/preparingcustomimage.htm
Generate an API signing key pair that is used for API requests to Oracle Cloud Infrastructure.
The key pair is usually installed in the
.ocifolder in your home directory. For example,~/.ocion a Linux system.Upload the public key of the key pair to the cloud service.
For step-by-step instructions for creating and uploading an API signing key for Oracle Cloud Infrastructure, see:
https://docs.cloud.oracle.com/iaas/Content/API/Concepts/apisigningkey.htm#How
Create a profile for your cloud account.
The cloud profile contains resource identifiers for your cloud account, such as your user OCID, and the fingerprint for your public key. You can create a cloud profile in the following ways:
Automatically by using the Cloud Profile Manager. See Section 1.14.6, “The Cloud Profile Manager”.
Manually by creating an
oci_configfile in your Oracle VM VirtualBox global configuration directory. For example, this is$HOME/.config/VirtualBox/oci_configon a Linux host.Manually by creating a
configfile in your Oracle Cloud Infrastructure configuration directory. For example, this is$HOME/.oci/configon a Linux host.This is the same file that is used by the Oracle Cloud Infrastructure command line interface.
Oracle VM VirtualBox automatically uses the
configfile if no cloud profile file is present in your global configuration directory. Alternatively, you can import this file manually into the Cloud Profile Manager.
For more information about the cloud profile settings used by Oracle Cloud Infrastructure see:
https://docs.cloud.oracle.com/iaas/Content/API/Concepts/sdkconfig.htm
Ensure that the subnets that are used by source VMs are available in the target compartment on the cloud service.
Perform the following steps to export a VM to Oracle Cloud Infrastructure:
Select File, Export Appliance to open the Export Virtual Appliance wizard.
Select a VM to export and click Next to open the Appliance Settings screen.
From the Format drop-down list, select Oracle Cloud Infrastructure.
In the Account drop-down list, select your Oracle Cloud Infrastructure account.
You can set up Oracle Cloud Infrastructure accounts by using the Cloud Profile Manager.
The list after the Account field shows the profile settings for your cloud account.
Click Next to make an API request to the Oracle Cloud Infrastructure service and open the Virtual System Settings screen.
Optionally edit settings used for the virtual machine on Oracle Cloud Infrastructure.
For example, you can edit the Disk Size and Shape used for the VM instance.
Click Export to export the VMs to the cloud service.
The VMs are uploaded to Oracle Cloud Infrastructure.
Instances are created for the uploaded VMs.
By default, the VM instance is started after upload to Oracle Cloud Infrastructure.
Monitor the export process by using the Oracle Cloud Infrastructure Console.
You can also use the VBoxManage export command to export a VM to Oracle Cloud Infrastructure. See Section 7.11.2, “Export to Oracle Cloud Infrastructure”.
Oracle VM VirtualBox supports the import of cloud instances from an Oracle Cloud Infrastructure service.
Before you can import an instance from Oracle Cloud Infrastructure, ensure that you perform the following configuration steps:
Generate an API signing key pair that is used for API requests to Oracle Cloud Infrastructure.
The key pair is usually installed in the
.ocifolder in your home directory. For example,~/.ocion a Linux system.Upload the public key of the key pair to the cloud service.
For step-by-step instructions for creating and uploading an API signing key for Oracle Cloud Infrastructure, see:
https://docs.cloud.oracle.com/iaas/Content/API/Concepts/apisigningkey.htm#How
Create a profile for your cloud account.
The cloud profile contains resource identifiers for your cloud account, such as your user OCID, and the fingerprint for your public key. You can create a cloud profile in the following ways:
Automatically by using the Cloud Profile Manager. See Section 1.14.6, “The Cloud Profile Manager”.
Manually by creating an
oci_configfile in your Oracle VM VirtualBox global configuration directory. For example, this is$HOME/.config/VirtualBox/oci_configon a Linux host.Manually by creating a
configfile in your Oracle Cloud Infrastructure configuration directory. For example, this is$HOME/.oci/configon a Linux host.This is the same file that is used by the Oracle Cloud Infrastructure command line interface.
Oracle VM VirtualBox automatically uses the
configfile if no cloud profile file is present in your global configuration directory. Alternatively, you can import this file manually into the Cloud Profile Manager.
For more information about the cloud profile settings used by Oracle Cloud Infrastructure see:
https://docs.cloud.oracle.com/iaas/Content/API/Concepts/sdkconfig.htm
Perform the following steps to import an instance from Oracle Cloud Infrastructure:
Select File, Import Appliance to open the Import Virtual Appliance wizard.
In the Source drop-down list, select Oracle Cloud Infrastructure.
In the Account drop-down list, select your Oracle Cloud Infrastructure account.
You can set up Oracle Cloud Infrastructure accounts by using the Cloud Profile Manager.
The list after the Account field shows the profile settings for your cloud account.
Choose the required cloud instance from the list in the Machines field.
Click Next to make an API request to the Oracle Cloud Infrastructure service and open the Appliance Settings screen.
Optionally edit settings for the new local virtual machine.
For example, you can edit the VM name, number of CPUs, RAM memory, OS type, and OS version.
Click Import to import the instance from the cloud service.
Monitor the import process by using the Oracle Cloud Infrastructure Console.
The following list describes the sequence of events when you import an instance from Oracle Cloud Infrastructure.
A custom image is created from the boot volume of the instance.
The custom image is exported to an Oracle Cloud Infrastructure object and is stored using Object Storage in the bucket specified by the user.
The Oracle Cloud Infrastructure object is downloaded to the local host. The object is a TAR archive which contains a boot volume of the instance in QCOW2 format and a JSON file containing metadata related to the instance.
The boot volume of the instance is extracted from the archive and a new VMDK image is created by converting the boot volume into the VMDK format. The VMDK image is registered with Oracle VM VirtualBox.
A new VM is created using the VMDK image for the cloud instance.
By default, the new VM is not started after import from Oracle Cloud Infrastructure.
The downloaded TAR archive is deleted after a successful import.
You can also use the VBoxManage import command to import an instance from Oracle Cloud Infrastructure. See Section 7.10.2, “Import from Oracle Cloud Infrastructure”.
The Cloud Profile Manager is a component of Oracle VM VirtualBox that enables you to create, edit, and manage cloud profiles for your cloud service accounts.

To open the Cloud Profile Manager select File, Cloud Profile Manager from the VirtualBox Manager window.
Use the Cloud Profile Manager to create a new cloud profile automatically. Or, create a cloud profile by importing settings from your Oracle Cloud Infrastructure configuration file into the Cloud Profile Manager.
Perform the following steps to create a new cloud profile:
Click the Add icon and specify a Name for the profile.
Click Properties and specify the following property values for the profile:
Compartment OCID
Fingerprint of the public key
Location of the private key on the client device
(Optional) Passphrase for the private key, if the key is encrypted
Region OCID
Tenancy OCID
User OCID
Some of these are settings for your Oracle Cloud Infrastructure account, which you can view from the Oracle Cloud Infrastructure Console.
Click Apply to save your changes.
The cloud profile settings are saved in the
oci_configfile in your Oracle VM VirtualBox global settings directory.
Perform the following steps to import an existing Oracle Cloud Infrastructure configuration file:
Ensure that a
configfile is present in your Oracle Cloud Infrastructure configuration directory. For example, this is$HOME/.oci/configon a Linux host.Click the Import icon to open a dialog that prompts you to import cloud profiles from external files.
WarningThis action overwrites any cloud profiles that are in your Oracle VM VirtualBox global settings directory.
Click Import.
Your cloud profile settings are saved to the
oci_configfile in your Oracle VM VirtualBox global settings directory.Click Properties to show the cloud profile settings.
Double-click on the appropriate field to change the value.
Click Apply to save your changes.