
The Storage category in the VM settings enables you to connect virtual hard disk, CD/DVD, and floppy images and drives to your virtual machine.
In a real PC, so-called storage controllers connect physical disk drives to the rest of the computer. Similarly, Oracle VM VirtualBox presents virtual storage controllers to a virtual machine. Under each controller, the virtual devices, such as hard disks, CD/DVD or floppy drives, attached to the controller are shown.
This section gives a quick introduction to the Oracle VM VirtualBox storage settings. See Chapter 5, Virtual Storage for a full description of the available storage settings in Oracle VM VirtualBox.
If you have used the Create VM wizard to create a machine, you will normally see something like the following:
Depending on the guest OS type that you selected when you created the VM, a new VM includes the following storage devices:
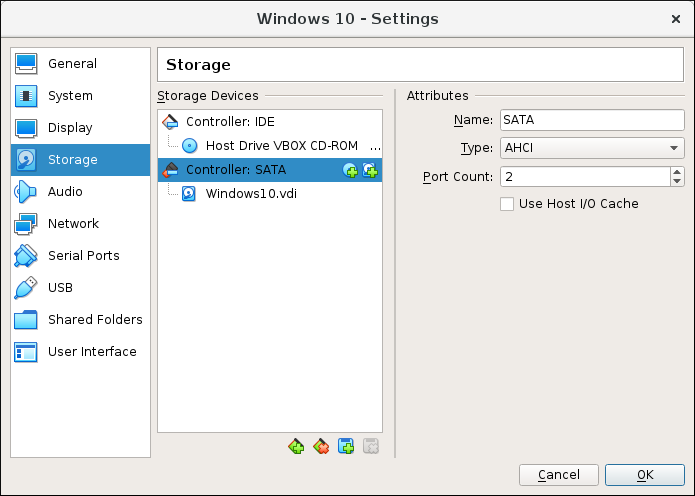
IDE controller. A virtual CD/DVD drive is attached to the secondary master port of the IDE controller.
SATA controller. This is a modern type of storage controller for higher hard disk data throughput, to which the virtual hard disks are attached. Initially you will normally have one such virtual disk, but as shown in the previous screenshot, you can have more than one. Each is represented by a disk image file, such as a VDI file in this example.
If you created your VM with an older version of Oracle VM VirtualBox, the default storage layout may differ. You might then only have an IDE controller to which both the CD/DVD drive and the hard disks have been attached. This might also apply if you selected an older OS type when you created the VM. Since older OSes do not support SATA without additional drivers, Oracle VM VirtualBox will make sure that no such devices are present initially. See Section 5.1, “Hard Disk Controllers”.
Oracle VM VirtualBox also provides a floppy controller. You cannot add devices other than floppy drives to this controller. Virtual floppy drives, like virtual CD/DVD drives, can be connected to either a host floppy drive, if you have one, or a disk image, which in this case must be in RAW format.
You can modify these media attachments freely. For example, if you wish to copy some files from another virtual disk that you created, you can connect that disk as a second hard disk, as in the above screenshot. You could also add a second virtual CD/DVD drive, or change where these items are attached. The following options are available:
To add another virtual hard disk, or a CD/DVD or floppy drive, select the storage controller to which it should be added (IDE, SATA, SCSI, SAS, floppy controller) and then click the Add Disk button below the tree. You can then either select Add CD/DVD Device or Add Hard Disk. If you clicked on a floppy controller, you can add a floppy drive instead. Alternatively, right-click on the storage controller and select a menu item there.
On the right part of the window, you can then set the following:
The device slot of the controller that the virtual disk is connected to. IDE controllers have four slots which have traditionally been called primary master, primary slave, secondary master, and secondary slave. By contrast, SATA and SCSI controllers offer you up to 30 slots for attaching virtual devices.
The image file to use.
For virtual hard disks, a button with a drop-down list appears on the right, offering you to either select a virtual hard disk file using a standard file dialog or to create a new hard disk (image file). The latter option displays the Create New Disk wizard, described in Section 1.7, “Creating Your First Virtual Machine”.
For virtual floppy drives, a dialog enables you to create and format a new floppy disk image automatically.
For details on the image file types that are supported, see Section 5.2, “Disk Image Files (VDI, VMDK, VHD, HDD)”.
For virtual CD/DVD drives, the image files will typically be in the standard ISO format instead. Most commonly, you will select this option when installing an OS from an ISO file that you have obtained from the Internet. For example, most Linux distributions are available in this way.
For virtual CD/DVD drives, the following additional options are available:
If you select Host Drive from the list, then the physical device of the host computer is connected to the VM, so that the guest OS can read from and write to your physical device. This is, for instance, useful if you want to install Windows from a real installation CD. In this case, select your host drive from the drop-down list presented.
If you want to write, or burn, CDs or DVDs using the host drive, you need to also enable the Passthrough option. See Section 5.9, “CD/DVD Support”.
If you select Remove Disk from Virtual Drive, Oracle VM VirtualBox will present an empty CD/DVD drive to the guest into which no media has been inserted.
To remove an attachment, either select it and click on the Remove icon at the bottom, or right-click on it and select the menu item.
Removable media, such as CD/DVDs and floppies, can be changed while the guest is running. Since the Settings dialog is not available at that time, you can also access these settings from the Devices menu of your virtual machine window.