JavaScript is required to for searching.
Skip Navigation Links
Exit Print View
Netra SPARC T3-1 Server HTML Document Collection
search filter icon
search icon

Document Information

Using This Documentation

Product Notes

Related Documentation

Feedback

Support and Accessibility

Installation

Preparing for Installation

Installation Task Overview

Server Overview

Confirming Server Specifications

Shipping Kit Inventory List

Front Panel Components

Back Panel Components

Server Handling Precautions

ESD Precautions

Tools Needed for Installation

Optional Component Installation

Installing the Server

Rack Compatibility

Rack Cautions

Stabilize the Rack for Installation

Mounting the Server Into a 4-Post Rack

Mounting the Server Into a 2-Post Rack

Connecting the Server Cables

Cabling Requirements

Back Panel Connectors and Ports

Connect the SER MGT Cable

Connect the NET MGT Cable

Connect the Ethernet Network Cables

Connect Other Data Cables

Prepare the Power Cords

Assembling and Connecting DC Power Cords

Assemble the DC Input Power Cables

Connect the DC Input Power Cords to the Server

Powering On the Server for the First Time

Power On Task Overview

Oracle ILOM System Console Overview

Connect a Terminal or Emulator to the SER MGT Port

Power On the Server for the First Time

Oracle Solaris OS Configuration Parameters

Assigning a Static IP Address to the Service Processor

Identifying the Server Ports

USB Ports

Alarm Port

SER MGT Port

NET MGT Port

Gigabit-Ethernet Ports

Video Port

Administration

Understanding System Administration Resources

Oracle ILOM Overview

Platform-Specific ILOM Features

Oracle Solaris OS Overview

OpenBoot Overview

Oracle VM Server for SPARC Overview

Multipathing Software

Accessing the Server

Log In to ILOM

Log In to the System Console

Display the ok Prompt

Display the ILOM Prompt

Use a Local Graphics Monitor

ILOM Remote Console

Controlling the Server

Power On the Server

Power Off the Server

Reset the Server From the Oracle Solaris OS

Reset the Server From ILOM

Reset the SP to Default Values

Configuring Hardware RAID

Hardware RAID Support

Prepare to Use the FCode Utility

FCode Utility Commands

Create a Hardware RAID Volume

Locate Device Paths

Changing Server Identification Information

Change Customer FRU Data Information

Change System Identifier Information

Configuring Policy Settings

Specify Cooldown Mode

Restore Host Power State at Restart

Specify Host Power State at Restart

Disable or Re-Enable Power-On Delay

Specify Parallel Boot of the SP and Host

Configure Host Behavior With the Keyswitch State

Configuring Network Addresses

SP Network Address Options

Disable or Re-Enable Network Access to the SP

Display the DHCP Server IP Address

Display the Host MAC Address

Using an In-band Connection to the SP

Configuring Boot Mode

Boot Mode Overview

Configure the Host Boot Mode of Oracle VM Server for SPARC

Change the Host Boot Mode Behavior at Reset

Manage the Host Boot Mode Script

Display Host Boot Mode Expiration Date

Override OBP Settings to Reset the Server

Configuring Server Behavior at Restart

Specify Behavior When the Host Resets

Specify Behavior When the Host Stops Running

Set the Boot Timeout Interval

Specify Behavior at Boot Timeout

Specify Behavior if Restart Fails

Specify Maximum Restart Attempts

Configuring Devices

Unconfigure a Device Manually

Reconfigure a Device Manually

Monitoring the Server

Monitoring Faults

Enabling ASR

Display Server Components

Locate the Server

Updating the Firmware

Display the System Firmware Version

Update the Firmware

Display the OBP Version

Display the POST Version

Display the Hypervisor Version

Service

Identifying Components

Power Supply, Hard Drive, and Fan Module Locations

Top Cover, Filter Tray, and DVD Tray Locations

Motherboard, DIMMs, and PCI Board Locations

Detecting and Managing Faults

Diagnostics Overview

Diagnostics Process

Locating Components, Ports, and LEDs

Interpreting Diagnostic LEDs

Managing Faults (Oracle ILOM)

Interpreting Log Files and System Messages

Verifying Oracle VTS Installation

Managing Faults (POST)

Managing Faults (PSH)

Managing Components (ASR)

Preparing for Service

Safety Information

Find the Chassis Serial Number

Locate the Server

Component FRU Names and Service Links

Removing Power From the Server

Accessing Internal Components

Servicing the Air Filter

Remove the Air Filter

Install the Air Filter

Servicing Fan Modules

Fan Module LEDs

Locate a Faulty Fan Module

Remove a Fan Module

Install a Fan Module

Verify a Fan Module

Servicing Power Supplies

Power Supply LEDs

Locate a Faulty Power Supply

Remove a Power Supply

Install a Power Supply

Verify a Power Supply

Servicing Hard Drives

Hard Drive LEDs

Locate a Faulty Hard Drive

Remove a Hard Drive

Install a Hard Drive

Verify a Hard Drive

Servicing the Hard Drive Fan

Determine if the Hard Drive Fan Is Faulty

Remove the Hard Drive Fan

Install the Hard Drive Fan

Verify the Hard Drive Fan

Servicing the Hard Drive Backplane

Determine if the Hard Drive Backplane Is Faulty

Remove the Hard Drive Backplane

Install the Hard Drive Backplane

Verify the Hard Drive Backplane

Servicing the Power Distribution Board

Determine if the Power Distribution Board Is Faulty

Remove the Power Distribution Board

Install the Power Distribution Board

Verify the Power Distribution Board

Servicing the DVD Drive

Determine if the DVD Drive Is Faulty

Remove the DVD Drive

Install the DVD Drive

Verify the DVD Drive

Servicing the DVD Tray

Remove the DVD Tray

Install the DVD Tray

Servicing the LED Board

Determine if the LED Board Is Faulty

Remove the LED Board

Install the LED Board

Verify the LED Board

Servicing the Fan Board

Determine if the Fan Board Is Faulty

Remove the Fan Board

Install the Fan Board

Verify the Fan Board

Servicing the PCIe2 Mezzanine Board

Determine if the PCIe2 Mezzanine Board Is Faulty

Remove the PCIe2 Mezzanine Board

Install the PCIe2 Mezzanine Board

Verify the PCIe2 Mezzanine Board

Servicing the PCIe2 Riser Card

Locate a Faulty PCIe2 Riser Card

Remove a PCIe2 Riser Card

Install a PCIe2 Riser Card

Verify a PCIe2 Riser Card

Servicing PCIe2 Cards

Locate a Faulty PCIe2 Card

Remove a PCIe2 Card From the PCIe2 Mezzanine Board

Remove a PCIe2 Card From the PCIe2 Riser Card

Install a PCIe2 Card Into the PCIe2 Mezzanine Board

Install a PCIe2 Card Into the PCIe2 Riser Card

Install SAS Cable for Sun Storage 6 Gb SAS PCIe RAID HBA, Internal

Verify a PCIe2 Card

Servicing the Signal Interface Board

Determine if the Signal Interface Board Is Faulty

Remove the Signal Interface Board

Install the Signal Interface Board

Verify the Signal Interface Board

Servicing DIMMs

DIMM Configuration

DIMM LEDs

Locate a Faulty DIMM

Remove a DIMM

Install a DIMM

Verify a DIMM

Servicing the Battery

Determine if the Battery Is Faulty

Remove the Battery

Install the Battery

Verify the Battery

Servicing the SP

Determine if the SP Is Faulty

Remove the SP

Install the SP

Verify the SP

Servicing the ID PROM

Determine if the ID PROM Is Faulty

Remove the ID PROM

Install the ID PROM

Verify the ID PROM

Servicing the Motherboard

Determine if the Motherboard Is Faulty

Remove the Motherboard

Install the Motherboard

Verify the Motherboard

Returning the Server to Operation

Install the Top Cover

Connect Power Cords to the Server

Power On the Server (Oracle ILOM)

Power On the Server (Power Button)

Glossary

Index

Assemble the DC Input Power Cables

The following procedure describes how to assemble the DC input power cables.

Assemble one cable for each DC power supply in your server.

Before you begin the installation procedure, verify that the required conditions described in the following table have been satisfied.

Prerequisite Condition
Responsible Party
Install a DC power source that meets the server's input power specifications.
Customer
Secure DC power cables that meet the server's power cabling specifications.
Customer
Attach the DC input plug to the DC input power cables. The input plug is provided in the server's shipping kit.
Customer
  1. Turn off power from the DC power source using the circuit breakers.

    Electrical

    Caution - Before proceeding with these instructions, turn off the power from the DC power source through the circuit breakers.


  2. Identify the parts that you will use to assemble the DC input power cables.

    For each cable, you need a DC input plug, cage clamp tool, or small screwdriver. These items are provided in the shipping kit that came with your server (DC models only).
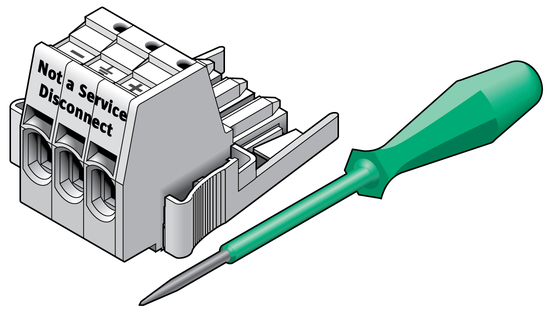

    image:Figure showing DC connection parts.
  3. Locate the three wires coming from your DC power source that will be used in the connection to your unit:
    • -48V or -60V (negative terminal)
    • Chassis ground
    • -48V or -60V Return (positive terminal)

      Note - Depending on the DC power source, the -48V or -60V (negative terminal) might be marked with a minus (-) symbol. The -48V or -60V Return (positive terminal) might be marked with a positive (+) symbol.


  4. Strip 1/2 in. (13 mm) of insulation from each of the wires coming from the DC power source.

    Do not strip more than 1/2 in. (13 mm) from each wire. Doing so leaves uninsulated wire exposed from the DC connector after the assembly is complete.


    image:Figure showing the amount of insulation to strip from the wire (1/2 inch, 13mm).
    1
    1/2 in. (13 mm)
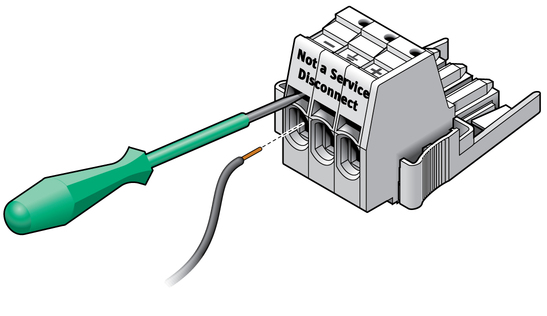
  5. Open the cage clamp by inserting the cage clamp tool (or small screwdriver) into the rectangular hole directly above the hole in the DC input plug where you want to insert the first wire, and push in to open the cage clamp.
    image:Figure showing how to open the cage clamp using the tool.
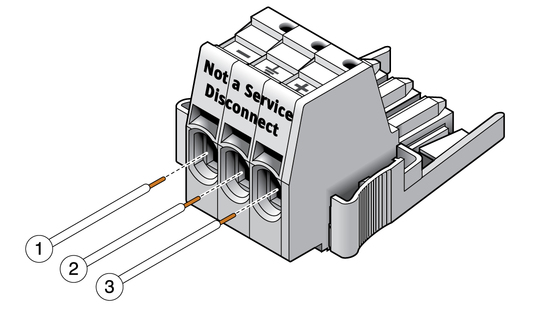
  6. Feed the exposed section of the appropriate wire into the round plug hole in the DC input plug.
    image:Figure showing how to assemble the DC input power cable.
    1
    From -48V or -60V
    2
    From Chassis ground (green/yellow)
    3
    From -48V or -60V Return

    Note - If you need to remove a wire from the DC input plug, insert the cage clamp operating tool or a small screwdriver into the slot directly above the wire and push in. Pull the wire from the DC input plug.


  7. Remove the cage clamp tool to secure the wire.
  8. Repeat the procedures for the other two wires to complete the assembly of the DC input power cable.
  9. Repeat this procedure to create as many DC input power cables as you need for your unit.
Related Information