Repack the Rack in the Enterprise Packaging
If you plan to ship a rack containing installed equipment, you must pack the rack in the enterprise packaging. You cannot reuse the standard packaging.
See Rack Packaging for more information about the packaging options.
 | Caution - The standard packaging was designed solely for shipping an empty rack. Never install equipment in the rack while it is on this pallet, and never repack a rack in the standard packaging. If you must populate the rack prior to moving it to a new building or site, repack the rack in the enterprise packaging. Contact your sales representative for information about ordering empty enterprise packaging. |
 | Caution - When moving the rack to a new location, including repacking, verify that the leveling feet are up before moving the rack. |
- Prior to repacking the rack, secure the PDUs, PDU power lead cords, and any equipment installed in the rack (see Secure the PDUs in the Rack).
- Gather the required tools.
For this procedure, you need the following tools, which you can find in the enterprise packaging shipping kit:
SW 17-mm wrench
6-mm hexagon Allen wrench key
You also need:
Torque wrench
3 people to push the rack onto the pallet
Stretch plastic wrap
- Unpack the empty enterprise packaging
and place the pallet on a level floor with plenty of space to work.
You need at least 4451 mm (15 ft) of floor space from the front edge of the pallet in order to safely roll the rack onto the pallet.
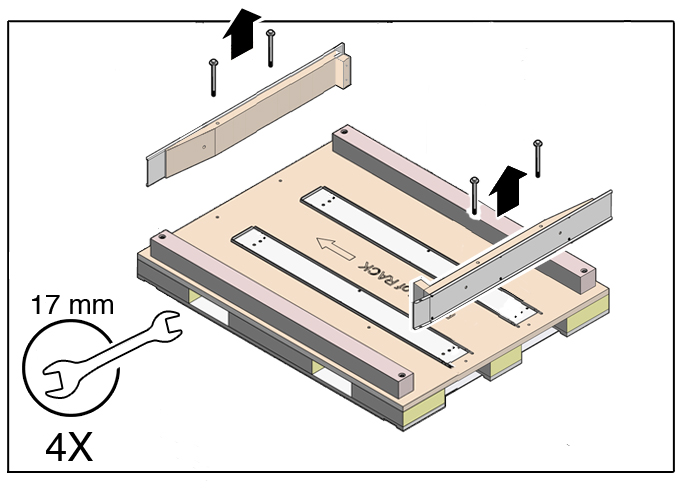
- Using a 17-mm wrench, remove
the bolts securing the ramps to the pallet, and remove the ramps
from the pallet.
Do not discard these bolts, because you use them to secure the ramps back to the pallet.
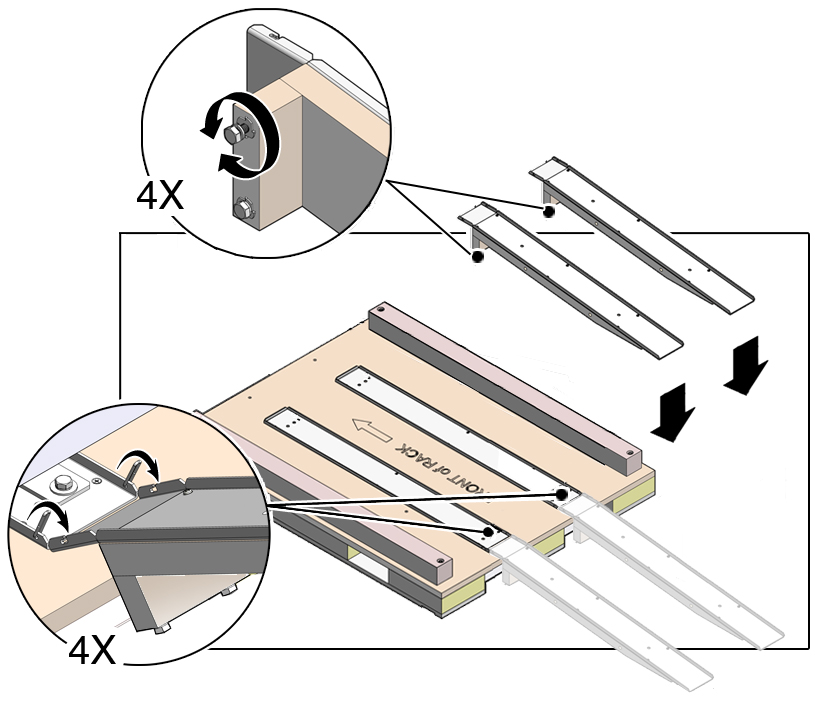
- Use a 17-mm wrench to adjust
the height of the bottom ramp bolts.
When you install these ramps, the bolts should touch the floor and support the weight of the rack.
-
With the ramps at an angle, bring the edges of the ramps flush against the
edges of the pallet tracks, then flip the ramp locks into the slots on the
ramps.
Lower the ramps to the floor to secure the ramps to the pallet.
There are two locks per ramp. If necessary, adjust the bottom ramp bolts until they reach the floor.

Caution - When moving the rack to a new location, including repacking, verify that the leveling feet are up before moving the rack.
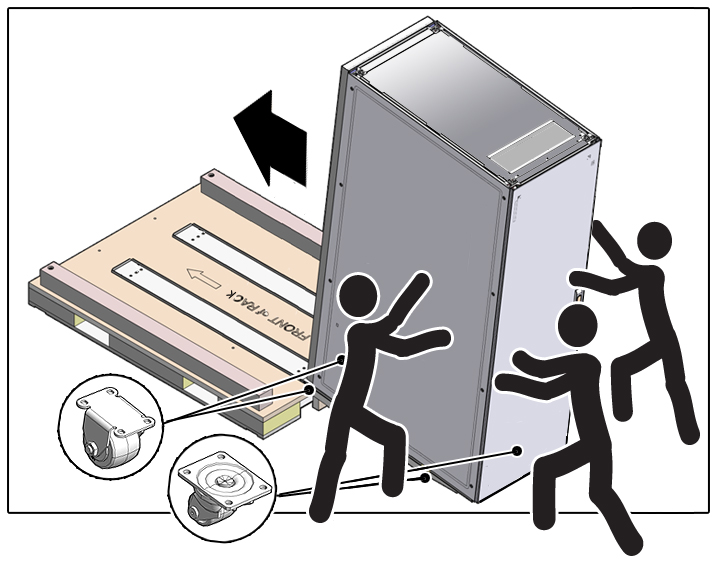
- Using three people, carefully
push the rack up the ramps up onto the pallet tracks.
Ensure that you push the rack from the rear and orient the rack on the tracks as marked, with the front of rack on the side pallet opposite of the ramps (note the “FRONT of RACK” markings on the pallet).
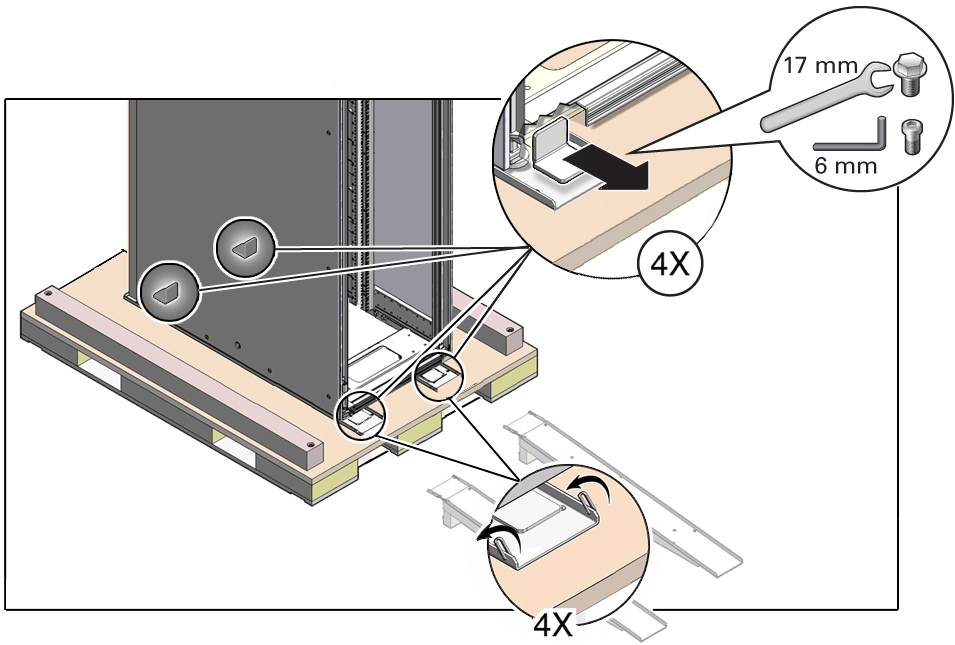
- Lift the ramps up at an angle,
remove the ramp locks from the slots on the ramps, and then remove
the ramps from the pallet.
Flip the ramp locks onto the track in the unlocked position so they are out of the way. Save these ramps in a safe location.
- Loosely secure the front and rear
shipping
brackets to the rack using a 6-mm Allen wrench and the appropriate number of
bolts per bracket.
The number of bolts and the type of shipping bracket can vary. Use the shipping bracket hardware included with the enterprise packaging.

Caution - Shipping brackets are not for use for bracing or anchoring the rack during seismic events.
- Loosely secure all four shipping brackets to the pallet using a 17-mm wrench and the appropriate number of bolts and washers per bracket.
- After confirming that each bracket is square to the rack and the pallet, use a 6-mm Allen
wrench to tighten the four
shipping
brackets firmly to the rack.
Secure the brackets to the rack at 12.654 Nm (112 in.-lbf) of torque.
- Use a 17-mm wrench to tighten each bolt securing the four
shipping
brackets firmly to the pallet.
Secure each bolt to the pallet at 7.457 Nm (66 in.-lbf) of torque.
- Close the rack doors and use
a 17-mm wrench to secure the ramps to the pallet using two bolts
per ramp.
Secure each bolt to the pallet at 7.457 Nm (66 in.-lbf) of torque.
- Place a plastic bag over the
rack.
Ensure that the bag covers the rack completely.
Note - To provide additional protection from paint scratches, optionally cover the top and bottom portions of the rack with polypropylene microfoam sheets or stretch wrap before placing the bag over the rack.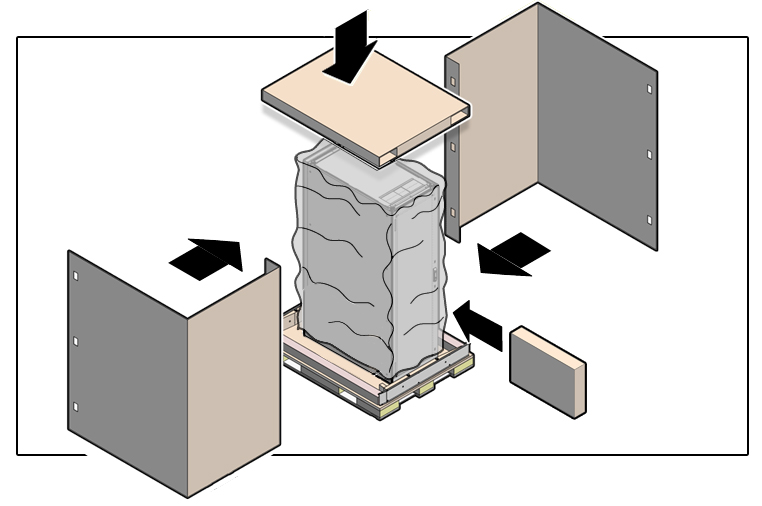
- Place the accessory box next to the rack and secure it to the rack using stretch wrap.
- Place the inside top cap on the
rack, ensuring that you correctly orient the cap on the rack.
When oriented correctly, the sides of the top cap should align with the sides of the pallet.
- Place the two large cardboard
carton sleeves around the rack and secure the sleeves together using
six plastic locking clips.
The small flaps of the sleeves fold inside the outer carton.
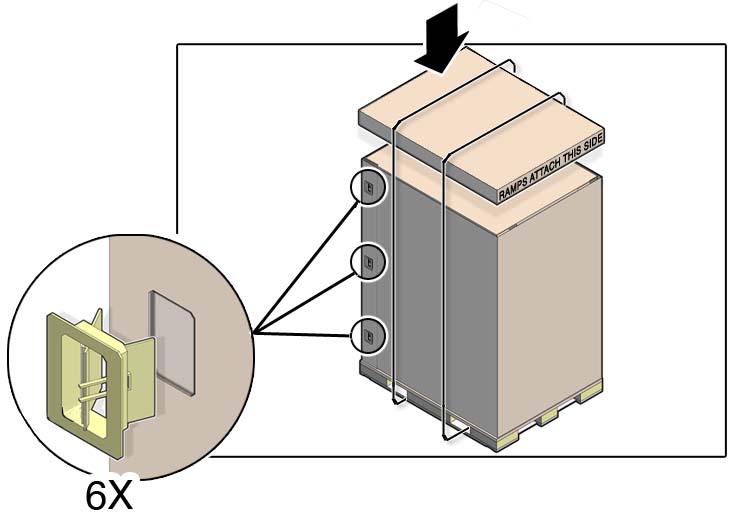
- Place the outside top cap on top of the cardboard carton and over the carton sleeves making sure that the words “RAMPS ATTACH THIS SIDE” face the rear of the carton.
- Secure the carton with strapping
bands and fiberboard edge protectors.
Ensure that the bands are tight and properly fitted to the carton.