On your ATG Service Administration server, launch the BCC from the Start > ATG > Tools menu or from
http://hostname:port/atg/bccand log in as a Service administrator. Refer to the ATG Installation and Configuration Guidefor your application server to identify the default port number.Select Content Administration > Admin Console > Configuration in the left-hand pane. The Deployment Administration Configuration screen appears.

Click the Add Site link in the right-hand pane. This will add the Self Service site to the deployment. The Adding a New Site screen appears.
Enter a Site Name for the Self Service deployment (for example,
self-service) and Site Description.In the Setting Repository Mappings area:
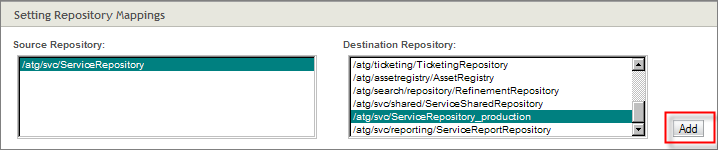
Select
/atg/svc/ServiceRepositoryin the Source Repository field.Select
/atg/svc/ServiceRepository_productionin the Destination Repository field.Click Add.
Click Save Changes.
The right-hand pane displays the Details tab for the target site you just created. Click the Site Name, for example
AgentSite.Once the Configuration pane appears, click the Agents tab. This tab allows you to add the Self Service Publishing Agent and the Self Service Web Publishing Agents to the site.
Click the Add Agent to Site link on the right-hand side of the Agents tab.

Enter a name for the Self Service Publishing Agent.
Select RMI for the Transport Type.
In Transport URL, enter the URL of your ATG Self Service server (for example,
rmi://hostname:port/atg/epub/AgentTransport).In the Available Destinations list, select
ConfigFileSystem,WWWFileSystem, andServiceRepositoryand click the > button to add them to the Include Destinations list.Click Save Changes.
Click Add Agent to Site and follow the previous steps to add the Self Service Publishing Web Agent.
