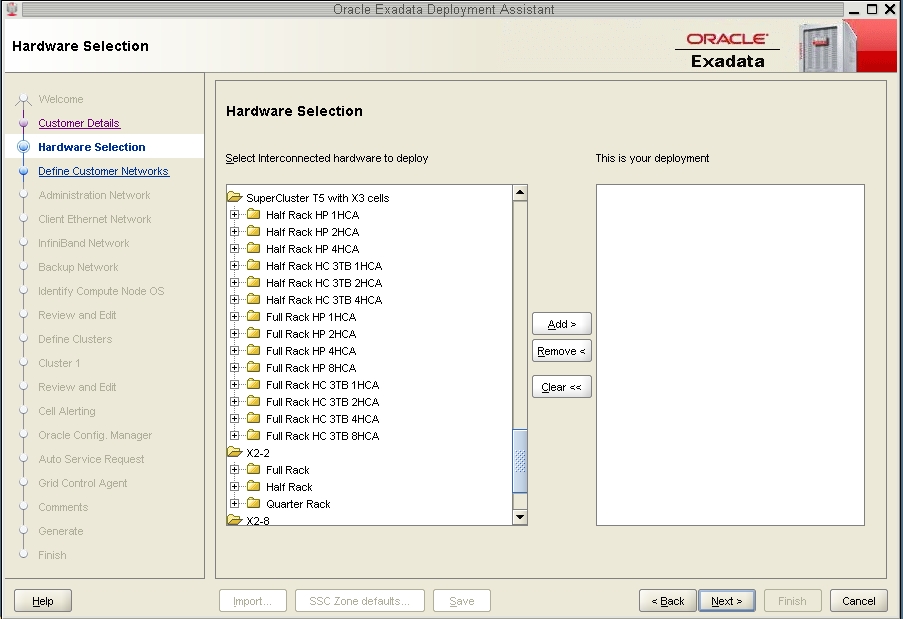
Complete the Hardware Selection Page
-
Review the Hardware Selection page.

-
Determine what version of the Exadata Storage Servers that you have in
your Oracle SuperCluster T5-8:
-
If you have the older, X3 version of the Exadata Storage Servers, scroll down the list until you see the SuperCluster T5 with X3 cells folder.
-
If you have the newer, X4 version of the Exadata Storage Servers, scroll down the list until you see the SuperCluster T5 with X4 cells folder.
-
-
Open the proper folder in the Hardware Selection page for your
configuration.
You must determine the following things before you can make a choice in this page:
-
The type of Oracle SuperCluster T5-8 that you have (Half Rack or Full Rack).
-
What domain configuration you have set up on the SPARC T5-8 servers in your Oracle SuperCluster T5-8 (H1-1 configuration for a Half Rack, F1-1 configuration for a Full Rack, and so on). See Understanding Domain Configurations for more information.
-
Which Database Domain you will be creating zones on in that domain configuration.
-
The number of IB HCAs that are associated with that Database Domain. See Understanding Domain Configurations for more information.
-
Whether you have high performance disks (HP) or high capacity (HC) disk in the Exadata Storage Servers.
For example, if you are entering information for the following cluster setup at this point:
-
A Full Rack version of the Oracle SuperCluster T5-8
-
Both SPARC T5-8 servers have the F4-2 domain configuration set up on the servers
-
You are setting up zones on the first Database Domain in the F4-2 configuration (the Large Domain)
-
There are four IB HCAs associated with this Large Domain
-
You have high performance (HP) disks in the Exadata Storage Servers
then you would open the following folder in the Hardware Selection page:
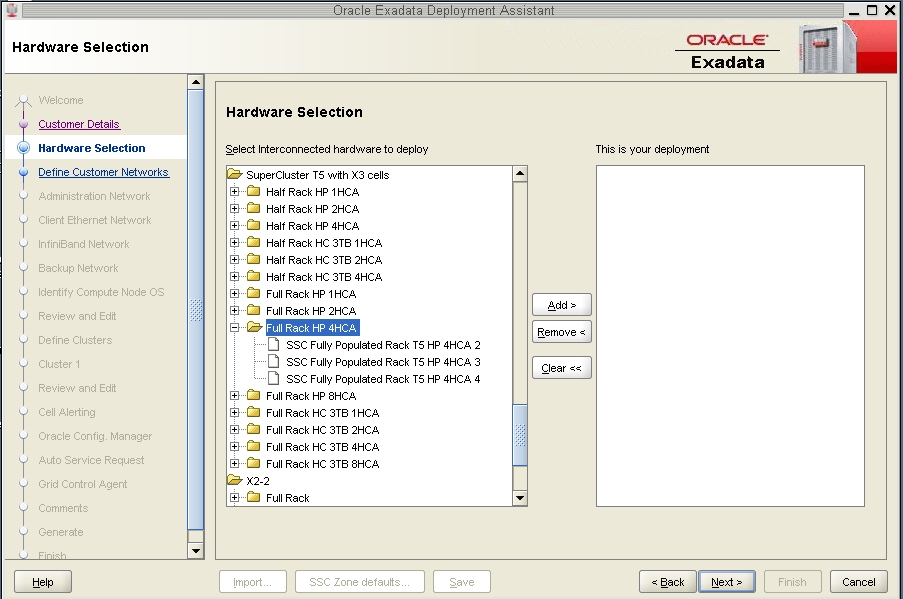
Full Rack HP 4HCA
The following figure shows the selections that would be available for that folder.

-
-
Make the appropriate selection within the folder that you opened.
The selections provided in this folder reflect the total number of similar Database Domains that could house zones in your system.
For example, within the Full Rack HP 4HCA folder, you would see the following options:
-
SSC Fully Populated Rack T5 HP 4HCA 2
-
SSC Fully Populated Rack T5 HP 4HCA 3
-
SSC Fully Populated Rack T5 HP 4HCA 4
The number at the end of each option denotes the number of Large Domains (domains with 4 IB HCAs) that could be part of this cluster. Therefore:
-
If you are creating a cluster that spans across two Large Domains, you would select SSC Fully Populated Rack T5 HP 4HCA 2
-
If you are creating a cluster that spans across three Large Domains, you would select SSC Fully Populated Rack T5 HP 4HCA 3
-
If you are creating a cluster that spans across four Large Domains, you would select SSC Fully Populated Rack T5 HP 4HCA 4
These are the only choices available in this folder because, for a Full Rack, there is one domain configuration option with two Large Domains on each SPARC T5-8 server, or four Large Domains total in your system (F2-1 on both SPARC T5-8 servers), and several domain configuration options with one Large Domain on each SPARC T5-8 server, or two Large Domains total in your system (F3-1, F4-2, and F5-2 on both SPARC T5-8 servers).
For this example configuration, where you would have the F4-2 domain configuration on both SPARC T5-8 servers, you would have two Large Domains total in your system, so the SSC Fully Populated Rack T5 HP 4HCA 2 option would apply in this example configuration.
-
-
When you have selected the proper configuration for your system, click the
Add button to add that selection to the This is your
deployment window, then click Next.
The Define Customer Networks page is displayed. Go to Complete the Define Customer Networks Page.