Complete the Client Ethernet Network Page
-
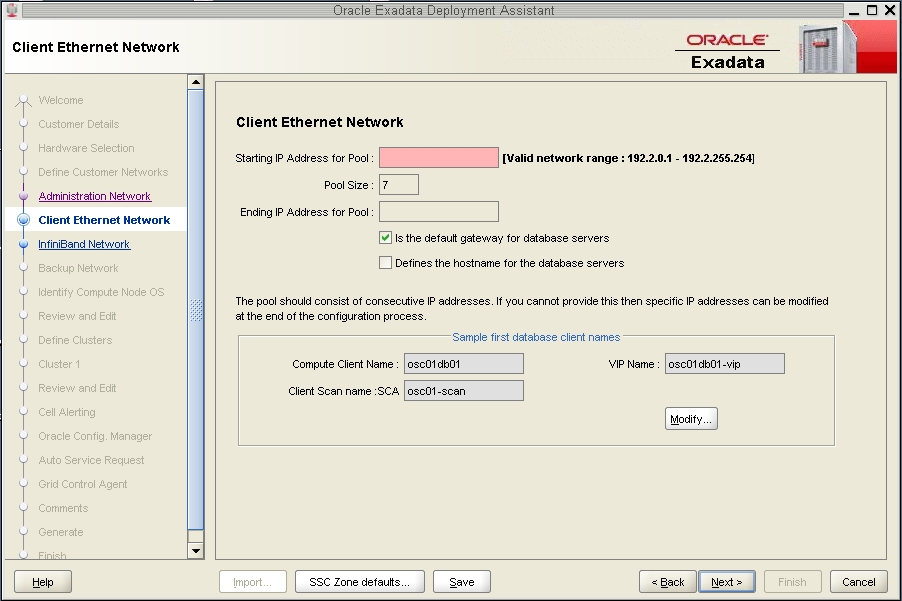
Complete the fields in the Client Ethernet Network page.
 FieldEntryStarting IP Address for PoolType the starting IP address for this cluster.Is the default gateway for database serversSelect this option if you want the client Ethernet network to be the default gateway for the cluster.Defines the Hostname for the database serversSelect this option.
 -
In the Sample first database client names field, click the Modify...
button.
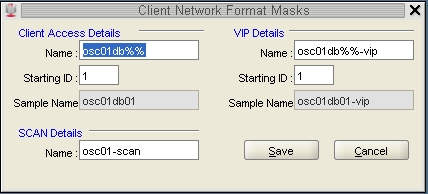
The Client Network Format Masks page is displayed.

-
Modify the host names in this page for the zones in this cluster.
-
In the Client Access Details area, enter a unique name for this
set of zones in the Name field.
The Client Access Details area will be populated with a name that was automatically generated, based on the Database Machine Name prefix that you entered earlier. However, this automatically-generated name does not provide necessary zone-specific information, so you should change the name in this field to reflect information on this cluster.
For example, if you entered osc01r1 for the Database Machine prefix in the Customer Details page, you should see this entry in the Name field in the Client Access Details area:
osc01r1client%%
The name that you enter in this field will be used as the host name for the client access network for zones that are part of this cluster. You should use the same naming convention for this field as you did for the administration network page. The following is an example format for this field:
cluster-namez#db#cn%-z#-client
For example:
osc01r1z1db2cn%-client
Note - There is a valid configuration where you would have a cluster where the zones reside on different Database Domains on the SPARC T5-8 servers (for example, a two-node cluster where the first zone resides on the first Database Domain on the first SPARC T5-8 server, and the second zone resides on the second Database Domain on the second SPARC T5-8 server). In this case, enter the Database Domain number for the first zone in this field for now - you will make manual modifications for the zone on the second Database Domain later on in this process.Note that the Name field in the VIP Details area automatically populates with the changes that you made in the Client Access Name field in the Client Access Details area. Because this name applies to each zone within this particular cluster, this automatically-generated information should be correct as-is.
Do not modify the information in the SCAN Details section. This will generate a single SCAN name and three SCAN IP addresses for the cluster or the single-instance database, which is correct.
-
Click the Save button to exit the Client Network Format Masks
page.
The main Client Access Network page is displayed, showing the results of the changes you made in the Client Network Format Masks page.
-
In the Client Access Details area, enter a unique name for this
set of zones in the Name field.
-
In the main Client Ethernet Network page, click Next.
The IB Network page is displayed. Go to Complete the IB Network Page.