JavaScript is required to for searching.
Skip Navigation Links
Exit Print View
SPARC M5-32 and SPARC M6-32 Servers

Service Manual

search filter icon
search icon

Document Information

Using This Documentation

Product Notes

Related Documentation

Feedback

Access to Oracle Support

Identifying Components

Identifying Front Components

Front Component Locations

Power System Cage Component Locations

Fan Cage Component Locations

Scalability Card Cage Component Locations

Identifying Rear Components

Rear Component Locations

IOU Component Locations

CMU Cage Component Locations

Side Panels

Identifying Internal Components

AC Input Filter and AC Power Cord

RFI Panel, Scalability Assembly, and Midplane Locations

Internal Cable Factory Names

Understanding Scalability

Scalability, DCUs, and PDomains

Scalability Hardware

Understanding Cooling Zones

Cooling Zones Overview

Cooling Zones 00 Through 03

Cooling Zone 04

Cooling Zone 05

Cooling Zone Assignments and DCUs

Component Service Task Reference

Detecting and Managing Faults

Diagnostic Overview

Diagnostics Process

Diagnostic Tools

Device Management Tools

Tool Availability

Oracle ILOM Service-Related Tools

Log In to Oracle ILOM (Service)

Managing Faults

PSH Overview

Check for Faults

Clear a Fault

Interpreting Log Files and System Messages

Check the Message Buffer

View Log Files (Oracle Solaris)

View Log Files (Oracle ILOM)

Configuring POST

POST Overview

Oracle ILOM Properties That Affect POST Behavior

Configure POST

Run POST With Maximum Testing

Interpreting LEDs

Front and Rear LED Panel LEDs and Controls

Preparing for Service

Service Sequence

Safety Information

Safety Symbols

Safety Precautions

ESD Measures

Prevent ESD Damage

Antistatic Wrist Strap Use

Antistatic Mat

Tools for Service

Torque Reference

Filler Panels

Find the Server Serial Number

Locate the Component

Power Off a PDomain

Removing Power From the Server

Prepare to Power Off the Server

Power Off the Server

Servicing Cabinet Doors

Remove the Door

Install the Door

Servicing Side Panels

Remove Side Panels

Install Side Panels

Servicing Trim Panels and the Kick Plate

Trim Panel Service Preparation

Remove the Trim Panels

Install Trim Panels

Remove the Kick Plate

Install the Kick Plate

Servicing Power Supplies

Power Supply Configuration

Power Supply LEDs

Remove a Power Supply

Install a Power Supply

Servicing PSDBs

PSDB LEDs

Remove a PSDB

Install a PSDB

Servicing Fan Modules

Fan Module Configuration

Fan Module LEDs

Remove a Fan Module

Install a Fan Module

Servicing SSBs

SSB Configuration

SSB LEDs

Remove an SSB

Install an SSB

Servicing Clock Boards

Clock Board Configuration

Clock Board LEDs

Display the Clock Board Type

Remove a Clock Board

Install a Clock Board

Servicing Service Processors

Service Processor LEDs

Service Processor General Status LEDs

Service Processor Network Management Port LEDs

Check a Service Processor Battery

Remove a Service Processor

Replace a Service Processor Battery

Install a Service Processor

Servicing I/O Switch Boards

I/O Switch Board Configuration

I/O Switch Board FRU Name

Determining Which PDomain Has the I/O Switch Board

I/O Switch Board LEDs

Remove an I/O Switch Board

Install an I/O Switch Board

Servicing Cable Management Assemblies

Remove a Cable Management Assembly

Install a Cable Management Assembly

Servicing I/O Cards

Understanding I/O Card Slot Configuration

Ensuring I/O Card Performance

IOU Locations

Identifying I/O Card Slots in an IOU

Understanding I/O Card Slot Device Paths and FRU Paths

I/O Card Slot Device Paths and FRU Paths in Fully-populated DCUs

I/O Card Slot Device Paths and FRU Paths in Half-Populated DCUs

Sun Flash Accelerator F40 PCIe Cards

PCIe Hot-Plug Carrier LEDs

Locate an I/O Card in the Server

Locate a Faulty I/O Card

Prepare an I/O Card For Removal

Remove an I/O Card From the Server

Remove an I/O Card From a Carrier

Install an I/O Card in a Carrier

Install an I/O Card in the Server

Remove a Filler Panel From the Server

Remove a Filler Panel From a Carrier

Install a Filler Panel in a Carrier

Install a Filler Panel in the Server

Verify an I/O Card

Relocate a Sun Flash Accelerator F40 PCIe Card

Servicing EMSs

Understanding EMS Configurations

EMS and Hard Drive Cage Compatibility

Redundant EMS Control of SAS-Format Drives

Nonredundant EMS Control of SATA-Format Drives

Identifying Hard Drive Slot Locations

EMS Slot Locations in Fully‐Populated DCUs

EMS Slot Locations in Half‐Populated DCUs

EMS General Status LEDs

EMS Network Port LEDs

Display the Hard Drive Cage Type

Display the EMS Type

Remove an EMS

Install an EMS

Servicing HDDs, SSDs, and Drive Filler Panels

Understanding HDD and SSD Slot Configurations

Redundant and Nonredundant Drive Controllers

Identifying Drive Slot Locations

HDD and SSD Hot-Plug Capabilities

HDD LEDs

SSD LEDs

Locate a Drive

Locate a Faulty Drive

Locate an HDD

Locate an SSD

Removing an HDD

Prepare an HDD for Removal

Remove an HDD

Install an HDD

Removing an SSD

Prepare an SSD for Removal

Remove an SSD

Install an SSD

Remove a Drive Filler Panel

Install a Drive Filler Panel

Servicing SPPs

SPP Configuration

SPP LEDs

Check an SPP Battery

Remove an SPP

Replace an SPP Battery

Install an SPP

Servicing CMUs

CMU Configuration

CMU Upgrades in a SPARC M5-32 Server

CMU LEDs

Display General CMU Information

Display Information for Upgrading CMUs

Remove a CMU

Install a CMU

Remove a CMU Filler Panel

Install a CMU Filler Panel

Servicing DIMMs

Memory Configuration

Cascaded DIMMs

Limitations on Mixing DIMMs

DIMM Slot Numbering

Quarter-Populated Memory

Half-Populated Memory

Fully-Populated Memory

DIMM FRU Names

Locate a Faulty DIMM

DIMM Fault Remind Button

Remove a DIMM

Install a DIMM

Move DIMMs to a New CMU

Servicing the Front LED Panel

Front LED Panel LEDs

Remove the Front LED Panel

Install the Front LED Panel

Servicing the Front Filler Panel

Remove the Front Filler Panel

Install the Front Filler Panel

Servicing Fan Cages

Fan Cage Configuration

Remove the Upper Fan Cage

Install the Upper Fan Cage

Remove the Lower Fan Cage

Install the Lower Fan Cage

Servicing a Cabled Lower Bus Bar Assembly

Remove a Cabled Lower Bus Bar Assembly

Install a Cabled Lower Bus Bar Assembly

Servicing the Scalability Card Cage

Remove the Scalability Card Cage

Install the Scalability Card Cage

Servicing the Scalability Fans Cable

Remove the Scalability Fans Cable

Install the Scalability Fans Cable

Servicing the Power System Cage

Remove the Power System Cage

Install the Power System Cage

Servicing Bus Bars

Bus Bar Configuration

Prepare to Replace Crown Clips on a Bus Bar

Replace Crown Clips

Return the Server to Operation

Servicing AC Power Cords

AC Power Cord Configuration

Remove an AC Power Cord

Install an AC Power Cord

Servicing AC Input Filters

AC Input Filter Configuration

Remove an AC Input Filter

Install an AC Input Filter

Disconnect AC Input Filters

Reconnect AC Input Filters

Servicing the Rear LED Panel

Rear LED Panel LEDs

Remove the Rear LED Panel

Install the Rear LED Panel

Servicing IOUs

Remove an IOU

Install an IOU

Servicing an I/O Power Cable Assembly

Remove an I/O Power Cable Assembly

Install an I/O Power Cable Assembly

Servicing Hard Drive Cages

Hard Drive Cage Configuration

Remove a Hard Drive Cage

Install a Hard Drive Cage

Servicing the Scalability Assembly

Remove the Scalability Assembly

Install the Scalability Assembly

Servicing the Fan Power Cable

Remove the Fan Power Cable

Install the Fan Power Cable

Servicing the Power System Cage to Scalability Assembly Cable

Remove the Power System Cage to Scalability Assembly Cable

Install the Power System Cage to Scalability Assembly Cable

Servicing the PSDB to Scalability Midplane Cable

Remove the PSDB to Scalability Midplane Cable

Install the PSDB to Scalability Midplane Cable

Servicing the Internal Link to Front LED Panel Cable

Remove the Internal Link Cable for the Front LED Panel

Install the Internal Link Cable for the Front LED Panel

Servicing the Rear LED Panel Cable

Remove the Rear LED Panel Cable

Install the Rear LED Panel Cable

Servicing Midplane Power Cables

Prepare to Remove a Midplane Power Cable

Remove a Midplane Power Cable

Install a Midplane Power Cable

Servicing the I/O Data Cable

Remove an I/O Data Cable

Install an I/O Data Cable

Servicing the Midplane

Inspect the Replacement Kit

Prepare to Remove the Midplane

Remove the Midplane

Install the Midplane

Reassemble the Server

Prepare the Old Midplane for Return

Returning the Server to Operation

Return to Operation Sequence

Reconnect AC Power to the Server

Restart the Server

Reset the Server

Reset Service Processors

Reset a PDomain

Restart a PDomain

Return a Component to Oracle

Glossary

Index

Prepare to Remove the Midplane

  1. Halt and power down the server.

    See Prepare to Power Off the Server.

  2. Prepare the front of the server:
    1. Use an antistatic wrist strap to protect the equipment from ESD damage.
    2. Remove the front door.

      See Remove the Door.

    3. Remove the side trim panels.

      Also remove the three lower trim panel standoffs on each side, to protect the standoffs from breakage. Do not remove the top cap or the kick plate.

      See Remove the Trim Panels .

    4. Remove the front filler panel.

      See Remove the Front Filler Panel.

    5. Remove the upper fan cage.

      See Remove the Upper Fan Cage.

    6. Remove the scalability card cage.

      See Remove the Scalability Card Cage.

    7. Remove the lower fan cage.

      See Remove the Lower Fan Cage.

    8. Remove the scalability assembly.

      See Remove the Scalability Assembly.

  3. Prepare the rear of the server:
    1. Remove the CMUs from the rear of the server.

      See Remove a CMU .

    2. Remove the SPPs from the rear of the server.

      See Remove an SPP.

  4. Prepare the inside of the server:
    1. At the front of the server, insert cable ties in slots on the bottom of the power system cage.

      You will be using the cable ties to raise cable assemblies for access to the midplane.
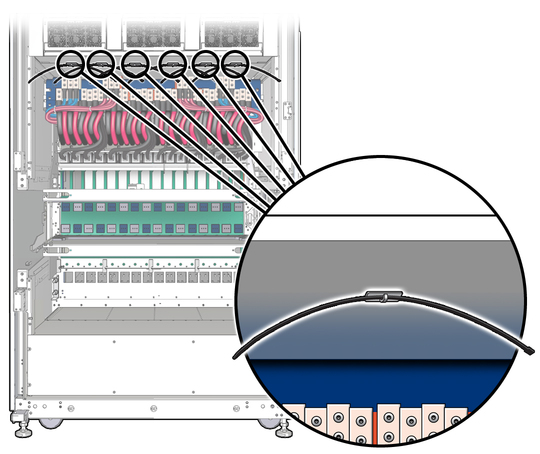

      image:Figure shows cable tie points above the midplane.
    2. Unlock and detach the CMU data cable assemblies.

      There are two metal locking levers on each CMU data cable assembly. The metal locking levers push against plastic locking tabs that are part of the CMU power cable assembly.

      1. Push up slightly on the plastic locking tab, and then pull down a metal lever.
        image:Unlocking the data cable.
      2. Repeat for the second lever.
      3. Pull the CMU data cable assembly out of the midplane and let the assembly hang loose while you remove other assemblies in steps.
      4. Detach the remaining sets of data cable assemblies.
    3. Unlock and detach the cabled lower bus bar assemblies:

      Remove two T20 Torx screws that hold an assembly to the midplane, and then pull the assembly out of the midplane. Detach all four assemblies.


      Note - Take care not to drop the screws. These are not captive screws.


      Note - Do not place screws or other loose hardware on the “shelves” of the midplane. Small items can easily fall inside the cabinet.
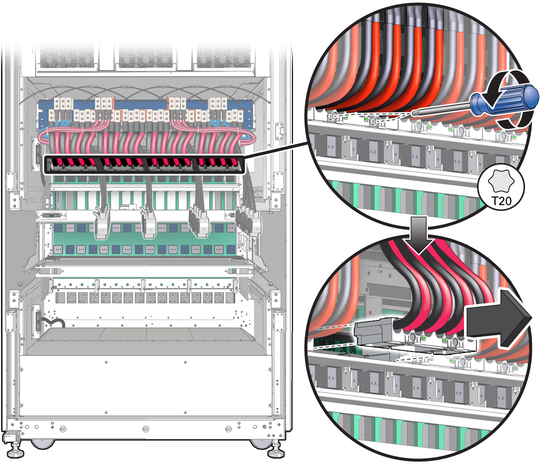
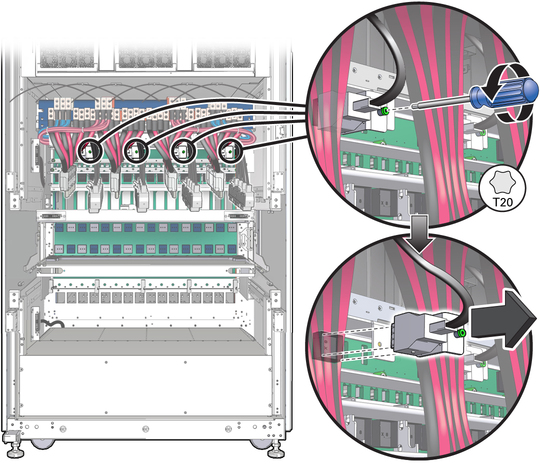
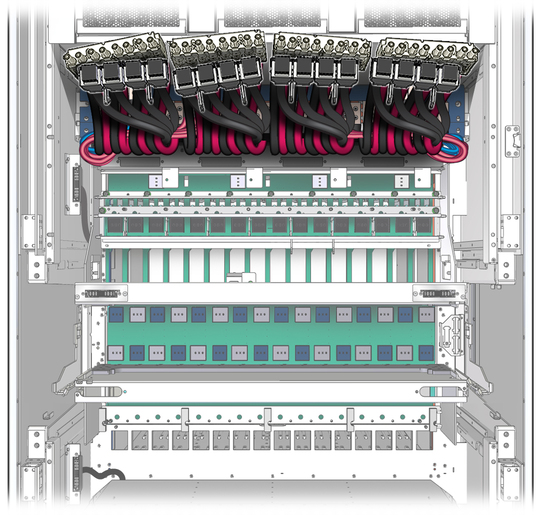
      image:Figure shows disconnection of a cabled lower bus bar assembly.
    4. Use a T20 Torx driver to detach the SPP cables.
      image:Figure shows SPP cable detachment
    5. Raise the cable assemblies that you loosened and tie them neatly to the top of the midplane area.
      image:Figure shows cables held out of the way.
  5. Remove the old midplane.

    See Remove the Midplane.

Related Information