When you add an action to a campaign, you must specify the segment of customers to whom the action applies (unless it inherits a segment from the root stage). For example, if you add a Send Email Communication action to a stage, you must specify the segment who will receive the e-mail. Note: If you create an action with multiple segments, always add the segments in order from most restrictive (fewest members) to least restrictive (most members). Doing so will produce a more efficient campaign.
The following image shows the Segments fields:
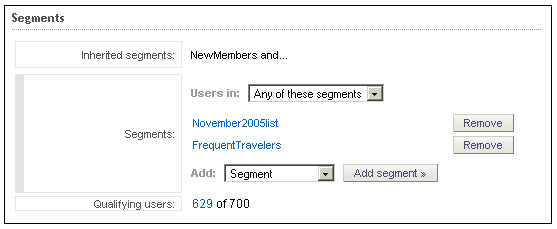
The Inherited Segments field shows any segments that have been added to the parent action in this campaign (the action that spawns the current stage). Those segments are also applied to this action and effectively narrow the range of people to whom this action can be targeted. For example, if an action in a parent stage contains a segment targeting people whose locale is en_US, and you add a segment here that targets people whose last name is Jones, this action can apply only to people whose locale is en_US and whose last name is Jones.
The Qualifying Users field shows the number of customer profiles that meet the criteria for the segments. If you use ATG Outreach with a staging environment, note that the number always shows actual customer profiles stored in the production database. It does not include any test profiles you have set up on the staging server. See Testing Campaigns on a Staging Server for more information.
In most cases the field shows only one number. For the Send Email Communication action, however, the field has two numbers, as shown in the image above. The number on the right shows the total number of profiles that meet the segment criteria. The number on the left shows the subset of those who are able to receive e-mail, meaning that the Receive Email property in their profile is set to “yes” and the Email Status property is set to “valid.” (Anyone who has chosen to opt out of all campaigns, for example, has this property set to “no.”) In the example above, 700 profiles meet the following criteria:
They are members of the NewMembers segment, and
They are members of either the November2005 or FrequentTravelers segments
Of those 700, 629 are able to receive e-mail:
Their Receive Email property is set to “yes” and
Their Email Status property is set to “valid”
Note also that the number on the left (or the only number, for actions other than Send Email Communication) is a link that you can use to examine the profiles that are included in the segment. For more information, see Browsing the Profiles that Make Up a Segment.
You can add as many segments as you need for this action. The Users In field allows you to specify Any/All behavior for actions that have more than one segment. If you select All of These Segments, only users who belong to all specified segments qualify for the action.
To add a segment to the action, click Add Segment. (For information about adding opt-in or opt-out segments, see the Using Opt-In and Opt-Out Segments chapter.)
The Segment Picker appears and allows you to browse existing segments, search for a specific segment to add, or create a new segment.
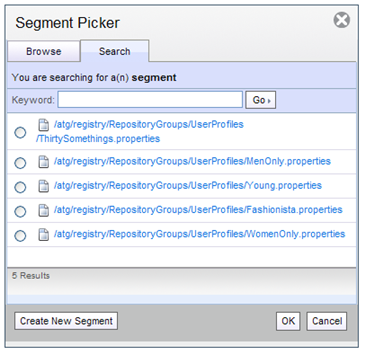
To search for a segment, enter the first few characters from the segment’s name in the Keyword field in the Search tab and click Go. To display all segments, leave the Keyword field blank and click Go. Alternatively, you can use the Browse tab to display a folder tree, as shown below:

Segment files are identified by the people icon shown in the image above. Segments that you create are stored by default in the /root/atg/registry/repositoryGroups/Campaigns/ folder.
Note that you cannot include anonymous (unregistered) user profiles in ATG Outreach segments.
For important information about adding an existing segment to a campaign, see Adding and Editing Existing Segments.
See the next section for information on creating a new segment.
