When you have finished creating a campaign, you must typically submit it for review before it can be deployed to your staging or production server. The campaign starts running as soon as the deployment is complete (unless the campaign includes a start date, in which case the campaign starts after it has been deployed and when that date has been reached).
Note that the tasks and outcomes described in the following sections are included in the default campaign workflow. The actions may vary if the workflow has been customized for your installation. For example, your ATG Outreach environment may include multiple reviews or no Content Review task.
To indicate that the campaign is ready for review, complete the following steps:
Select Ready for Review from the Task Actions list at the top of the Structure tab.
Click Go.
In the Confirmation dialog box, enter any notes you want. This step is optional. The notes appear on the History page for this campaign.
Click OK.
Locate the campaign project in the To Do list on the Home page and click Go To Project.
In the Tasks tab, complete the Content Review task by selecting Approve Content in the Actions column and clicking Go. (Note that you may not have access to this task. See Using ATG Outreach Projects for more information.)
If the campaign is incomplete (one ore more required elements have not been supplied), an error message similar to the following appears when you attempt to approve the campaign for deployment:
Campaign scenario cannot be generated due to an incomplete stage
<name of stage> for <name of campaign>. Please complete the
required information and try again.
Optionally, enter a note in the Confirmation dialog box, and click OK.
The steps you complete to deploy the campaign depend on whether your environment includes a staging server.
Deploying to Staging and Production Servers
The image below shows the tasks that make up the deployment stages for a campaign if your ATG Outreach environment includes both a staging server and a production server.
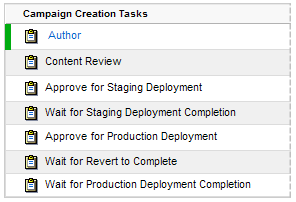
After you have completed the Author and Content Review tasks, complete the following steps to deploy the campaign.
From the To Do list in the Home page, click the Go to Project link for this campaign. The campaign’s Tasks tab is displayed.
Complete the Approve for Staging Deployment task by selecting one of the following options:
Approve and Deploy to Staging: Generates the internal elements that represent the campaign, and initiates deployment to the staging server.
Approve for Staging Deployment: Generates the campaign but does not initiate deployment. Progress through the workflow is interrupted, and the campaign must be deployed manually through the Admin Console in ATG Content Administration. For more information, refer to the ATG Content Administration Programming Guide.
Reject Staging Deployment: The workflow returns the project to the Author stage so the campaign can be edited again.
The next task, Wait for Staging Deployment Completion, requires no user action unless it fails. If a failure does occur, the workflow reverts to the beginning of the Approve for Staging Deployment task, and you must attempt to approve the campaign for deployment again. Otherwise, when ATG Outreach determines that deployment to the staging server is complete, the next task, Approve for Production Deployment, becomes active in the Tasks tab. Note that you may have to refresh the page to see that the next task is active.
Complete the Approve for Production Deployment task by selecting one of the following options:
Approve and Deploy to Production: Initiates deployment to the production server.
Approve for Production Deployment: Does not initiate deployment. Progress through the workflow is interrupted, and the campaign must be deployed manually through the Admin Console in ATG Content Administration. For more information, refer to the ATG Content Administration Programming Guide.
Reject Production Deployment: The workflow engine removes the deployment from the staging server and returns the project to the Author stage so the campaign can be edited again.
If you selected Reject Production Deployment, the Wait for Revert to Complete task becomes active. Again, this task requires no user action unless it fails. If a failure does occur, the workflow reverts to the beginning of the Approve for Production Deployment task, and you must reject the deployment again.
The final task, Wait for Production Deployment Completion, also requires no user action unless it fails. If a failure does occur, the Approve for Production Deployment task becomes active again, and you must approve the campaign for deployment again. Otherwise, the system checks the campaign’s assets into the ATG Content Administration versioning system and changes the project’s status to Complete.
For more information on deploying in an environment that uses a staging server as well as a production server, refer to Testing Campaigns on a Staging Server.
Deploying to a Production Server
The image below shows the tasks that make up the deployment stages for a campaign if your ATG Outreach environment includes just a production server.
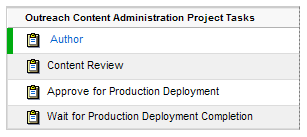
After you have completed the Author and Content Review tasks, complete the following steps to deploy the campaign.
From the To Do list in the Home page, click the Go to Project link for this campaign. The campaign’s Tasks tab is displayed.
Complete the Approve for Production Deployment task by selecting one of the following options:
Approve and Deploy to Production: Generates the internal elements that represent the campaign and initiates deployment to the production server.
Approve for Production Deployment: Generates the campaign but does not initiate deployment. Progress through the workflow is interrupted, and the campaign must be deployed manually through the Admin Console in ATG Content Administration. For more information, refer to the ATG Content Administration Programming Guide.
Reject Production Deployment. The workflow returns the project to the Author stage so the campaign can be edited again.
The final task, Wait for Production Deployment Completion, requires no user action unless it fails. If a failure does occur, the Approve for Production Deployment task becomes active again, and you must approve the campaign for deployment again. Otherwise, the system checks the campaign’s assets into the ATG Content Administration versioning system and changes the project’s status to Complete. You can stop and modify the campaign if necessary. See Modifying, Stopping, and Deleting Deployed Campaigns for more information.
