Note that your ATG Outreach environment must be configured to use the import lists feature. For information, see the ATG Outreach Administration and Development Guide.
On the Home page of the Business Control Center, select Operations > Outreach > Import Email List. The Import an Email List page appears.
Enter a name and description for the new list.
If you want to create a segment from this list automatically (see step 7), use alphanumeric characters only for the list name. If you use other characters, such as periods, the resulting segment name may be mishandled by the segment editor, causing errors to occur.
Click Next.
Use the following optional fields to enter additional information that will be used to keep track of this list.
List Type: Enter any text you want to categorize or identify lists.
List Source: The origin of the list (if the list was acquired).
Cost: The cost of the list, if it was acquired.
Purchase Date
Expiration Date. If you enter a date here, it will be tracked for all members of the list. On the expiration date, the members of the list are deleted from the user repository if they are not part of any other imported list, and/or if they were not already in the user profile repository before this list was imported. In addition, your application administrator can set properties that ensure that engaged prospects or customers whose names came from a list are not deleted from the repository. For example, if a user has registered with your site and logged in, or has clicked a link in a campaign e-mail, he or she will not be deleted from the repository when the list expires.
In the Upload File field, enter the path and name of the CSV file that contains the list, or click the Browse button to locate the file.
Select the Create User Segment from List option if you want ATG Outreach to use the records in the list to create a new segment automatically. It gives the segment the same name as the imported list. If you do not select this option, the names can still be used to create other segments or target users in other ways.
Click Next. A page appears that allows you to preview the data in the list (by default, the first five entries). For each column of data that the list contains, select the property in the ATG user profile repository that you want to use to store that piece of data. If the names of the columns in your CSV file correspond to existing profile properties, ATG Outreach automatically makes the association, but you can typically map any field to any user profile property that is available. (The exceptions are certain required properties -- by default, the Email Address property is required. An error appears if required properties are not given a mapping.)
In the example shown below, the list contains columns called
email,name1,name2, andstate, which correspond to the profile propertiesEmail Address,First Name,Last Name, andHome Address's State: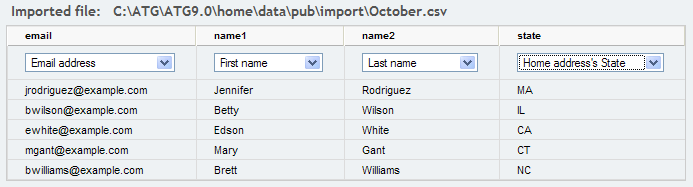
If the list contains any columns of data that you do not want to import, select None --Skip This Column from the dropdown list in that column. The columns are ignored by the import mechanism.
When you have finished configuring the list, click Import List.
The Browse Imported Lists page appears. Click Refresh to display the new import, which appears with the status Import Completed.
Note that you do not have to complete the import procedure in one session. You can name the new list and specify other general information for it (steps 1 to 4 above), and then return to the task at a later date to configure the data columns and perform the import. To return to an imported list that you have started:
Locate the list in the To Do panel in the Home page of the Business Control Center.
Click Go to Project.
Display the Tasks tab.
Click Import List.
