Remove the Motherboard
-
Prepare the controller for service.
-
Power off the controller with the faulty motherboard.
See Powering Off the Controller.
The peer controller of the cluster configuration takes over the resources.
- Disconnect all cables.
- Remove the controller from the rack.
- Attach an antistatic wrist strap to your wrist, and then to a metal area on the chassis.
- Open the controller fan door.
- Remove the controller top cover.
-
Power off the controller with the faulty motherboard.
-
Remove the fan modules.
See Remove a Fan Module.
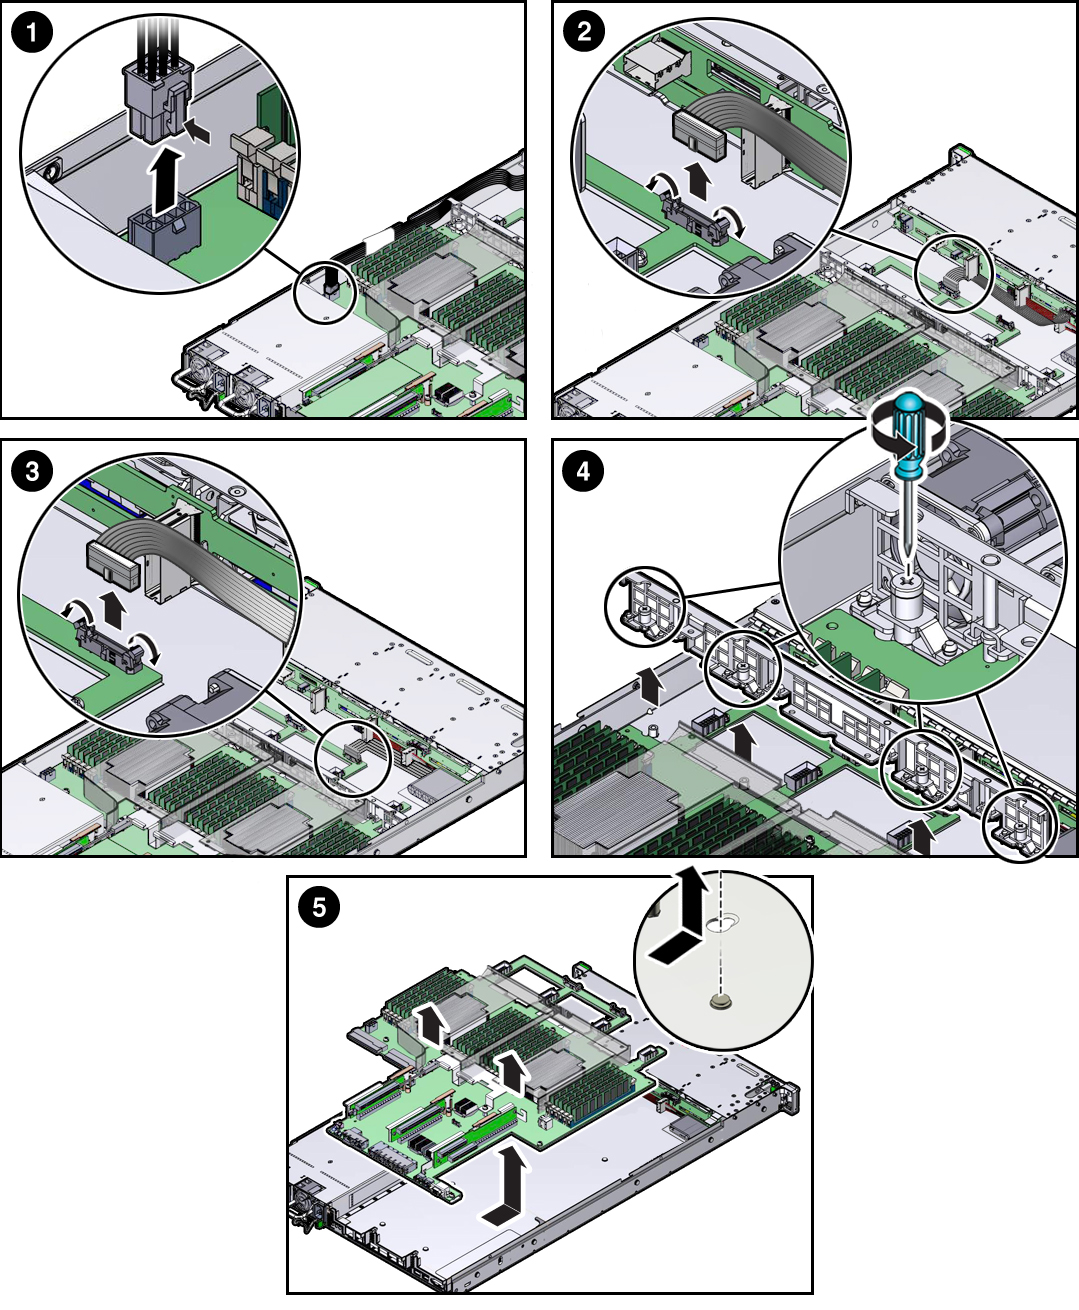
- To disconnect the disk backplane power cable from the motherboard, press in on the connector and pull the connector out [1].
- To eject the signal cable connector, open both side latches [2].
-
To eject the FIM cable connector, open both side latches. Disconnect the
FIM cable [3].

- Disconnect and remove the internal HBA SAS cable assembly.
-
Remove all PCIe risers and cards.
See Servicing PCIe Risers (CRU) and Servicing PCIe Cards (CRU).
-
Remove the controller mid-wall [4].
- Using a screwdriver (No. 2 Phillips or flathead), loosen the four captive screws that secure the mid-wall to the controller chassis.
- Slightly lift up the mid-wall slightly to disengage it from the raised mushroom-shaped standoffs that are located on the controller chassis sidewall (one on each end of the mid-wall). Lift the mid-wall of the controller and set it aside.
- Lift the motherboard out of the controller chassis and place it on an antistatic mat, next to the replacement motherboard [5].
- Remove the air baffle from the motherboard and set it aside.
-
Remove all DIMMs from the motherboard and install them in the
corresponding DIMM sockets on the replacement motherboard.
See Servicing the DIMMs (CRU).
Note - Install the DIMMs only in the sockets (connectors) that correspond to the sockets from which they were removed. Performing a one-to-one replacement of the DIMMs significantly reduces the possibility that the DIMMs will be installed in the wrong slots. If you do not reinstall the DIMMs in the same sockets, controller performance might suffer and some DIMMs might not be used by the controller. -
Using the processor removal tool, remove the CPUs from the faulty
motherboard.
See Remove a Processor.
-
Remove the processor socket covers from the replacement motherboard and
install the processors.
-
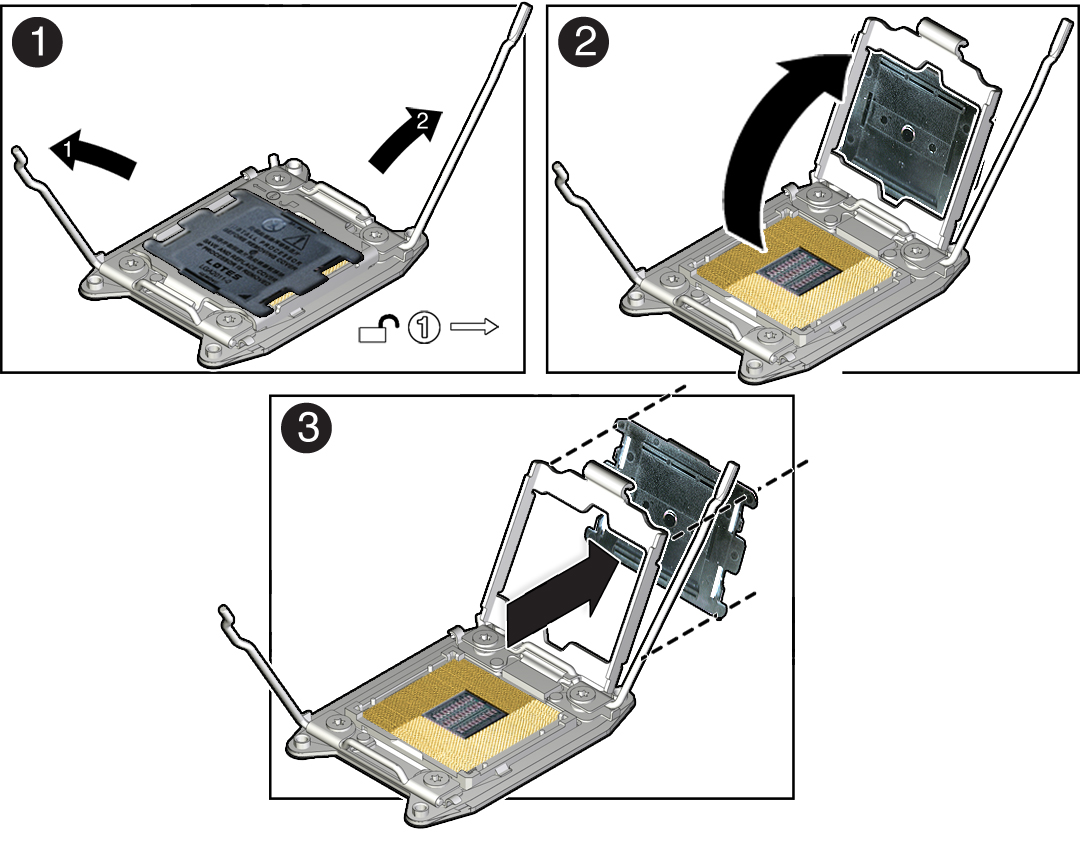
Disengage the processor independent loading mechanism (ILM)
assembly hinge lever on the right side of the processor socket
(viewing the controller from the front) by pushing down on the lever
and moving it to the side away from the processor, and then rotating
the lever upward [1].

- Disengage the processor ILM assembly load lever on the left side of the processor socket (viewing the controller from the front) by pushing down on the lever and moving it to the side away from the processor, and then rotating the lever upward [1].
-
To lift the processor ILM assembly load plate off of the processor
socket, rotate the ILM assembly hinge lever on the right side of the
processor toward the closed position (the load plate is lifted up as
the hinge lever is lowered) and carefully swing the load plate to
the fully open position [2].

Caution - Be careful not to allow the processor socket cover to fall into the processor socket as this could result in damage to the socket.
- Grasp the top and underside of the processor socket cover with one hand (place your thumb against the underside of the cover), place your other thumb against the underside of the cover, and carefully push the cover out of the processor ILM assembly load plate [3].
-
Install a processor into the socket from which you removed the
processor socket cover.
See Install a Processor.
- Repeat steps a through e to remove the second processor socket cover from the replacement motherboard and install the second processor.
-
Disengage the processor independent loading mechanism (ILM)
assembly hinge lever on the right side of the processor socket
(viewing the controller from the front) by pushing down on the lever
and moving it to the side away from the processor, and then rotating
the lever upward [1].
- Install the air baffle on the replacement motherboard.
-
Install the processor socket covers on the failed motherboard.

Caution - The processor socket covers must be installed on the failed motherboard; otherwise, damage might result to the processor sockets during handling and shipping.

Caution - Be careful not to allow the processor socket cover to fall into the processor socket as this could result in damage to the socket.
-
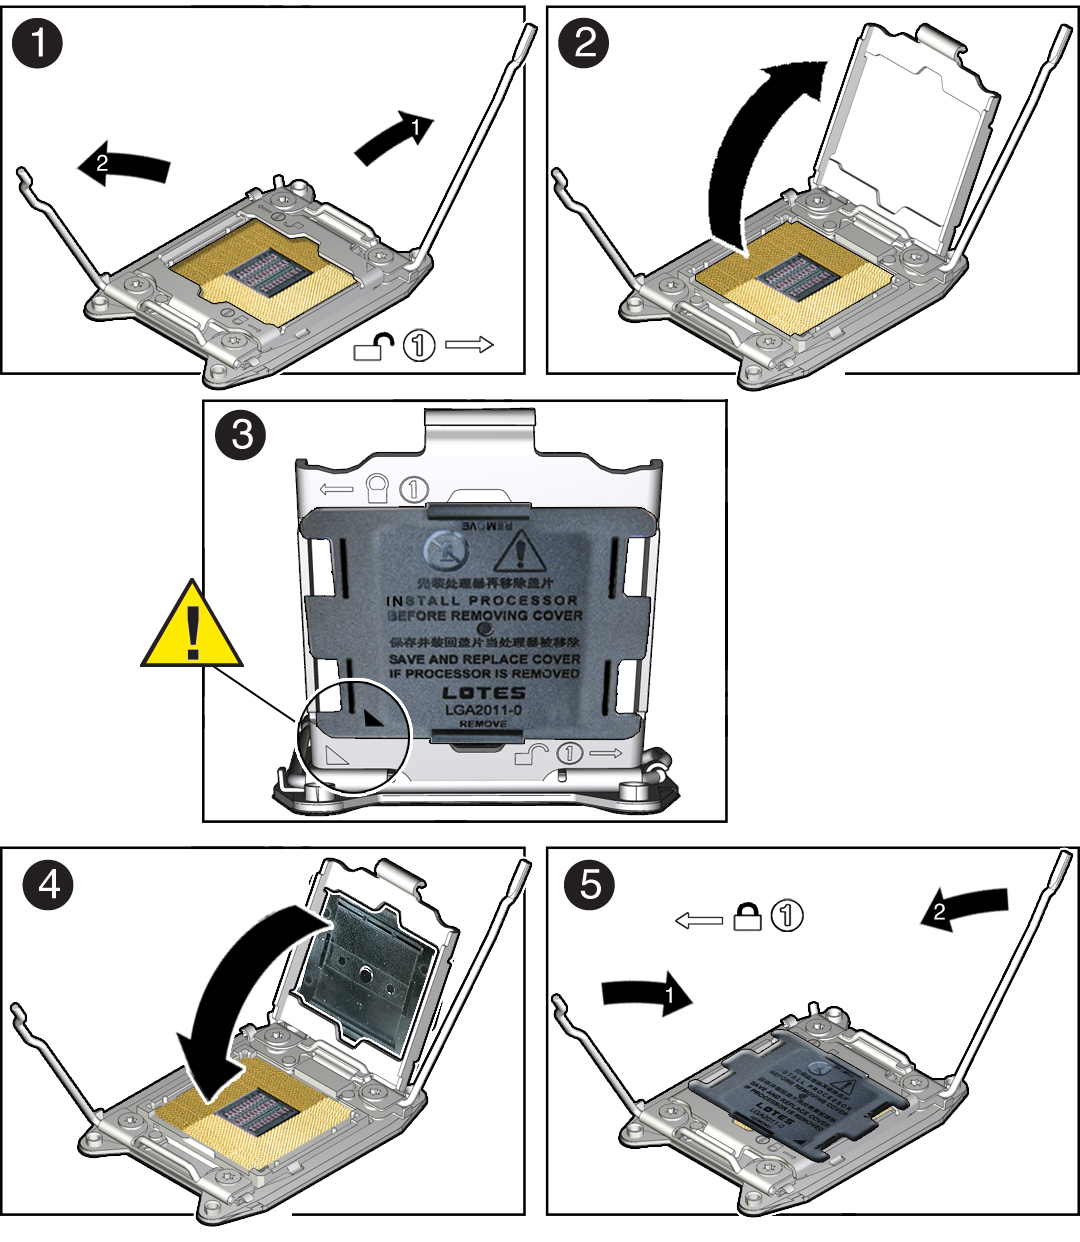
Open one of the processor ILM assemblies on the failed motherboard
[1 and 2].

-
Hold the processor ILM assembly load plate open with one hand and
position the processor socket cover over the top of the ILM assembly
load plate so that 1) the arrow on the processor socket cover is
aligned with the arrow on the load plate and 2) the fasteners on one
side of the cover (the fasteners are located on the underside of the
cover) are inside the load plate (it does not matter which side),
and use your thumb to press the other side of the processor socket
cover into the load plate. [3].
You will hear a clicking sound when the processor socket cover snaps into place.
- Close the processor ILM assembly load plate [4 and 5].
- Repeat steps a through c to install the second processor socket cover on the failed motherboard.
-
Open one of the processor ILM assemblies on the failed motherboard
[1 and 2].