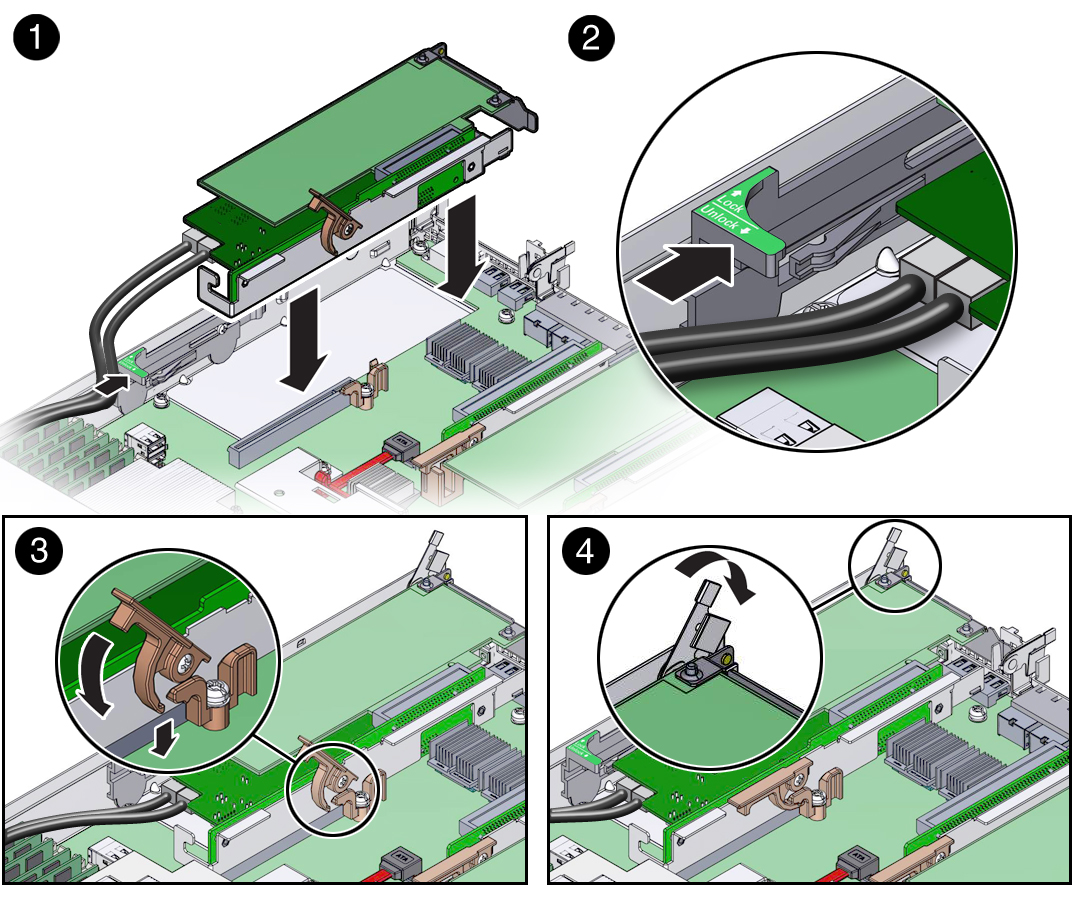
Install the PCIe Riser Into PCIe Slots 3 and 4
Note - The PCIe riser in slots 3 and 4 is different than the PCIe risers in slots 1 and 2. Do not attempt to install a PCIe riser from slot 1 or 2 into PCIe slots 3 and 4 and vice versa.
- Retrieve the PCIe riser and any PCIe cards attached to it.
-
Reconnect the SAS cables to the internal host bus adapter card.
Be sure to connect the SAS cable for storage drives 0 through 3 (HDDs 0-3) to the connector that is farthest from the riser in which the HBA card is installed; otherwise, the controller will incorrectly identify the storage drives when it is powered on.

- Raise the green-tabbed release lever on the PCIe riser to the open (up) position, and then gently press the riser into the motherboard connector until it is seated [1].
-
Ensure that the rear bracket on the internal HBA card in PCIe slot 4 is
connected to the slot in the controller chassis side wall.
If the bracket is not connected, remove the riser and reposition it so that the rear bracket connects to the side wall, and then gently press the riser into the motherboard connector.
- Slide the plastic PCIe card retainer, which is mounted on the side of the chassis, toward the back of the controller to secure the card(s) installed in the riser [2].
- Press the green-tabbed release lever on the PCIe riser to the closed (down) position [3].
-
To secure the rear bracket on the PCIe card to the controller, close the
green-tabbed latch on the rear of the controller chassis [4].
Note - If the riser does not have a PCIe card installed in slot 3, install a PCIe slot filler panel and close the green-tabbed latch to secure the PCIe slot filler panel. - If there is a PCIe card installed in slot 3 of the riser, reconnect any external or internal cables to the card.
- Return the controller to operation.
-
Use Oracle ILOM to clear the controller PCIe riser fault.
If the PCIe riser fault message in Oracle ILOM is not cleared under Active Problems, you must manually clear the fault in Oracle ILOM. For instructions for manually clearing a PCIe riser fault, see the procedure "Clear Faults for Undetected Replaced or Repaired Hardware Components" in the Oracle ILOM User's Guide for System Monitoring and Diagnostics Firmware Release 3.2.x in the Oracle Integrated Lights Out Manager (ILOM) 3.2 Documentation Library at http://www.oracle.com/goto/ILOM/docs.