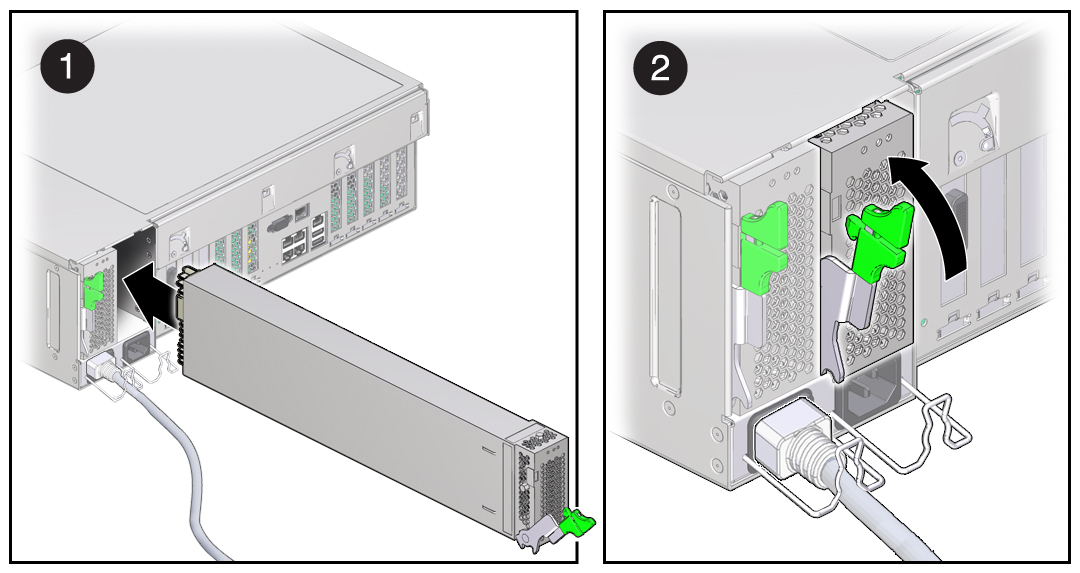
Install a Power Supply
This procedure describes how to install a power supply (PSU). When installing a PSU, ensure that the pawl near the hinge of the latch engages the slot in the sidewall of the PSU bay. The pawl supplies the necessary leverage to seat the PSU connector with the PSU backplane.
The correct power supply for the Sun Server X4-4 is the A239C model.
 | Caution - System overheat and shut down. Installing the incorrect model of power supply can cause the server to over heat. Install only the supported model. |
Before You Begin
-
For serviceability considerations, see Component Serviceability.
-
For power supply designation information, see Component Designations.
- If necessary, remove the failed power supply. See Remove a Power Supply.
-
Prepare the server for service. See Prepare the Server for Hot
Service.
To perform a cold-service procedure, see Prepare the Server for Cold Service.
- Ensure that the power supply handle is in the open position.
- Align the power supply with the empty power supply bay.
- Slide the power supply into the bay until it stops.
-
To seat the power supply, rotate the release handle upward until it locks in place.
Note - The pawl at the hinge of the handle must engage the slot at the bottom of the power supply bay.This action of rotating the handle upward draws the power supply into the server and engages it with the internal connector.

- Connect the AC power cord to the power supply.
-
Verify that the AC Present indicator is lit.
For more information, see Power Supply Reference.
-
Verify that the following indicators are not lit:
-
Service Action Required indicator on the power supply
-
Front and back Service Action Required indicators
-
Rear PS Failure indicator on the bezel of the server
See Server Front Panel Features and Server Back Panel Features for locations of system indicators.
-
- If you performed a cold-service procedure, power on the server.