Install I/O Modules in a Fabric Interconnect F1‐15
To install I/O Modules in a Fabric Interconnect F1-15, you will need a #2 Phillips (cross-head) screwdriver.
With the exception of the Management module, which must be installed in Slot 16 of the chassis, the I/O modules may be installed in any of the remaining 15 slots. All I/O modules may be installed or removed while the system is running. This procedure is supported by all models of Fabric Interconnect F1-15.
 | Caution - When tightening screws, make sure to tighten them to lightly snug. Do not overtighten screws or they can break. |
To install I/O modules, follow this procedure:
- Install
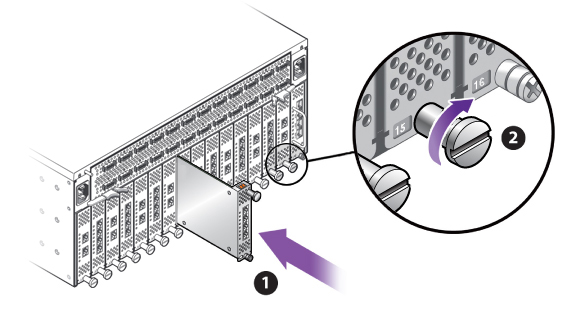
the I/O modules as shown in the following illustration (1). Ensure
that the module's component side is facing towards the right edge
of the chassis. Also, ensure that the module's top and bottom edges
are correctly aligned with the upper and lower tracks at the left
edge of each module slot. See Installing a Fabric Interconnect F1-15 I/O Module.
Figure 43 Installing a Fabric Interconnect F1-15 I/O Module

- Secure the module in the slot by tightening the securing screw (2), located at the bottom edge of the module's rear panel.