Upgrade a Fabric Interconnect F1-15 to a QDR Fabric Board
Upgrading to a QDR Fabric Board requires removing the existing Fabric Board, then installing the QDR Fabric Board.
Note - This procedure documents the physical procedure of removing a non-QDR Fabric Board, and inserting a QDR Fabric Board. However, there are additional considerations such as: * reconnecting servers that were on a 24-port DDR Fabric Board the QDR Fabric Board, which has 20 ports. * considerations for using QDR cables (and their cable lengths) when the DDR Fabric Board you will be replacing was using DDR cables. * Bringing the Fabric Interconnect with the new QDR Fabric Board online in a data center managed by Oracle Fabric Manager. These additional considerations are addressed in the QDR Fabric Board Upgrade Guide, Release XgOS 3.0.0. For full documentation about the entire procedure of bringing the Fabric Interconnect and hosts back online after the QDR Fabric Board Upgrade, consult the QDR Fabric Board Upgrade Guide.
To replace the fabric board, follow this procedure:
- If the Fabric Interconnect is not running XgOS 3.0 or later, upgrade your XgOS version to 3.0 or greater for Fabric Interconnects with InfiniBand server ports.
-
Move or stop all traffic going through the Fabric Interconnect in either
of the following ways:
- In an HA Fabric Interconnect environment, move all traffic to the other Fabric Interconnect for the duration of the Fabric Board upgrade on the first Fabric Interconnect. When the first Fabric Interconnect boots up with a QDR Fabric Board, move all traffic off of the second Fabric Interconnect and upgrade that Fabric Interconnect to a QDR Fabric board.
- In a single Fabric Interconnect environment, stop all traffic going through the chassis. For example, scheduled traffic, such as backups, can be halted. You can also turn down vNICs, vHBAs, or Server Profiles. Or, live traffic will be halted when you power off the Fabric Interconnect.
- Remove the InfiniBand cables from your DDR Fabric Board, and disconnect the Fabric Interconnect from facility power by unplugging the power cables.
-
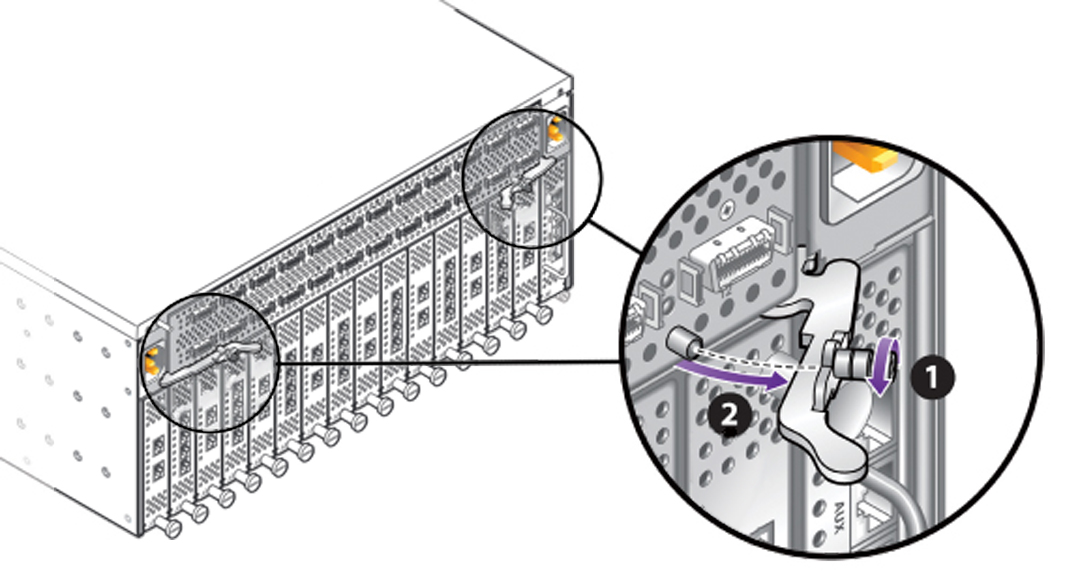
Using a screwdriver, loosen the captive screws in the release levers by
turning them counterclockwise (1) as shown in Unlocking the DDR Fabric Board from a Fabric Interconnect F1-15.
Figure 83 Unlocking the DDR Fabric Board from a Fabric Interconnect F1-15

- Grasp the DDR Fabric Board handles, and keeping the level, pivot them toward you until they are pointing straight at you (2). You should feel the Fabric Board's hinges disconnect it from the Fabric Interconnect's midplane.
-
Grasping both of the release levers, slide the DDR Fabric Board halfway
out of the chassis. When the Fabric Board is halfway out, place your hand
under the sheet metal bottom to support it, then slide it out of the chassis
the rest of the way. Removing the DDR Fabric Board from a Fabric Interconnect F1-15 shows removing the Fabric Board.
Figure 84 Removing the DDR Fabric Board from a Fabric Interconnect F1-15

- Set the DDR Fabric Board on an ESD-safe work surface or in a ESD bag.
- Remove the QDR Fabric Board from the packaging, and orient the module so that it is right side up.
-
Orient the QDR Fabric Board so that the sheet metal surface is on the
bottom, pivot the QDR Fabric Board's handles so that they are pointing
directly towards you—not flush with the module.
At the far end of each of the Fabric Board's handles, notice there is a notch. This notch will meet a part in the chassis, and allow you to lock the Fabric Board into the system midplane and power channel.
-
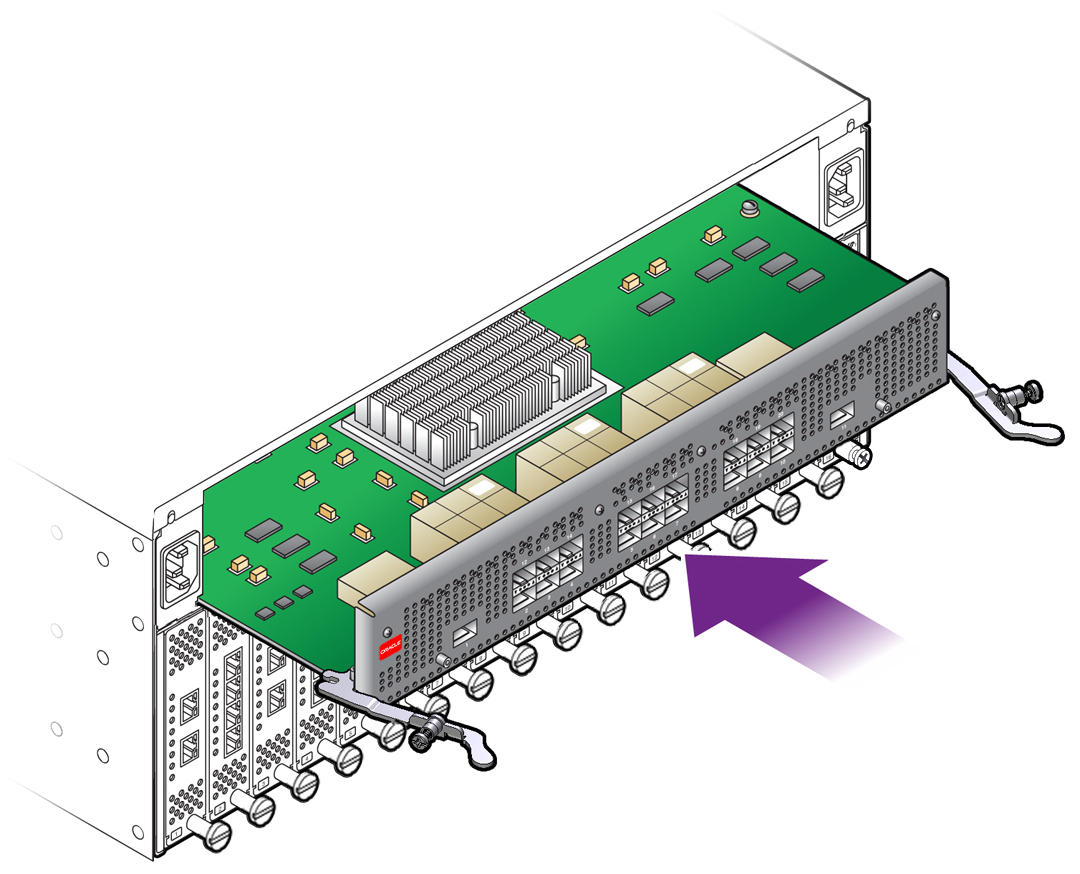
Supporting the QDR Fabric Board under the sheet metal bottom, hold the
Fabric Board level and align it with the empty Fabric Board bay in the
Fabric Interconnect. Inserting the QDR Fabric Board into a Fabric Interconnect F1-15 shows aligning and inserting the QDR Fabric
Board.

Caution - Pay attention to the leading edges of the Fabric Board—the edges that will contact and insert into the chassis first. These edges must be kept horizontal. If you tip one side of the Fabric Board, it possible to insert the Fabric Board incorrectly. Make sure you hold the Fabric Board level while you insert it.
Figure 85 Inserting the QDR Fabric Board into a Fabric Interconnect F1-15

-
When the Fabric Board is properly aligned, gently slide it in until you
feel some resistance, then check the notches at the end of the Fabric
Board's handles to make sure they are contacting the guides on the inside of
the chassis.

Caution - Do not force the Fabric Board into place. If it does not slide in easily, remove it and attempt to insert it again. Make sure that the leading edges are level, and you are keeping the Fabric Board level while you slide it in.
-
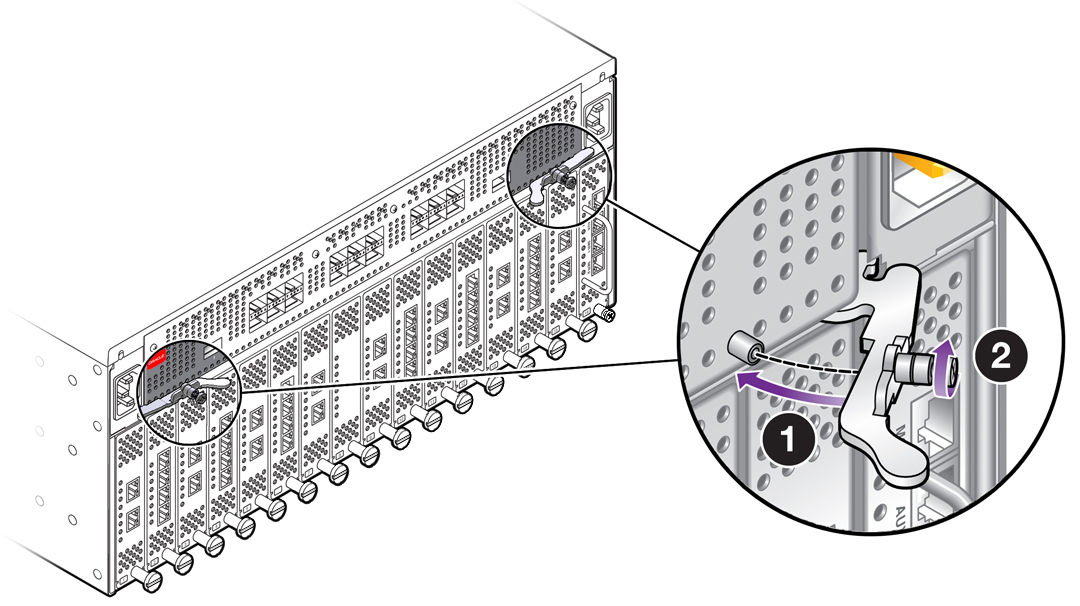
When the notches and guides are properly positioned, press the Fabric
Board's handles inward to seat the Fabric Board (1) as shown in Seating the QDR Fabric Board into a Fabric Interconnect F1-15. The Fabric Board is
properly seated when it and its handles lie flush against the chassis.

Caution - Do not force the levers. They should glide easily when properly aligned. If you feel uneven resistance or the release levers do not move easily, gently swing the levers away from each other, partially remove the Fabric Board, and attempt Step 10 through Step 12 while paying attention to how the release levers contact the edge of the chassis.
Figure 86 Seating the QDR Fabric Board into a Fabric Interconnect F1-15

-
When the release levers have correctly locked the QDR Fabric Board into
the chassis, use the screwdriver to secure the captive screws in the release
levers (2).

Caution - When tightening screws, make sure to tighten them to lightly snug. Do not overtighten screws or they can break.
-
Reconnect the Fabric Interconnect to facility power, then power on the
Fabric Interconnect, and allow it to completely boot up.
The Fabric Board will boot, and when the board completes is bootup and passes to runtime, the Power LED will glow. The Power LED does not glow until the Fabric Board is in runtime.
- Start a management session on the Fabric Interconnect, and log in.
-
Verify that the Fabric Interconnect recognizes the QDR Fabric Board, by
issuing show
hardware then scrolling to the Fabric Board Status
section:
- The Model column should show the string VP-FRU-FB-QDR
- The State column should show UP
- The Speed column should show QDR
If these values are not displayed, the Fabric Interconnect does not recognize the QDR Fabric Board.
-
Reconnect your servers to the Fabric Interconnect by using QDR
cables.
If your DDR Fabric Board had all 24 ports connected, and you will be reconnecting ports 21 through 24 on the QDR Fabric board, you will need to connect an IB expansion switch to a port on the QDR Fabric Board. The reason for connecting the IB expansion switch is to allow the servers that were on ports 21 through 24 to be connected to the QDR Fabric Board, which has only 20 ports.
-
If your data center is being managed by an SNMP management tool, through
the SNMP Manager, rediscover the devices on the new QDR fabric.
After rediscovering the devices, the procedure is complete. If you encounter problems with this procedure, you can contact Oracle Technical Support for assistance.
You do not need to return the old Fabric Board. You can keep it as a spare part. But if you choose to return the old Fabric Board, Oracle can dispose of it. If you choose to return the old Fabric Board, you can use the shipping container for the QDR Fabric Board to return the DDR Fabric Board.