When you open Engagement Engine Editor you are presented with the Dashboard. The dashboard displays all of the rules available via the application and all of the sites available via the application, and provides a quick means of identifying which rules are deployed on which sites, and the current status of particular rule on a particular site.
If you hover over a cell in the dashboard, a tool tip appears which describes the current relationship between that particular site and rule.

Dashboard
You can navigate through the list of available rules by using the scroll bar to move up and down the list, and you can filter the rules using the rule filter option.
If you hover over a rule name in the dashboard, a tool tip appears which displays the name and the description for the rule.
There is a maximum of eight sites displayed on the dashboard at any time. If there are more than eight sites available, you can navigate through the sites by using the arrows displayed above the row containing the site names, and you can filter the sites using the site filter option.
As well as displaying the current status of a rule within a particular site, clicking on a cell in the grid cycles through the various available states for that rule on that site, i.e., you can identify a rule to be added to, modified on, or deleted from a site, depending on the current status of that particular rule on that particular site.
The icons displayed in the cells in the dashboard are:
(Blank Square) - This rule is not published on this site.
If a rule is in this state then clicking once on the relevant cell in the dashboard pushes it to the publish queue for the site.

This rule is queued to be published on this site.
If a rule is in this state then clicking once on the relevant cell in the dashboard removes it from the publish queue for the site.

This site is running the most up-to-date version of this rule.
If a rule is in this state then clicking once on the relevant cell in the dashboard marks it for removal from the site.

This site is NOT running the most up-to-date version of this rule.
If a rule is in this state then clicking once on the relevant cell in the dashboard pushes it to the publish queue for the site and clicking twice marks it for removal from the site.

The modified version of this rule is queued to be published on this site.
If a rule is in this state then clicking once on the relevant cell in the dashboard marks it for removal from the site.
Note: A rule in this state cannot be removed from the publish queue. At this stage it must either be published or deleted from the site.
The latest version of this rule has been queued for removal from this site.
If a rule is in this state then clicking once on the relevant cell in the dashboard unselects it for removal from the site.
The modified version of this rule has been queued for removal from this site.
If a rule is in this state then clicking once on the relevant cell in the dashboard unselects it for removal from the site and clicking twice unselects it for removal from the site and pushes the most recent version of the rule to the publish queue for the site.
The following table displays which states are accessible for a rule in any particular state. These are the states you can select by clicking on a cell within the dashboard. The rows represent the current state for a rule on a particular site, and the columns represent the potential states for the rule.
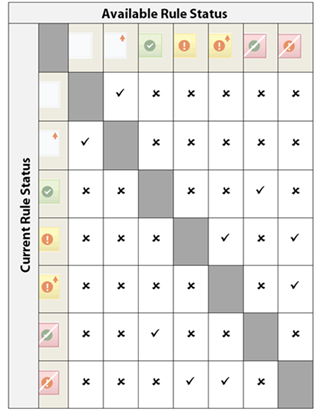
Accessible rule states
The dashboard also provides a warning if any of the rules are affected by particular circumstances. These warnings are:
The Rule contains invalid data. This means that either a link or an operating hours set associated with the rule has been deleted, and the rule must be updated accordingly.
Another user has updated rules & sites during your session. This means that someone else who is logged onto Engagement Engine Editor has made changes to the highlighted rule or site during your session. You can remove this warning by clicking on the link provided to refresh the dashboard.
You can also sort the rules displayed on the dashboard. You can sort using the following criteria:
Rule Name: Rules are sorted in alphabetical order.
Invalid Rules: Rules which reference invalid invitations or operating hours are at the top of the list.
Site Associated: Rules associated with a site are listed first, and then in alphabetical order.
Recently Added: Rules are sorted by their creation date, with the most recent listed first.
Recently Updated: Rules are sorted by the date they were last modified, with the most recent listed first.
Rule and Site Filtering
You can filter the rules and sites displayed on the dashboard using the filter option, which can be found above the dashboard. First, select whether you wish to filter rules or sites and then enter the criteria you wish to use.
Rules can be filtered by:
Name: The rule name contains the specified text.
Description: The rule description contains the specified text.
Invite: The rule contains an action that may display the specified invite.
Sites can be filtered by:
Name: The site name contains the specified text.
Description: The site description contains the specified text.
Title: The Page Title site condition carries out a comparison against the specified text.
URL: The URL site condition carries out a comparison against the specified URL.
IP: The IP site condition carries out a comparison against the specified IP address.
Invite. The site has an associated rule that contains an action that may display the specified invite.
There is no distinction between the fields used for filtering. Whatever you enter in the filter field is compared against all the relevant fields in the rule or site and all matching rules or sites are returned.
When the dashboard is filtered, a ‘Filter Mode Active’ notification is displayed above the filter field.
You can de-activate the filter by clicking on the X button at the end of the filter field or by deleting the filter term from text box.
