You can start the process to create a new rule by clicking the Create New Rule button on the Rules screen.
This opens the Create New Rule Screen.
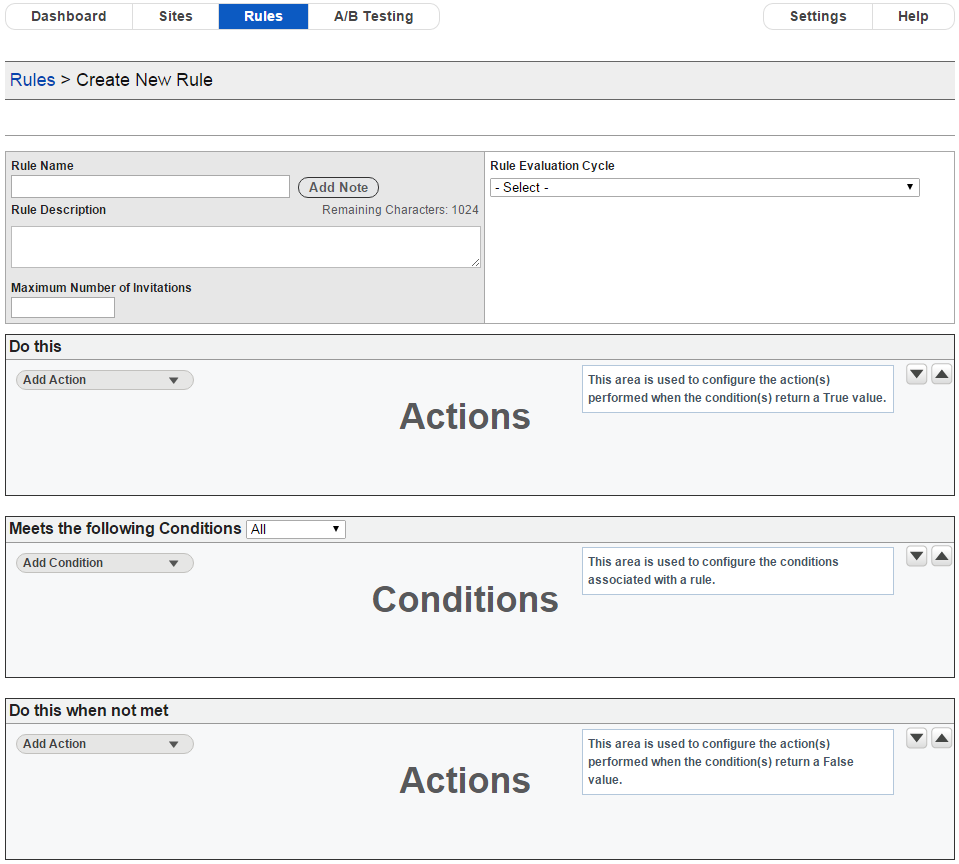
Create New Rule Screen
This screen allows you to provide all of the details necessary to create a new rule. The fields displayed on this screen are:
Rule Name: This is the name of the rule that is displayed on the dashboard. This must be unique for each rule, regardless of whether uppercase or lowercase is used, i.e., ‘Rule A’ is regarded as identical to ‘rule a’.
Rule Description: This field should be used to provide a meaningful description of what the rule does so that other users can easily identify the purpose of the rule before deciding if it meets their requirements. The text entered in this field also displays in the tooltip when you hover over the rule on the dashboard.
Maximum Number of Invitations: This is the maximum number of invitations that can be displayed to a visitor as a result of this rule. This value is compared against the number of invitations displayed during the visitor’s current session, and if the number of invitations displayed exceeds the maximum number for this site then there no more invitations are displayed to the visitor as a result of this rule.
Note: Entering a value of -1 for rule-level Maximum Number of Invitations instructs the rule to ignore any site-level Maximum Number of Invitations value on the site on which the rule is currently running.
Add Note: This button opens a pop-up window that allows you to add a note to the rule. You can add up to 1,000 characters of text. If a note has already been created for a rule, the Add Note button is replaced with an Update Note button. Hovering over the Update Note button displays the contents of the note in a tooltip.
Rule Evaluation Cycle: This is used to define when the rule should evaluate, and whether further rules should be processed while the current page is loaded. There are a number of options that are available to you here. You can evaluate the rule:
Once every Page Load – Rules with this option selected will evaluate in rule evaluation order when the page loads and will then not evaluate again until a new page loads, or the current page reloads.
On Page Load – Rules with this option selected will evaluate once in rule evaluation order when the page loads and will then evaluate once every specified number of seconds. You can use the Recurrence text box to specify the interval between each instance of the rule running.
On Change of JavaScript Variable – Rules with this option selected will evaluate every time a specified JavaScript variable changes. You can use the JavaScript Variable text box to specify which JavaScript variable to monitor.
True Action: You can use the true action canvas to define the actions that run if the rule evaluates as true. Click on the Add Action button to open the menu that displays the available actions. Actions are performed in the order that they are displayed in the true action canvas.
Condition: You can use the condition canvas to define the condition(s) associated with the rule. If you do not define a condition then the rule will always evaluate as true. Click on the Add Condition button to open the menu that displays the available conditions.
If you include more than one condition with the rule, you must specify whether ALL or ANY of the conditions must be met for the rule to evaluate as true. You do this by selecting the appropriate option from the dropdown box. The default option is that ALL of the listed conditions must be met.
Note: Conditions are not necessarily evaluated in the order displayed on the condition canvas.
False Action: You can use the false action canvas to define the actions that run if the rule evaluates as false. Click on the Add Action button to open the menu that displays the available actions. Actions are performed in the order that they are displayed in the false action canvas.
Note: Engagement Engine Editor performs a syntax check for any JavaScript entered in a condition or action. This check is performed when you click on the Save button and any errors found are highlighted with an error icon that displays the error message when you hover the cursor over the icon.
If you wish to remove a condition or action after adding it to the rule, then click on the X button on the right-hand side of the condition or action that you wish to remove.
You can expand or collapse all of the conditions or actions contained within the true action, condition, or false action canvas by clicking on the Expand or Collapse buttons as required.
For more detailed information on each of the conditions and actions available, please refer to the Definition Of Conditions and Definition Of Actions chapters of this document.
Click on the Save button once you have entered all the information for the rule. This returns you to the dashboard, where you can now select which sites the rule should be published on. For more information on publishing a rule, please refer to the Publishing section of this document.
Click on the Cancel button to return to the dashboard without saving the rule.
