The following steps use the example environment outlined above. Because CIM will configure the servers according to your environment, this information is provided merely as a guideline.
Configuring the Agent-Facing Server
Create a
JTDataSource.propertiesfile in<ATG10dir>/home/servers/. Edit the file to contain:
svcagent/localconfig/atg/dynamo/service/jdbc$class=atg.nucleus.JNDIReference
JNDIName=java:/ATGAgentDSCreate a
JTDataSource_production.propertiesfile in<ATG10dir>/. Edit the file to contain:
home/servers/svcagent/localconfig/atg/dynamo/service/jdbc$class=atg.nucleus.JNDIReference
JNDIName=java:/ATGProductionDSIf you are using ATG Business Intelligence, create a
JTDataSource.propertiesfile in the<ATG10dir>/home/servers/svcagent/localconfig/atg/reporting/directory. Edit the file to contain:
datawarehouse$class=atg.nucleus.JNDIReference
JNDIName=java:/ATGDataWarehouseDSIf you are using ATG Business Intelligence, create a
JTDataSource.propertiesfile in the<ATG10dir>/home/servers/svcagent/localconfig/atg/directory. Edit the file to contain:
reporting/datawarehouse/loaders$class=atg.nucleus.JNDIReference
JNDIName=java:/ATGDatawarehouseDSEdit the
Configuration.propertiesfile in<ATG10dir>/home/directory. Edit the file to contain:
servers/svcagent/localconfig/atg/dynamoadminPort=admin_port_number
siteHttpServerPort=http_server_port_number
Configuring the Customer-Facing Server
Create a
JTDataSource.propertiesfile in<ATG10dir>/home/servers/. Edit the file to contain:
svcadmin/localconfig/atg/dynamo/service/jdbc$class=atg.nucleus.JNDIReference
JNDIName=java:/ATGProductionDSCreate a
SearchJTDataSource.propertiesfile in/atg/search/service/that points Search to the correct location of your other data sources. Refer to the ATG Search Installation and Configuration Guide for additional information.If you are using ATG Business Intelligence, create a
JTDataSource.propertiesfile in<ATG10dir>/home/servers/svcadmin/localconfig/atg/reporting/datawarehouse. Edit the file to contain:$class=atg.nucleus.JNDIReference
JNDIName=java:/ATGDataWarehouseDSIf you are using ATG Business Intelligence, create a
JTDataSource.propertiesfile in the<ATG10dir>/home/servers/svcadmin/localconfig/atg/reporting/directory. Edit the file to contain:
datawarehouse/loaders$class=atg.nucleus.JNDIReference
JNDIName=java:/ATGDatawarehouseDSEdit the
Configuration.propertiesfile in the<ATG10dir>/home/directory. Edit the file to contain:
servers/svcadmin/localconfig/atg/dynamoadminPort=admin_port_number
siteHttpServerPort=http_server_port_number
Configuring the Management Server
Create a
JTDataSource.propertiesfile in<ATG10dir>/home/servers/. Edit the file to contain:
svcsearch/localconfig/atg/dynamo/service/jdbc$class=atg.nucleus.JNDIReference
JNDIName=java:/ATGProductionDSCreate a
JTDataSource_production.propertiesfile in<ATG10dir>/. Edit the file to contain:
home/servers/svcsearch/localconfig/atg/dynamo/service/jdbc$class=atg.nucleus.JNDIReference
JNDIName=java:/ATGProductionDSEdit the
Configuration.propertiesfile in<ATG10dir>/home/directory. Edit the file to contain:
servers/svcsearch/localconfig/atg/dynamoadminPort=admin_port_number
siteHttpServerPort=http_server_port_numberCreate a
RemoteSolutionAuxiliaryDataAdapter.propertiesfile in the<ATG10dir>/servers/svcsearch/localconfig/atg/searchadmin/directory. Edit the file to contain:
adapter/customizationinitialRepositories+=/atg/userprofiling/
PersonalizationRepository_production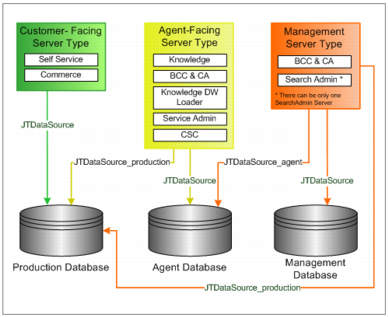
JTDataSource Configuration
