Install FB-DIMMs
 | Caution - Ensure that all power is removed from the server before removing or installing FB-DIMMs or damage to the FB-DIMMs might occur. You must disconnect the power cables from the system before performing this procedure. |
- Unpackage the replacement FB-DIMMs and place them on an antistatic mat.
- Ensure that the ejector tabs are in the open position.
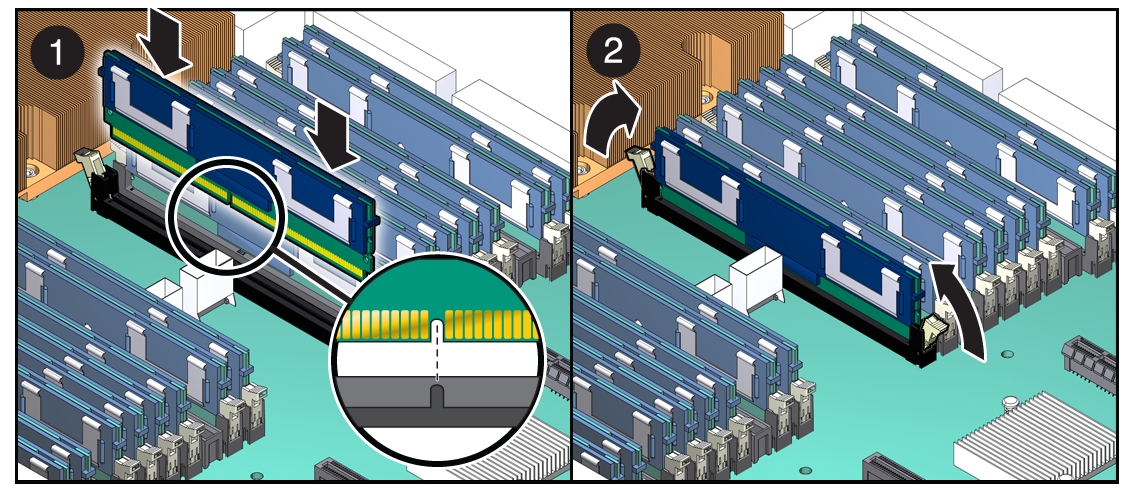
- Line up the replacement FB-DIMM
with the connector (Inserting the FB-DIMM Into the Slot).
Align the FB-DIMM notch with the key in the connector. This ensures that the FB-DIMM is oriented correctly.
- Push the FB-DIMM into the connector
until the ejector tabs lock the FB-DIMM in place.
If the FB-DIMM does not easily seat into the connector, verify that the orientation of the FB-DIMM is as shown in Inserting the FB-DIMM Into the Slot. If the orientation is reversed, damage to the FB-DIMM might occur.
Figure 4-22 Inserting the FB-DIMM Into the Slot

- Repeat Step 2 through Step 4 until all replacement FB-DIMMs are installed.
- Consider your next step:
If you installed FB-DIMMs as part of another procedure, return to that procedure.
If you are to only install FB-DIMMs go to Step 7.
Note - If you removed the memory mezzanine, you must reinstall it. See ***
- See Returning the Server to Operation to bring the server back online.