1.9.1 Exercising the System Using SunVTS Software
Before you begin, t he Solaris OS must be running. You also must ensure that SunVTS validation test software is installed on your system. See Checking Whether SunVTS Software Is Installed.
The SunVTS installation process requires that you specify one of two security schemes to use when running SunVTS. The security scheme you choose must be properly configured in the Solaris OS for you to run SunVTS. For details, refer to the SunVTS User's Guide.
SunVTS software features both character-based and graphics-based interfaces. This procedure assumes that you are using the graphical user interface (GUI) on a system running the Common Desktop Environment (CDE). For more information about the character-based SunVTS TTY interface, and specifically for instructions on accessing it by tip or telnet commands, refer to the SunVTS User's Guide.
SunVTS software can be run in several modes. This procedure assumes that you are using the default mode.
This procedure also assumes that the server is headless. That is, it is not equipped with a monitor capable of displaying bitmap graphics. In this case, you access the SunVTS GUI by logging in remotely from a machine that has a graphics display.
Finally, this procedure describes how to run SunVTS tests in general. Individual tests might presume the presence of specific hardware, or might require specific drivers, cables, or loopback connectors. For information about test options and prerequisites, refer to the following documentation:
Exercising the System With SunVTS Software
- Log
in as superuser to a system with a graphics display.
The display system should be one with a frame buffer and monitor capable of displaying bitmap graphics such as those produced by the SunVTS GUI.
- Enable the remote display.
On the display system, type:
# /usr/openwin/bin/xhost + test-system
where test-system is the name of the server you plan to test.
- Remotely log in to the server
as superuser.
Use a command such as rlogin or telnet.
- Start
SunVTS software.
If you have installed SunVTS software in a location other than the default /opt directory, alter the path, as in Alternate Command for Starting SunVTS Software where display-system is the name of the machine through which you are remotely logged in to the server.
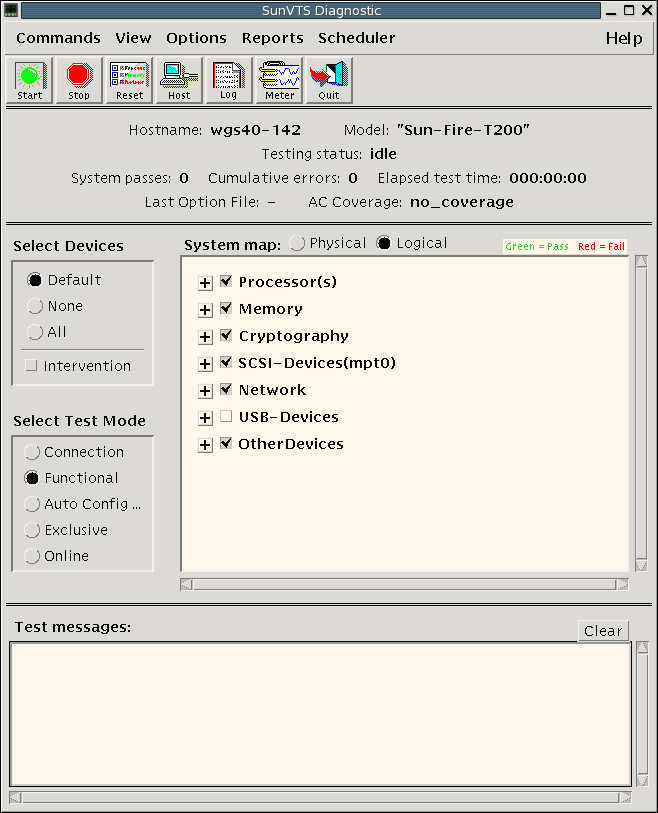
The SunVTS GUI is displayed (SunVTS GUI).
Figure 1-9 SunVTS GUI

- Expand the test lists to see
the individual tests.
The test selection area lists tests in categories, such as Network. To expand a category, left-click the expander icon (expand category icon) to the left of the category name.
- (Optional) Select the tests you
want to run.
Certain tests are enabled by default, and you can choose to accept these.
Alternatively, you can enable and disable individual tests or blocks of tests by clicking the checkbox next to the test name or test category name. Tests are enabled when checked, and disabled when not checked.
The following table lists tests that are especially useful to run on this server.
FRUs Exercised by Testscmttest, cputest, fputest, iutest, l1dcachetest, dtlbtest, and l2sramtest – indirectly: mptest, and systestFB-DIMMS, CPU motherboarddisktestDisks, cables, disk backplanecddvdtestCD/DVD device, cable, motherboardnettest, netlbtestNetwork interface, network cable, CPU motherboardpmemtest, vmemtest, ramtestFB-DIMMs, motherboardserialtestI/O (serial port interface)usbkbtest, disktestUSB devices, cable, CPU motherboard (USB controller)hsclbtestMotherboard, service processor(Host to service processor interface) - (Optional) Customize individual
tests.
You can customize individual tests by right-clicking on the name of the test. Right-clicking on the text string ce0(nettest) brings up a menu that enables you to configure this Ethernet test.
- Start testing.
Click the Start button that is located at the top left of the SunVTS window. Status and error messages appear in the test messages area located across the bottom of the window. You can stop testing at any time by clicking the Stop button.
During testing, SunVTS software logs all status and error messages. To view these messages, click the Log button or select Log Files from the Reports menu. This action opens a log window from which you can choose to view the following logs:
- Information – Detailed versions of all the status and error messages that appear in the test messages area.
- Test Error – Detailed error messages from individual tests.
- VTS Kernel Error – Error messages pertaining to SunVTS software itself. Look here if SunVTS software appears to be acting strangely, especially when it starts up.
- Solaris OS Messages (/var/adm/messages) – A file containing messages generated by the operating system and various applications.
- Log Files (/var/opt/SUNWvts/logs) – A directory containing the log files.
# /opt/SUNWvts/bin/sunvts -display display-system:0