Configure the Preinstalled Oracle VM Server
These instructions describe only how to configure the preinstalled Oracle VM Server on your server. Oracle VM also has other components, such as Oracle VM Manager, that must be installed or already running to support the virtual machine environment.
- If you are not already logged in to Oracle ILOM, log in either locally from a serial connection, or remotely from an Ethernet connection.
-
Power on or reset the server, as follows:
-
To power on the server, use one of the following methods:
-
From the Oracle ILOM web interface, select Host Management → Power Control, and in the Select Action list box, click Power On. Click Save, and then click OK.
-
From the Oracle ILOM CLI, type:
-> start /System
When prompted, enter y to confirm:
Are you sure you want to start /System (y/n)? y
Starting /System
-
-
To reset the server, use one of the following methods:
-
From the Oracle ILOM web interface, select Host Management → Power Control, and in the Select Action list box, click Reset. Click Save, and then click OK.
-
From the Oracle ILOM CLI, type:
-> reset /System
When prompted, enter y to confirm:
Are you sure you want to reset /System (y/n)? y
Performing hard reset on /System
-
The server begins the boot process.
-
-
Start the remote host console using one of the following methods.
-
From the Oracle ILOM web interface, select Remote Control → Redirection, and then click the Launch Remote Console button to launch video console redirection.
-
From the Oracle ILOM CLI, type:
-> start /HOST/console
When prompted, type y to confirm:
Are you sure you want to start /HOST/console (y/n)? y
Serial console started.
After the server boots, the GRUB menu appears.
GNU GRUB version 0.97 (619K lower / 2068064K upper memory)

Oracle VM Server-ovs (xen-4.1.3 2.6.39-300.22.2.e15uek)
Oracle VM Server-ovs serial console (xen-4.1.3 2.6.39-300.22.2.e15uek)
-
- To pause at the GRUB menu, press a key other than Enter; otherwise, in five seconds the highlighted installation option will be used.
-
From the GRUB menu, use the up and down arrow keys to select the display option,
and then press Enter. Options include one for default booting, and one for serial
console enabled booting.
-
To display output to the video port (default option), select the first option in the list and press Enter:
Oracle VM Server - ovs (xen-4.1.3 2.6.39-300.22.2.e15uek)
-
To display output to the serial port, select the second option in the list and press Enter:
Oracle VM Server - ovs serial console (xen-4.1.3 2.6.39-300.22.2.e15uek)
As the configuration process begins, the following screen appears:

-
-
Scroll down the screen and set and confirm the root password
and the Oracle VM Agent password.
Note - The prompts for the root and the Oracle VM Agent passwords are only displayed the first time you boot the Oracle VM Server. -
Follow the prompts to select the onboard network interface controller (NIC) to
configure, and to enter other required configuration information related to the
network.

Note - Network interfaces eth2 and eth3 correspond to Ethernet ports NET2 and NET3, which are nonfunctional in single-processor systems. -
If all of the configuration settings are correct, type Y
and press Enter to save the settings.

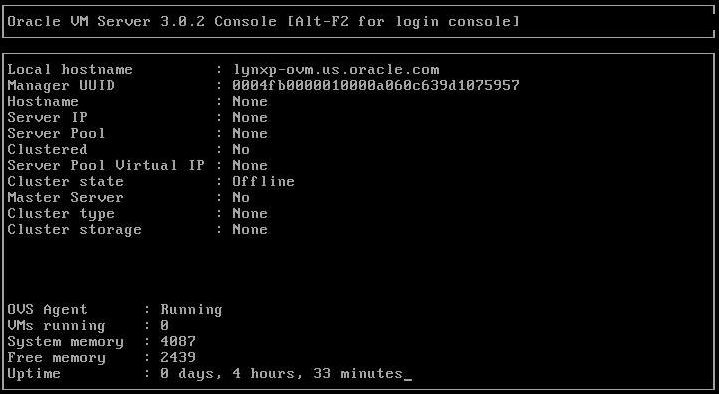
When all settings have been entered and saved, the system loads an Oracle VM Server Console session. For example:

This completes the configuration of the preinstalled Oracle VM Server to create a virtual operating system.